
 – Buying and selling Methods – 24 April 2026")
Apex Break PRO Indicator – Full Consumer Handbook (MT4 & MT5)
Introduction
The Apex Break PRO indicator is a non-repainting pivot trendline breakout system for MetaTrader 4 and MetaTrader 5. It routinely detects pivot highs and pivot lows, attracts dynamic trendlines between them, and fires BUY or SELL indicators when worth breaks by means of a trendline with enough confluence affirmation.
Key Options:
- Automated Pivot Trendlines: Resistance and assist traces drawn from detected pivot factors
- Multi-Filter Confluence Scoring: EMA, RSI, Quantity, ADX, and Breakout Margin filters mixed right into a single confluence rating
- Non-Repainting Alerts: Alerts seem solely after bar shut and by no means disappear
- ATR-Primarily based Danger Administration: Automated SL, TP1, TP2, and TP3 calculation with hit monitoring
- On-Chart Dashboard: Actual-time sign standing, filter cross/fail, and commerce stage show
- Six Alert Sorts: BUY sign, SELL sign, TP1 hit, TP2 hit, TP3 hit, and SL hit through popup, sound, push, and electronic mail
Product Hyperlinks
TIP: This indicator is designed for merchants who need a structured, rules-based method to trendline breakout buying and selling. It really works on any image and any timeframe accessible in MetaTrader.
Understanding Pivot Trendline Breakouts
Apex Break PRO identifies swing highs and swing lows utilizing a configurable left/proper bar lookback window. When two consecutive pivot highs are discovered, the indicator attracts a resistance trendline connecting them. When two consecutive pivot lows are discovered, it attracts a assist trendline.
How indicators are generated:
- The indicator detects a brand new pivot excessive or pivot low on the bar situated PivotRightBars bars again from the present bar
- A trendline is drawn from the earlier pivot of the identical kind to the newly detected pivot and prolonged ahead
- When the closing worth of a confirmed bar breaks above a resistance line (or under a assist line) by not less than the required margin, a uncooked breakout is detected
- The confluence filters (EMA, RSI, Quantity, ADX) are evaluated and scored
- If the confluence rating meets or exceeds MinConfluence and the cooldown interval has elapsed, a sign is generated
- The sign arrow and label are drawn on the chart, TP/SL ranges are calculated, and alerts hearth
Energetic trendlines are drawn as stable traces. Damaged or expired trendlines change to dashed type.
NOTE: As a result of the indicator requires PivotRightBars of confirmed information to the suitable of a pivot earlier than detecting it, there’s a built-in affirmation lag. That is what makes the indicators non-repainting — the pivot should be totally confirmed earlier than any line or sign can seem.
Set up Information
Apex Break PRO is distributed by means of the MQL5.com Market. Set up is automated.
Steps:
- Buy the indicator from the MQL5 Market product web page
- The indicator installs routinely into your MetaTrader terminal
- Open MetaTrader and press Ctrl+N to open the Navigator panel
- Broaden Indicators > Market
- Find Apex_Break_PRO within the checklist
- Drag the indicator onto any chart, or double-click its title
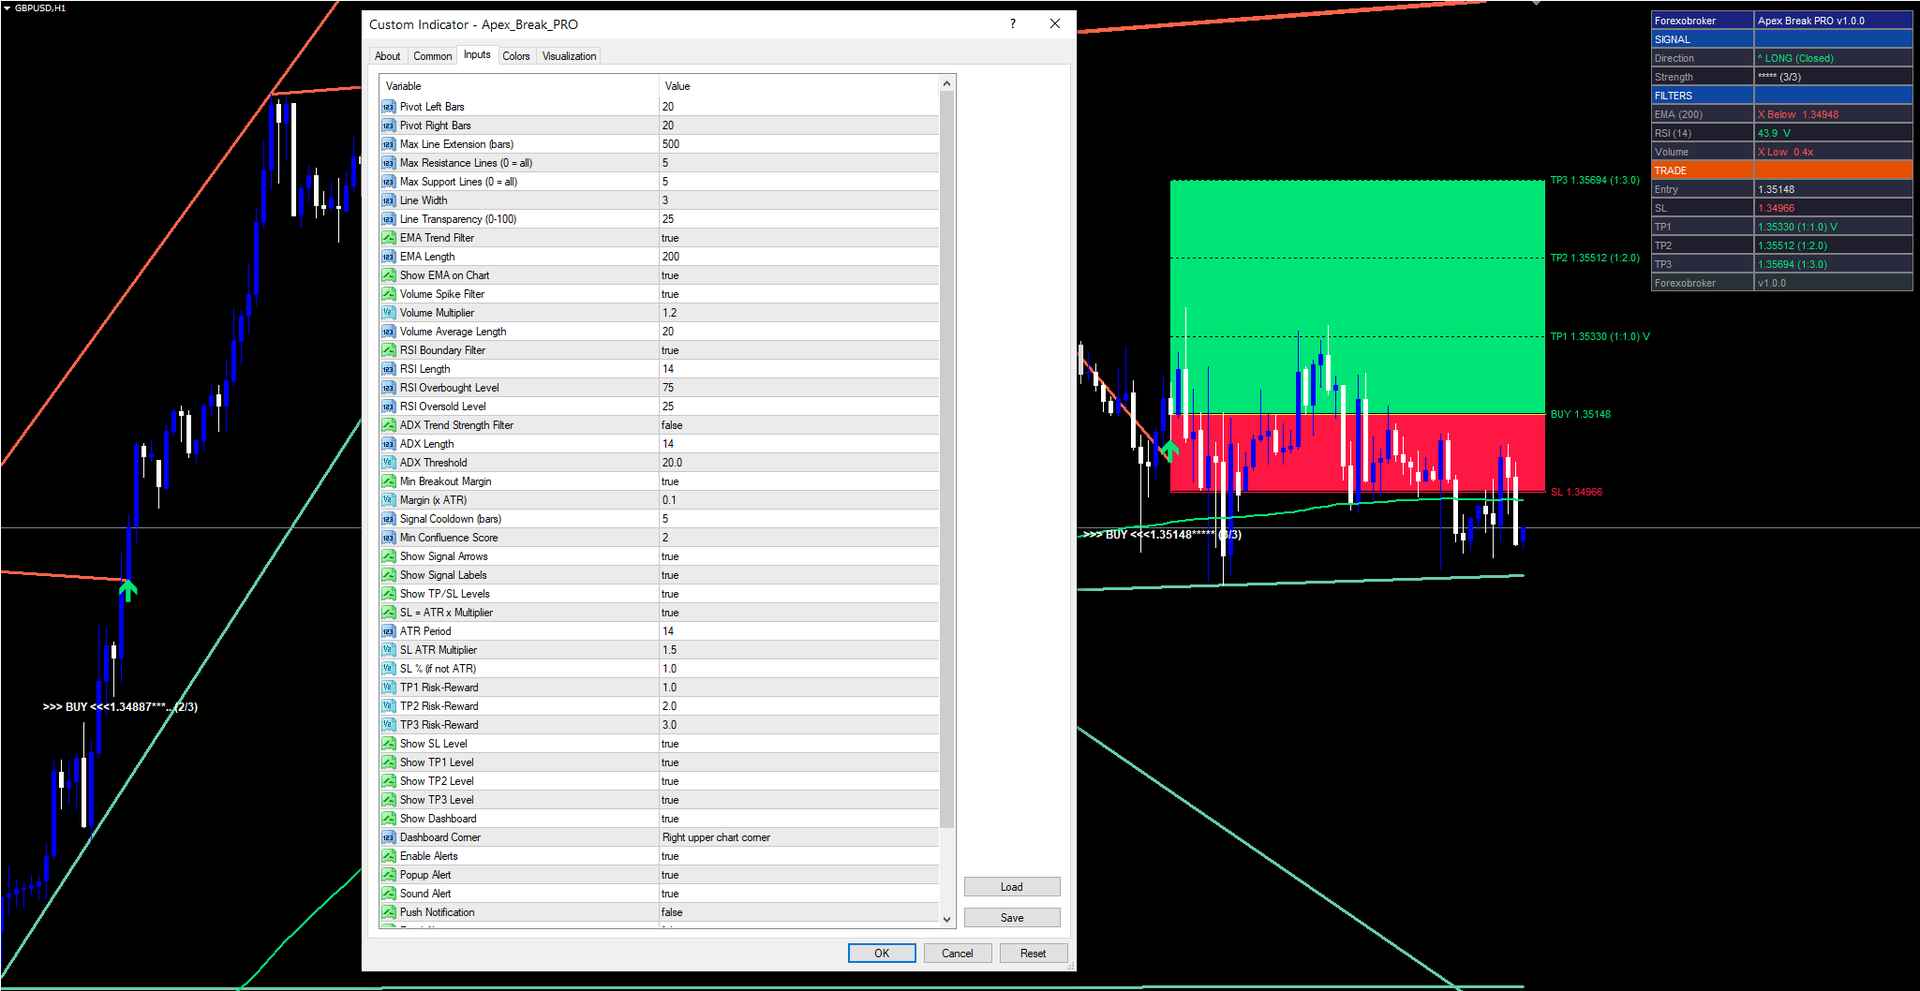
- The settings dialog seems — regulate parameters as wanted (see sections under)
- Click on OK to use
After loading, you will note:
- Trendlines drawn on the chart connecting pivot factors (resistance in purple/tomato, assist in inexperienced/aquamarine)
- Sign arrows (Wingding 233 for BUY, Wingding 234 for SELL) at breakout factors
- Sign labels exhibiting worth, star score, and confluence rating
- TP/SL ranges drawn as horizontal traces with coloured fill zones
- Dashboard panel within the nook of the chart (if enabled)
IMPORTANT: Don’t manually copy information to the info folder. The MQL5 Market handles all file placement and updates routinely.
Sign System Overview
Every sign consists of three visible parts on the chart:
1. Sign Arrow
- BUY indicators show a inexperienced upward arrow (Wingding 233) under the sign bar
- SELL indicators show a purple downward arrow (Wingding 234) above the sign bar
- Arrows seem solely on confirmed (closed) bars
2. Sign Label
Beneath or above the arrow, a textual content label reveals:
- Path: >>> BUY <<< or >>> SELL <<<
- Value stage at sign shut
- Star score and confluence rating, e.g. ***. (3/4)
The star score maps the uncooked confluence rating to a 5-star scale. The fraction in parentheses reveals what number of filters handed versus what number of are enabled.
3. Confluence Rating
The confluence rating is the depend of filters that cross in the mean time of breakout. For instance, if EMA, RSI, and Quantity filters are enabled (3 filters whole) and the breakout passes EMA and Quantity however not RSI, the confluence rating is 2/3.
A sign solely fires when the confluence rating is at or above the MinConfluence threshold.
Non-Repainting Affirmation:
- Breakout detection runs solely on confirmed bars ( barConfirmed = true when the bar index is lower than rates_total – 1 )
- As soon as a sign arrow and label seem, they’re everlasting and can by no means be eliminated or repositioned
- What you see in historic information is precisely what would have appeared in actual time
Trendline Show Settings
These parameters management how pivot factors are detected and the way trendlines are drawn on the chart.
| Parameter | Default | Description |
|---|---|---|
| PivotLeftBars | 20 | Variety of bars to the left that will need to have decrease highs (for pivot excessive) or larger lows (for pivot low) |
| PivotRightBars | 20 | Variety of bars to the suitable that should affirm the pivot. Increased values enhance affirmation lag however cut back false pivots |
| MaxLineExtension | 500 | Most variety of bars a trendline extends ahead from its detection level earlier than expiring |
| MaxResistanceLines | 5 | Most variety of resistance trendlines displayed concurrently. Oldest traces are eliminated first. Set to 0 for limitless |
| MaxSupportLines | 5 | Most variety of assist trendlines displayed concurrently. Oldest traces are eliminated first. Set to 0 for limitless |
| LineWidth | 3 | Pixel width of trendlines |
| LineTransparency | 25 | Transparency stage (0 = totally opaque, 100 = invisible). Default 25 offers a delicate, non-distracting look |
Visible conduct:
- Energetic trendlines (not but damaged or expired) are drawn with a stable line type
- Damaged trendlines (worth closed past the road) change to a dashed line type and grow to be inactive
- Expired trendlines (reached MaxLineExtension bars) additionally change to dashed
- Resistance traces use the ResistanceColor enter (default: Tomato)
- Help traces use the SupportColor enter (default: MediumAquamarine)
TIP: For scalping on decrease timeframes (M5-M15), strive lowering PivotLeftBars and PivotRightBars to 10. For swing buying and selling on H4-D1, enhance them to 30 for extra vital pivot factors.
Confluence Filter Configuration
The confluence system is the core of Apex Break PRO. Every filter evaluates a separate market situation. A breakout should cross sufficient filters (assembly MinConfluence ) earlier than a sign is generated.
EMA Development Filter
| Parameter | Default | Description |
|---|---|---|
| UseEmaFilter | true | Allow or disable the EMA pattern filter |
| EmaLength | 200 | Interval of the Exponential Shifting Common |
| ShowEmaOnChart | true | Draw the EMA line on the chart |
Logic: For BUY indicators, worth should shut above the EMA. For SELL indicators, worth should shut under the EMA. This ensures trades align with the dominant pattern.
RSI Boundary Filter
| Parameter | Default | Description |
|---|---|---|
| UseRsiFilter | true | Allow or disable the RSI filter |
| RsiLength | 14 | RSI calculation interval |
| RsiOverbought | 75 | Higher boundary. BUY indicators require RSI under this stage |
| RsiOversold | 25 | Decrease boundary. SELL indicators require RSI above this stage |
Logic: BUY indicators cross when RSI is under the overbought stage (not already overextended). SELL indicators cross when RSI is above the oversold stage. This prevents getting into trades at exhaustion factors.
Quantity Spike Filter
| Parameter | Default | Description |
|---|---|---|
| UseVolumeFilter | true | Allow or disable the quantity filter |
| VolumeMultiplier | 1.2 | Present quantity should exceed the common by this a number of |
| VolumeAvgLength | 20 | Interval for the quantity easy transferring common |
Logic: The present bar’s tick quantity should be better than VolumeMultiplier occasions the 20-bar common quantity. This confirms that the breakout has institutional participation slightly than occurring on skinny quantity.
ADX Development Power Filter
| Parameter | Default | Description |
|---|---|---|
| UseAdxFilter | false | Allow or disable the ADX filter (disabled by default) |
| AdxLength | 14 | ADX calculation interval |
| AdxThreshold | 20.0 | Minimal ADX worth required to cross |
Logic: ADX should be above the brink, indicating a trending surroundings. This filter is disabled by default as a result of many legitimate breakouts happen throughout range-to-trend transitions when ADX remains to be rising.
TIP: Allow the ADX filter when buying and selling pairs recognized for sturdy trending conduct (e.g., GBPJPY, EURJPY). Preserve it disabled for pairs that often vary (e.g., EURGBP, AUDNZD).
Breakout Margin
| Parameter | Default | Description |
|---|---|---|
| UseBreakoutMargin | true | Require worth to shut past the trendline by a minimal margin |
| MarginMultiplier | 0.1 | Margin measurement as a a number of of ATR |
Logic: Value should shut not less than 0.1 x ATR past the trendline to depend as a legitimate breakout. This filters out false breakouts the place worth barely touches the trendline.
Cooldown and Minimal Confluence
| Parameter | Default | Description |
|---|---|---|
| SignalCooldown | 5 | Minimal variety of bars between consecutive indicators of the identical kind |
| MinConfluence | 2 | Minimal confluence rating required to generate a sign |
How MinConfluence works: In case you have 4 filters enabled (EMA + RSI + Quantity + ADX) and MinConfluence = 2 , not less than 2 of these 4 filters should cross for a sign to fireplace. The star score on the sign label displays the ratio: 2/4 = 2.5 stars.
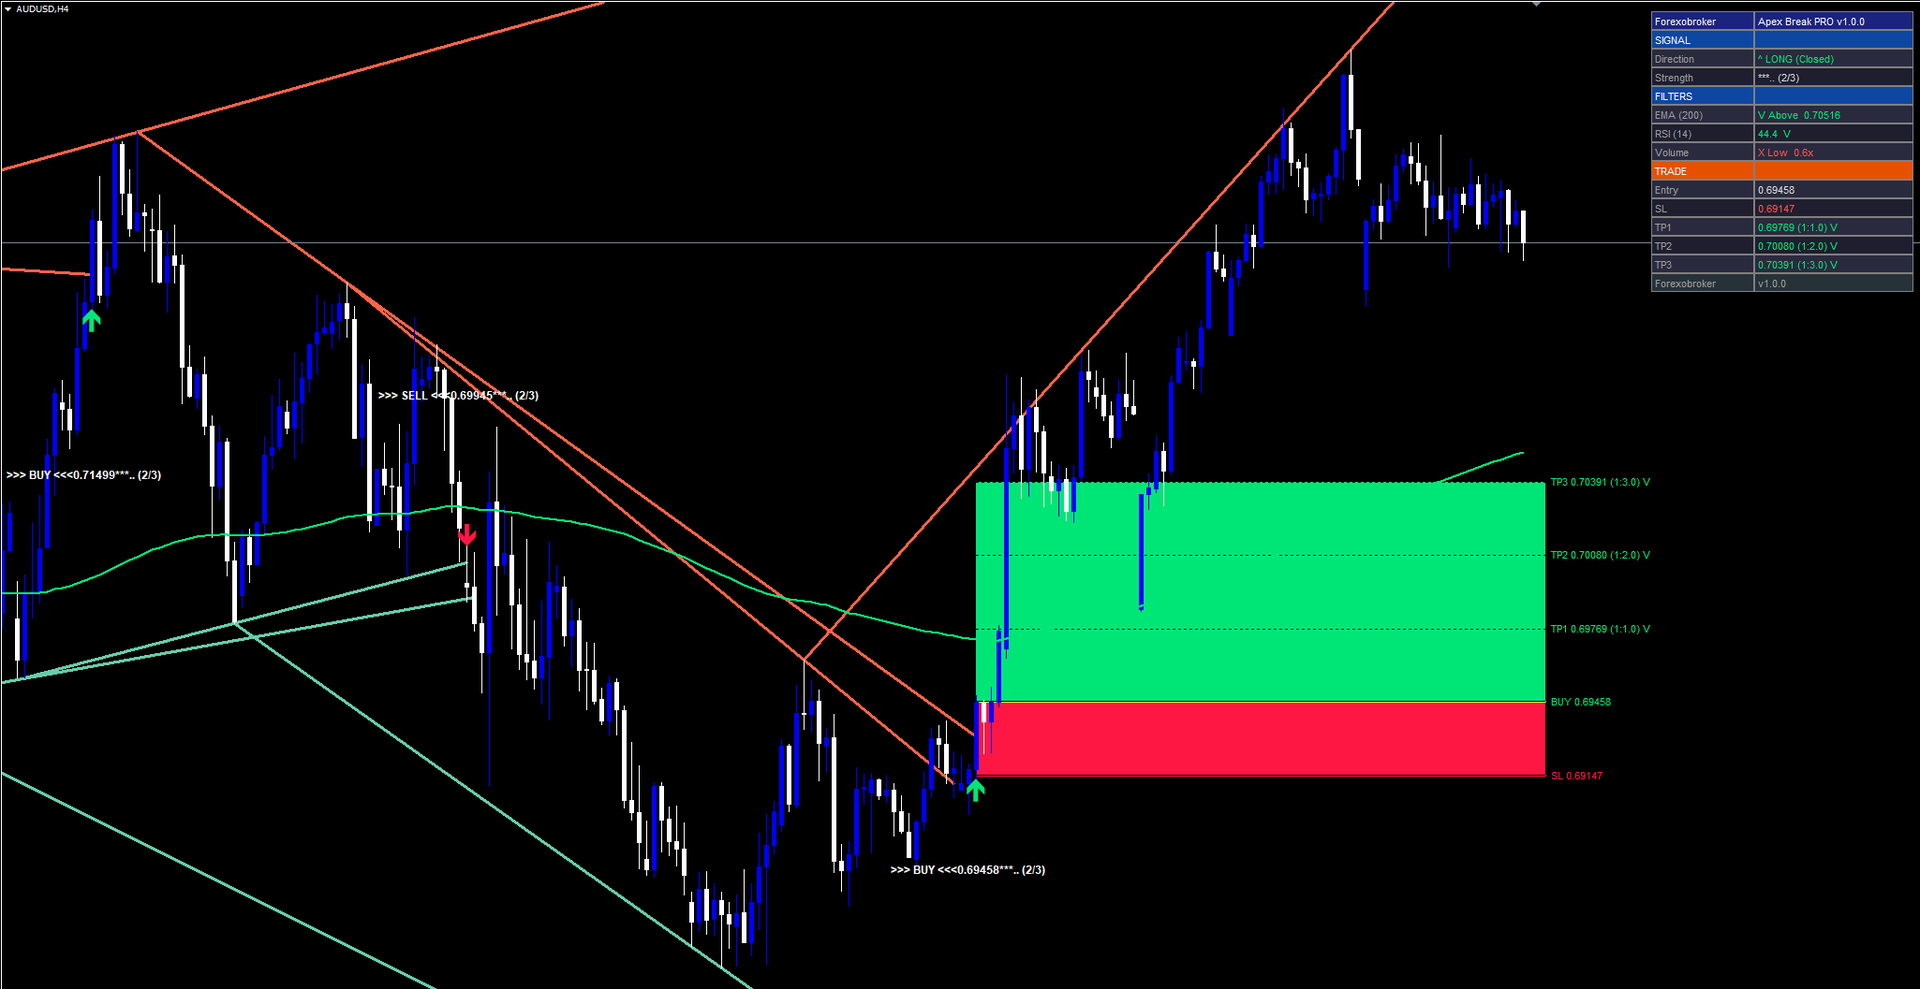
Danger Administration Setup
Apex Break PRO calculates cease loss and three take revenue ranges routinely for every sign. These ranges are drawn on the chart as horizontal traces with coloured fill zones.
Cease Loss Calculation
| Parameter | Default | Description |
|---|---|---|
| UseAtrSL | true | Calculate SL utilizing ATR. If false, makes use of percentage-based SL |
| AtrPeriod | 14 | ATR calculation interval |
| SlMultiplier | 1.5 | SL distance = ATR x this multiplier |
| SlPercent | 1.0 | SL distance as share of entry worth (used solely when UseAtrSL = false) |
When UseAtrSL = true , the cease loss is positioned at Entry Value – (ATR x 1.5) for BUY indicators, or Entry Value + (ATR x 1.5) for SELL indicators. This adapts the cease distance to present market volatility.
Take Revenue Ranges
| Parameter | Default | Description |
|---|---|---|
| TP1_RR | 1.0 | TP1 at 1:1 risk-reward ratio |
| TP2_RR | 2.0 | TP2 at 1:2 risk-reward ratio |
| TP3_RR | 3.0 | TP3 at 1:3 risk-reward ratio |
The “threat” within the risk-reward calculation is the gap from entry to SL. So if SL is 50 pips from entry:
- TP1 (1:1) = 50 pips from entry within the commerce course
- TP2 (1:2) = 100 pips from entry within the commerce course
- TP3 (1:3) = 150 pips from entry within the commerce course
Show Toggles
| Parameter | Default | Description |
|---|---|---|
| ShowTPSL | true | Grasp toggle for all TP/SL visualization |
| ShowSL | true | Present the SL line and fill zone |
| ShowTP1 | true | Present the TP1 line and label |
| ShowTP2 | true | Present the TP2 line and label |
| ShowTP3 | true | Present the TP3 line and label |
Hit Monitoring
The indicator tracks whether or not every TP stage and the SL have been reached by subsequent worth motion:
- When worth reaches TP1, a checkmark (V) seems subsequent to the TP1 label on chart and dashboard
- Identical for TP2 and TP3
- If SL is hit, the commerce is taken into account closed
- If TP3 is hit, the commerce can also be thought-about closed (full goal reached)
- The dashboard reveals “(Energetic)” whereas a commerce is open and “(Closed)” after SL or TP3 is hit
Full Parameter Reference
The next desk lists all 34 enter parameters within the order they seem within the indicator settings dialog.
| # | Parameter | Kind | Default | Class |
|---|---|---|---|---|
| 1 | PivotLeftBars | int | 20 | Pivot Detection |
| 2 | PivotRightBars | int | 20 | Pivot Detection |
| 3 | MaxLineExtension | int | 500 | Pivot Detection |
| 4 | MaxResistanceLines | int | 5 | Line Show |
| 5 | MaxSupportLines | int | 5 | Line Show |
| 6 | LineWidth | int | 3 | Line Show |
| 7 | LineTransparency | int | 25 | Line Show |
| 8 | UseEmaFilter | bool | true | Sign Filters |
| 9 | EmaLength | int | 200 | Sign Filters |
| 10 | ShowEmaOnChart | bool | true | Sign Filters |
| 11 | UseVolumeFilter | bool | true | Sign Filters |
| 12 | VolumeMultiplier | double | 1.2 | Sign Filters |
| 13 | VolumeAvgLength | int | 20 | Sign Filters |
| 14 | UseRsiFilter | bool | true | Sign Filters |
| 15 | RsiLength | int | 14 | Sign Filters |
| 16 | RsiOverbought | int | 75 | Sign Filters |
| 17 | RsiOversold | int | 25 | Sign Filters |
| 18 | UseAdxFilter | bool | false | Sign Filters |
| 19 | AdxLength | int | 14 | Sign Filters |
| 20 | AdxThreshold | double | 20.0 | Sign Filters |
| 21 | UseBreakoutMargin | bool | true | Sign Filters |
| 22 | MarginMultiplier | double | 0.1 | Sign Filters |
| 23 | SignalCooldown | int | 5 | Sign Filters |
| 24 | MinConfluence | int | 2 | Sign Filters |
| 25 | ShowArrows | bool | true | Sign Show |
| 26 | ShowLabels | bool | true | Sign Show |
| 27 | ShowTPSL | bool | true | Danger Administration |
| 28 | UseAtrSL | bool | true | Danger Administration |
| 29 | AtrPeriod | int | 14 | Danger Administration |
| 30 | SlMultiplier | double | 1.5 | Danger Administration |
| 31 | SlPercent | double | 1.0 | Danger Administration |
| 32 | TP1_RR | double | 1.0 | Danger Administration |
| 33 | TP2_RR | double | 2.0 | Danger Administration |
| 34 | TP3_RR | double | 3.0 | Danger Administration |
| 35 | ShowSL | bool | true | TP/SL Show |
| 36 | ShowTP1 | bool | true | TP/SL Show |
| 37 | ShowTP2 | bool | true | TP/SL Show |
| 38 | ShowTP3 | bool | true | TP/SL Show |
| 39 | ShowDashboard | bool | true | Dashboard |
| 40 | DashCorner | ENUM_BASE_CORNER | CORNER_RIGHT_UPPER | Dashboard |
| 41 | EnableAlerts | bool | true | Alerts |
| 42 | AlertPopup | bool | true | Alerts |
| 43 | AlertSound | bool | true | Alerts |
| 44 | AlertPush | bool | false | Alerts |
| 45 | AlertEmail | bool | false | Alerts |
| 46 | ResistanceColor | colour | clrTomato | Colours |
| 47 | SupportColor | colour | clrMediumAquamarine | Colours |
| 48 | BuySignalColor | colour | C’0,230,118′ | Colours |
| 49 | SellSignalColor | colour | C’255,23,68′ | Colours |
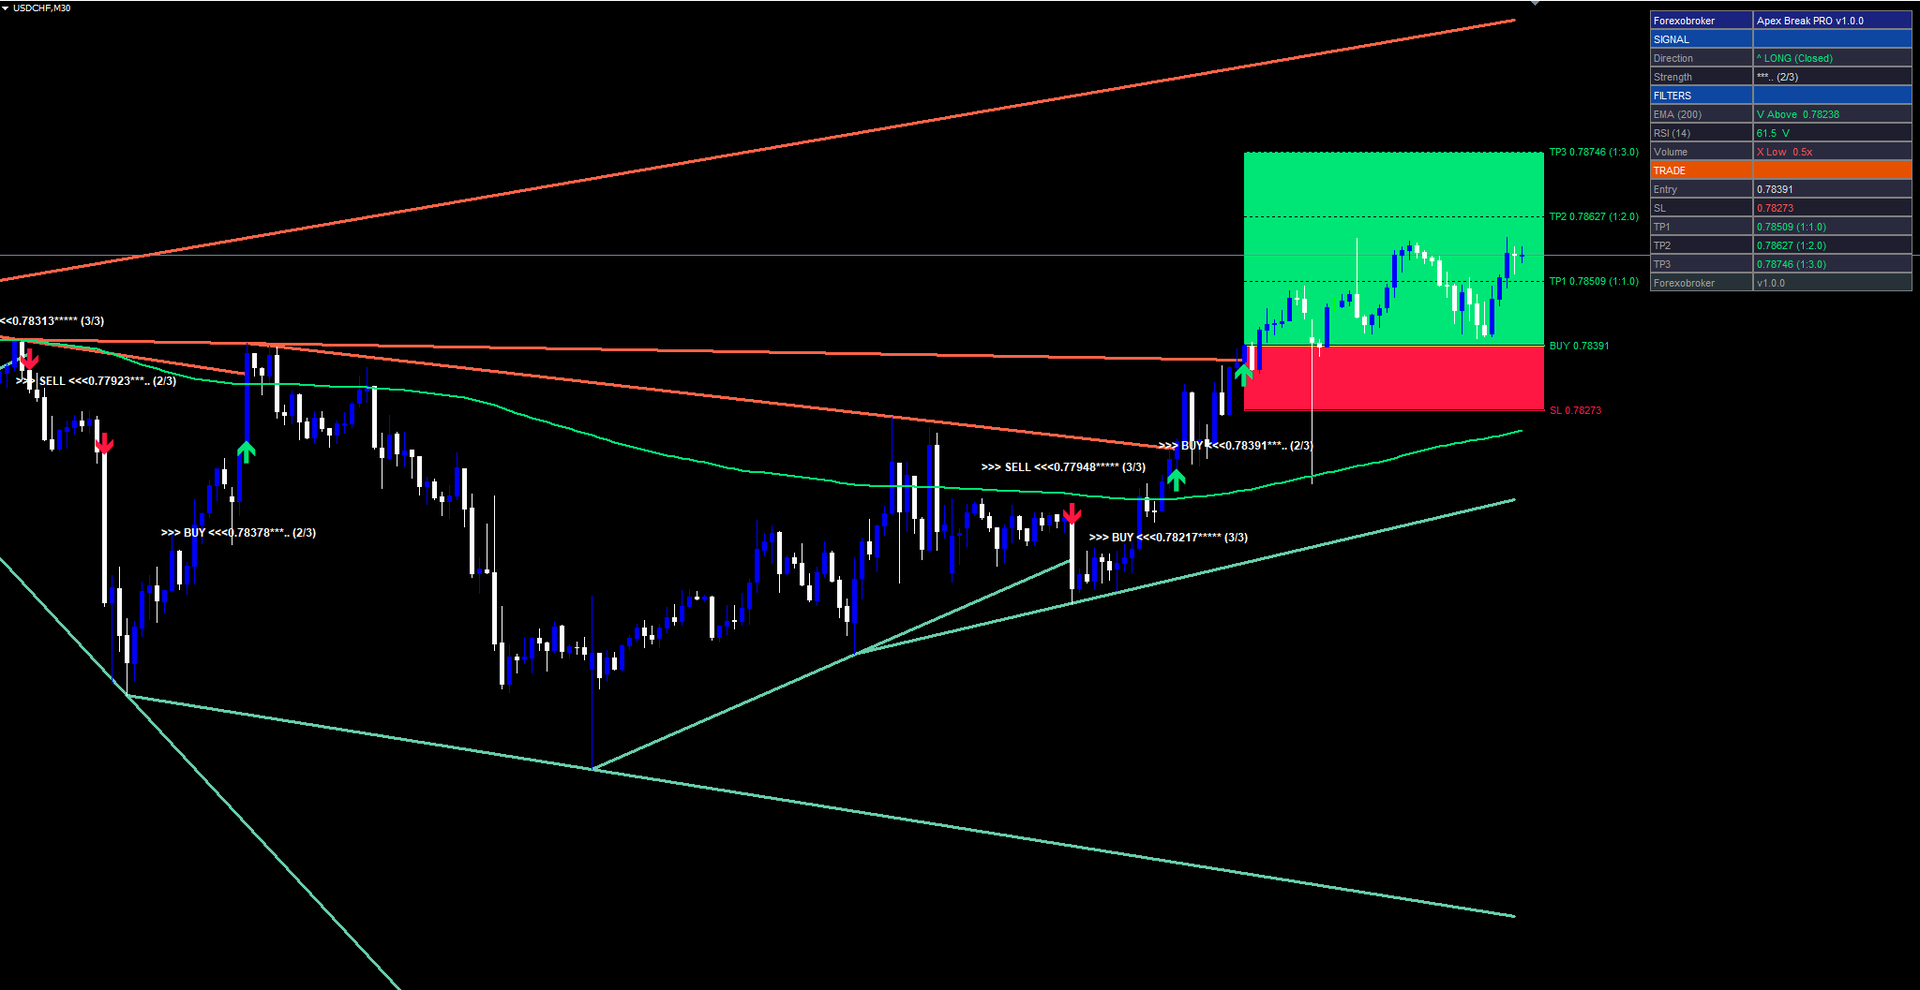
Dashboard Information
The on-chart dashboard supplies a compact, real-time abstract of the indicator state. It’s organized into three sections: SIGNAL, FILTERS, and TRADE.
Dashboard Settings:
| Parameter | Default | Description |
|---|---|---|
| ShowDashboard | true | Present or conceal the dashboard |
| DashCorner | CORNER_RIGHT_UPPER | Which nook of the chart to anchor the dashboard |
The dashboard nook may be set to any of the 4 chart corners: Proper Higher, Left Higher, Proper Decrease, or Left Decrease.
SIGNAL Part
| Row | Description |
|---|---|
| Path | Reveals ^ LONG (Energetic) , v SHORT (Energetic) , ^ LONG (Closed) , v SHORT (Closed) , or – WAITING relying on the present sign state. Inexperienced for LONG, purple for SHORT, grey for WAITING |
| Power | Star score and confluence fraction, e.g. ***. (3/4) . Reveals —– when no sign is lively |
FILTERS Part
Every enabled filter seems as a row with a cross/fail indicator:
| Row | Go Show | Fail Show |
|---|---|---|
| EMA (200) | V Above 1.08542 (inexperienced) | X Beneath 1.08542 (purple) |
| RSI (14) | 52.3 V (inexperienced) | 78.1 X (purple) |
| Quantity | V Spike 1.8x (inexperienced) | X Low 0.7x (purple) |
| ADX (14) | 28.5 V (inexperienced) | 15.2 X (purple) |
Solely filters which are enabled through their Use*Filter toggle will seem within the dashboard. Disabled filters are hidden solely.
TRADE Part
| Row | Description |
|---|---|
| Entry | Entry worth of the newest sign |
| SL | Cease loss worth (displayed in purple) |
| TP1 | TP1 worth with risk-reward ratio, e.g. 1.08920 (1:1.0) . Appends V when hit |
| TP2 | TP2 worth with ratio, e.g. 1.09298 (1:2.0) . Appends V when hit |
| TP3 | TP3 worth with ratio, e.g. 1.09676 (1:3.0) . Appends V when hit |
The dashboard header row reveals Forexobroker | Apex Break PRO v1.0.0 and the footer reveals the model quantity.
TIP: If the dashboard overlaps with worth motion, change DashCorner to a unique nook or quickly conceal it with ShowDashboard = false .
Alert Configuration
Apex Break PRO helps 4 alert supply channels and 6 distinct alert occasions.
Alert Channels
| Parameter | Default | Description |
|---|---|---|
| EnableAlerts | true | Grasp change for all alerts |
| AlertPopup | true | Present a popup dialog in MetaTrader |
| AlertSound | true | Play the default alert sound |
| AlertPush | false | Ship push notification to the MetaTrader cellular app |
| AlertEmail | false | Ship electronic mail notification |
Alert Occasions
The indicator fires alerts for six occasions, every as soon as per bar:
| Alert Occasion | Instance Message | ||||||||
|---|---|---|---|---|---|---|---|---|---|
| BUY Sign | `BUY | EURUSD | TF: H1 | Value: 1.08542 | *.. Average (3/4) | SL: 1.08164 | TP1: 1.08920 | TP2: 1.09298 | TP3: 1.09676` |
| SELL Sign | `SELL | EURUSD | TF: H1 | Value: 1.08542 | **. Sturdy (4/4) | SL: 1.08920 | TP1: 1.08164 | TP2: 1.07786 | TP3: 1.07408` |
| TP1 Hit | `ABPTP1 Hit | EURUSD | H1 | Entry: 1.08542` | |||||
| TP2 Hit | `ABPTP2 Hit | EURUSD | H1 | Entry: 1.08542` | |||||
| TP3 Hit | `ABPTP3 Hit | EURUSD | H1 | Entry: 1.08542` | |||||
| SL Hit | `ABPStop Loss Hit | EURUSD | H1 | Entry: 1.08542` |
Every alert fires solely as soon as per bar to forestall duplicate notifications. The alert textual content contains the image, timeframe, entry worth, confluence particulars, and all TP/SL ranges.
Enabling Push Notifications
- Set up the MetaTrader cellular app in your cellphone (iOS or Android)
- Open the app and navigate to Settings > Messages
- Copy your MetaQuotes ID
- Within the desktop MetaTrader, go to Instruments > Choices > Notifications
- Enter your MetaQuotes ID and allow notifications
- Set AlertPush = true within the indicator settings
Enabling E-mail Notifications
- In MetaTrader, go to Instruments > Choices > E-mail
- Examine Allow
- Enter your SMTP server, port, login, password, and vacation spot electronic mail tackle
- Click on Check to confirm the configuration works
- Set AlertEmail = true within the indicator settings
Buying and selling Methods
The next three approaches reveal alternative ways to make use of Apex Break PRO. All methods assume default filter settings except acknowledged in any other case.
WARNING: Buying and selling includes vital threat of loss. These methods are supplied for instructional functions solely. All the time check on a demo account first and by no means commerce with cash you can’t afford to lose.
Technique A: Scalping (M5 – M15)
Aim: Seize fast strikes with tight threat administration.
Really useful settings changes:
- PivotLeftBars = 10, PivotRightBars = 10 (quicker pivot detection)
- EmaLength = 50 (shorter pattern reference)
- MinConfluence = 3 (stricter filtering to compensate for noise)
- SignalCooldown = 3 (permit extra frequent indicators)
- SlMultiplier = 1.0 (tighter stops)
- TP1_RR = 1.0, TP2_RR = 1.5, TP3_RR = 2.0 (decrease TP targets)
Commerce administration:
- Anticipate a sign with confluence rating of three or larger
- Enter on the open of the following bar after the sign
- Take partial revenue at TP1 (shut 50% of place)
- Transfer cease to breakeven after TP1 is hit
- Shut remaining place at TP2
Technique B: Swing Buying and selling (H1 – H4)
Aim: Journey medium-term traits utilizing all three TP ranges.
Really useful settings: Use defaults (PivotLeftBars=20, PivotRightBars=20, EmaLength=200, MinConfluence=2).
Commerce administration:
- Anticipate a sign that aligns with the EMA course (the EMA filter handles this routinely)
- Enter on the open of the following bar after the sign
- Shut 1/3 of the place at TP1
- Transfer cease to breakeven after TP1
- Shut 1/3 at TP2
- Path cease behind TP1 stage and let the ultimate 1/3 run to TP3
Technique C: Alert-Primarily based (Set and Overlook)
Aim: Monitor a number of charts with out sitting on the display screen.
Setup:
- Open charts for all symbols and timeframes you need to monitor
- Apply Apex Break PRO to every chart together with your most popular settings
- Allow AlertPush = true and configure your MetaQuotes ID
- When a push notification arrives, open the chart to guage the sign
- Use the dashboard to examine filter standing and TP/SL ranges earlier than getting into
TIP: For Technique C, think about setting MinConfluence one level larger than your default to cut back noise in push notifications.
Parameter Tuning Presets
The next preset tables present beginning factors for various buying and selling kinds. Regulate based mostly in your image, dealer situations, and private choice.
Scalping Preset (M5 – M15)
| Parameter | Scalping Worth |
|---|---|
| PivotLeftBars | 10 |
| PivotRightBars | 10 |
| MaxLineExtension | 200 |
| EmaLength | 50 |
| VolumeMultiplier | 1.5 |
| SignalCooldown | 3 |
| MinConfluence | 3 |
| SlMultiplier | 1.0 |
| TP1_RR | 1.0 |
| TP2_RR | 1.5 |
| TP3_RR | 2.0 |
Swing Buying and selling Preset (H1 – H4)
| Parameter | Swing Worth |
|---|---|
| PivotLeftBars | 20 |
| PivotRightBars | 20 |
| MaxLineExtension | 500 |
| EmaLength | 200 |
| VolumeMultiplier | 1.2 |
| SignalCooldown | 5 |
| MinConfluence | 2 |
| SlMultiplier | 1.5 |
| TP1_RR | 1.0 |
| TP2_RR | 2.0 |
| TP3_RR | 3.0 |
Conservative / Place Preset (H4 – D1)
| Parameter | Conservative Worth |
|---|---|
| PivotLeftBars | 30 |
| PivotRightBars | 30 |
| MaxLineExtension | 800 |
| EmaLength | 200 |
| UseAdxFilter | true |
| AdxThreshold | 25 |
| VolumeMultiplier | 1.5 |
| SignalCooldown | 10 |
| MinConfluence | 3 |
| SlMultiplier | 2.0 |
| TP1_RR | 1.0 |
| TP2_RR | 2.0 |
| TP3_RR | 4.0 |
TIP: Begin with the Swing Buying and selling preset and modify one parameter at a time to watch its impact on sign high quality and frequency.
Troubleshooting
No Alerts Showing on the Chart
Doable causes and fixes:
- Warmup interval not reached. The indicator requires a minimal variety of historic bars earlier than it may possibly detect pivots and generate indicators. The warmup is roughly EmaLength + 50 bars or PivotLeftBars + PivotRightBars + 50 bars, whichever is bigger. Scroll again in historical past or await extra bars to kind.
- MinConfluence is simply too excessive. If MinConfluence equals the variety of enabled filters, each single filter should cross concurrently. Attempt lowering MinConfluence by 1.
- Cooldown is simply too lengthy. On larger timeframes, a SignalCooldown of 5 bars can imply a number of days with no indicators. Cut back the cooldown for larger timeframes.
- No trendline breakouts within the seen vary. Zoom out or scroll again. The indicator could have indicators additional again in historical past.
Trendlines Not Seen
- Confirm that MaxResistanceLines and MaxSupportLines usually are not set to 0 in the event you anticipate to see traces (0 means limitless, not zero traces)
- Examine LineTransparency — a worth of 100 makes traces invisible
- Improve LineWidth if traces are tough to see in your monitor
- Make sure the chart has sufficient historical past for pivots to be detected ( PivotLeftBars + PivotRightBars bars minimal)
Dashboard Not Exhibiting
- Affirm ShowDashboard = true
- If the chart window is simply too slender, the dashboard could also be drawn outdoors the seen space. Attempt altering DashCorner to CORNER_LEFT_UPPER
- Resize the chart window to be wider
- The dashboard repositions routinely when the chart is resized (dealt with by the OnChartEvent handler)
Alerts Not Firing
- Examine that EnableAlerts = true (that is the grasp change)
- For push notifications: confirm your MetaQuotes ID is configured in Instruments > Choices > Notifications and that AlertPush = true
- For electronic mail alerts: confirm SMTP settings in Instruments > Choices > E-mail and that AlertEmail = true
- Alerts hearth solely as soon as per bar per occasion kind. In case you missed the alert, you’ll not obtain a reproduction on the identical bar
Totally different Outcomes Between MT4 and MT5
- The underlying calculation logic is an identical, however minor variations in warmup conduct between MT4 and MT5 could cause the primary few indicators in historical past to look at barely totally different bar positions
- Tick quantity information could differ between MT4 and MT5 feeds, which may have an effect on the Quantity filter
- These variations are anticipated and diminish as extra historic bars are processed
In case you want help with Apex Break PRO:
| Contact Methodology | Particulars |
|---|---|
| assist@forexobroker.com | |
| Web site | www.forexobroker.com |
| MQL5 Market | Use the Feedback part on the product web page |
When contacting assist, please embrace:
- Your MetaTrader model (MT4 or MT5)
- Dealer title and image format
- An outline of the problem
- Screenshots of the chart and the indicator settings dialog
- The precise parameter values you’re utilizing

