

Trendline breakouts stay some of the dependable alerts in technical evaluation, but drawing trendlines by hand is sluggish, subjective, and liable to inconsistency. A line that appears legitimate on a 1-hour chart could also be drawn in another way by two merchants trying on the identical information. Even the identical dealer might draw completely different strains relying on whether or not they zoom in or out, which pivot factors they choose, and the way far they prolong the road. This subjectivity results in missed entries, late exits, and an lack of ability to systematically backtest what ought to be an easy idea.
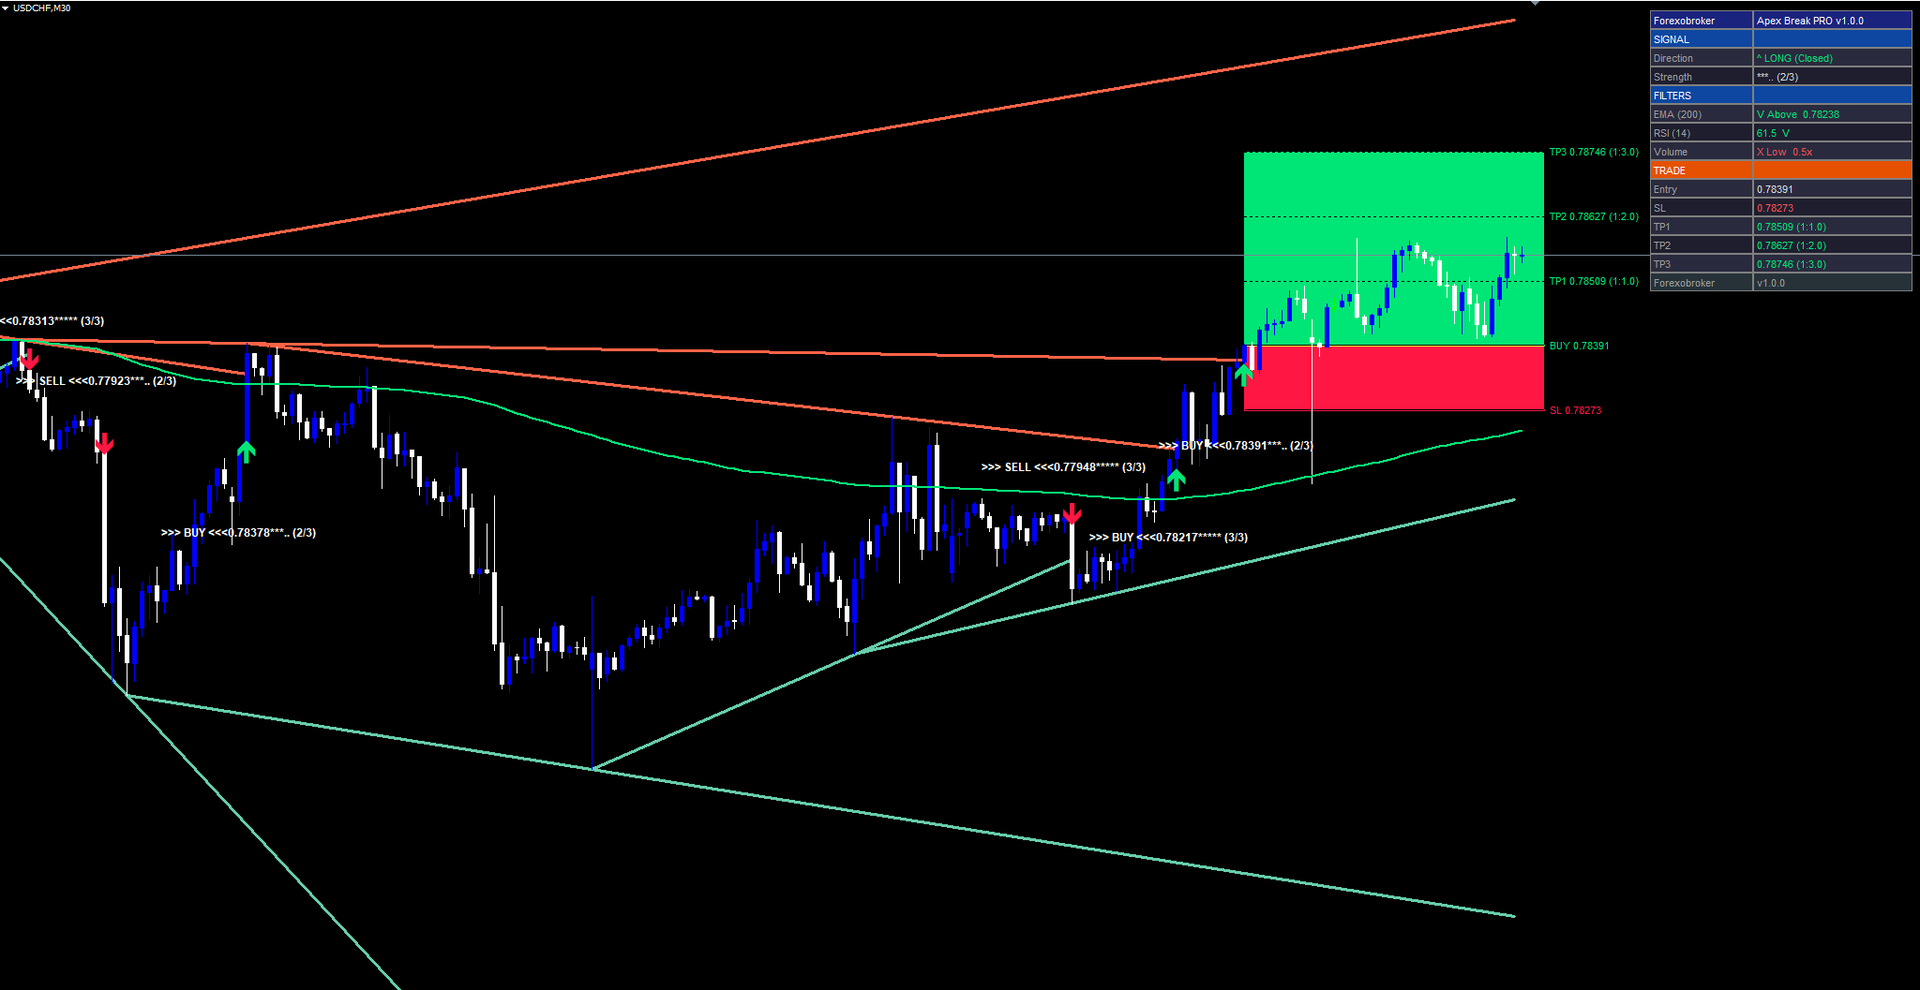
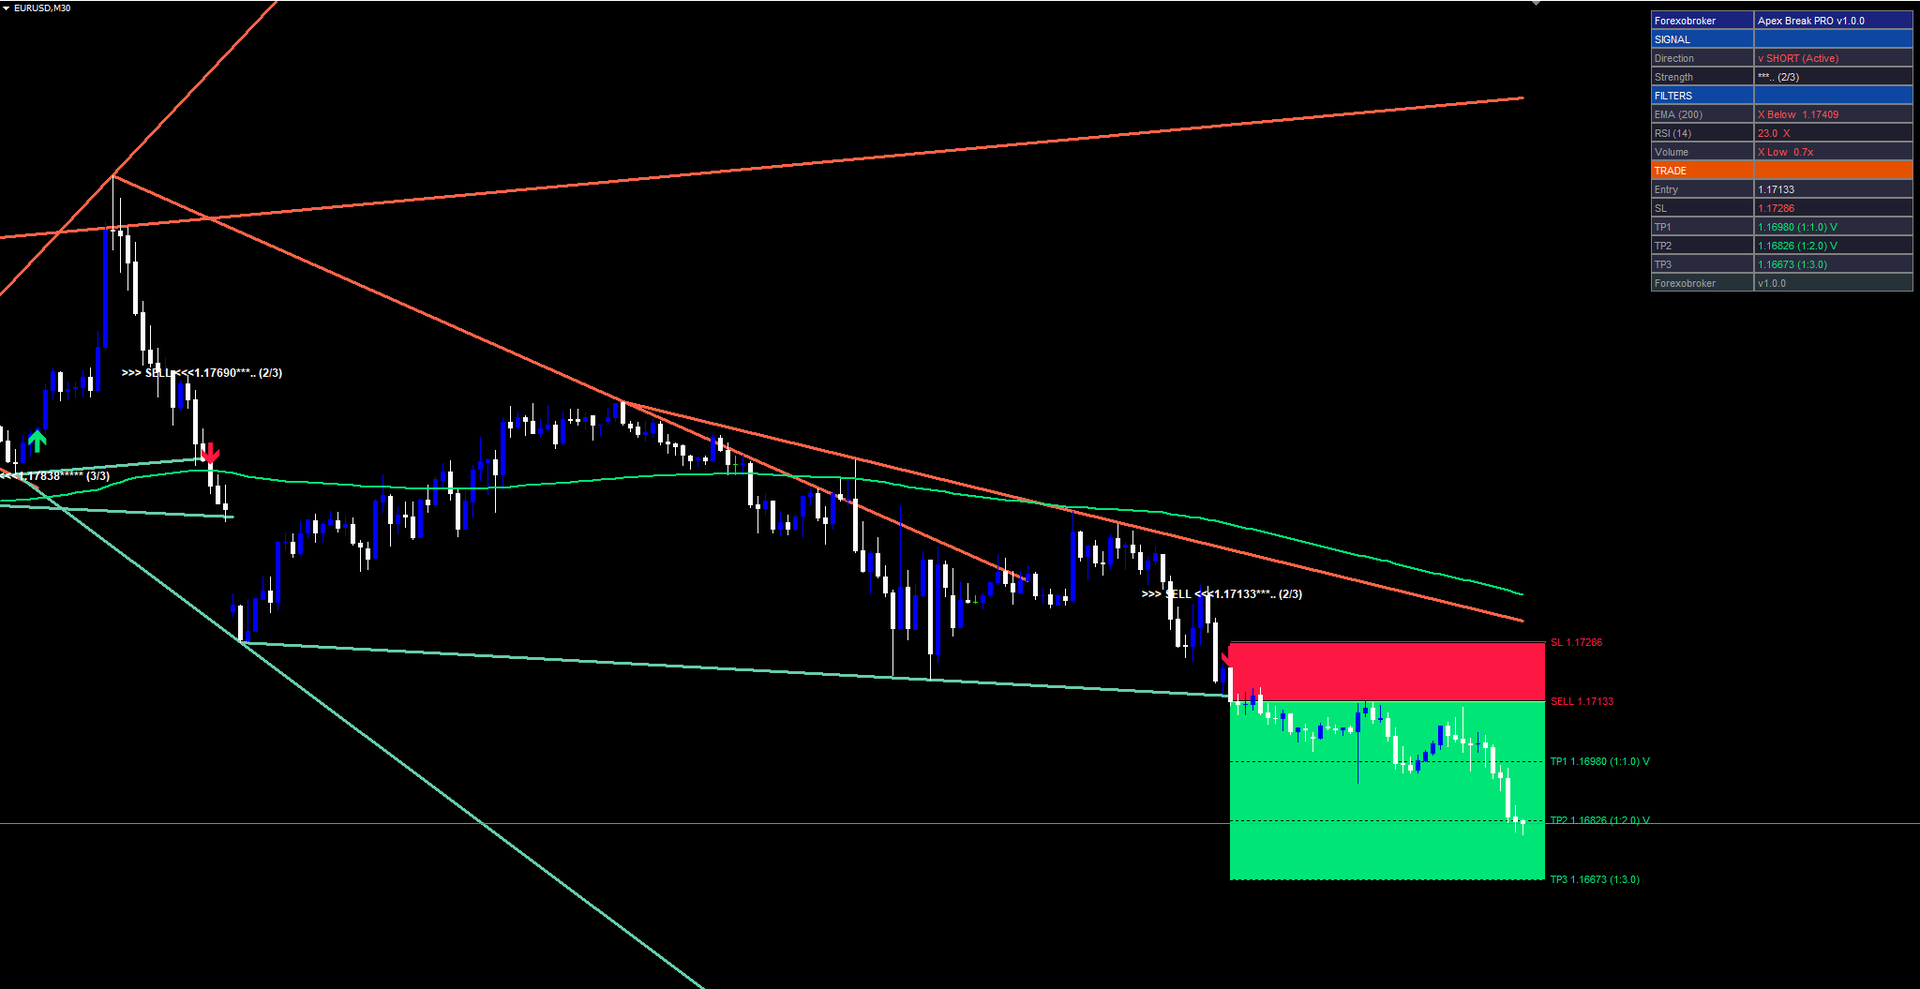
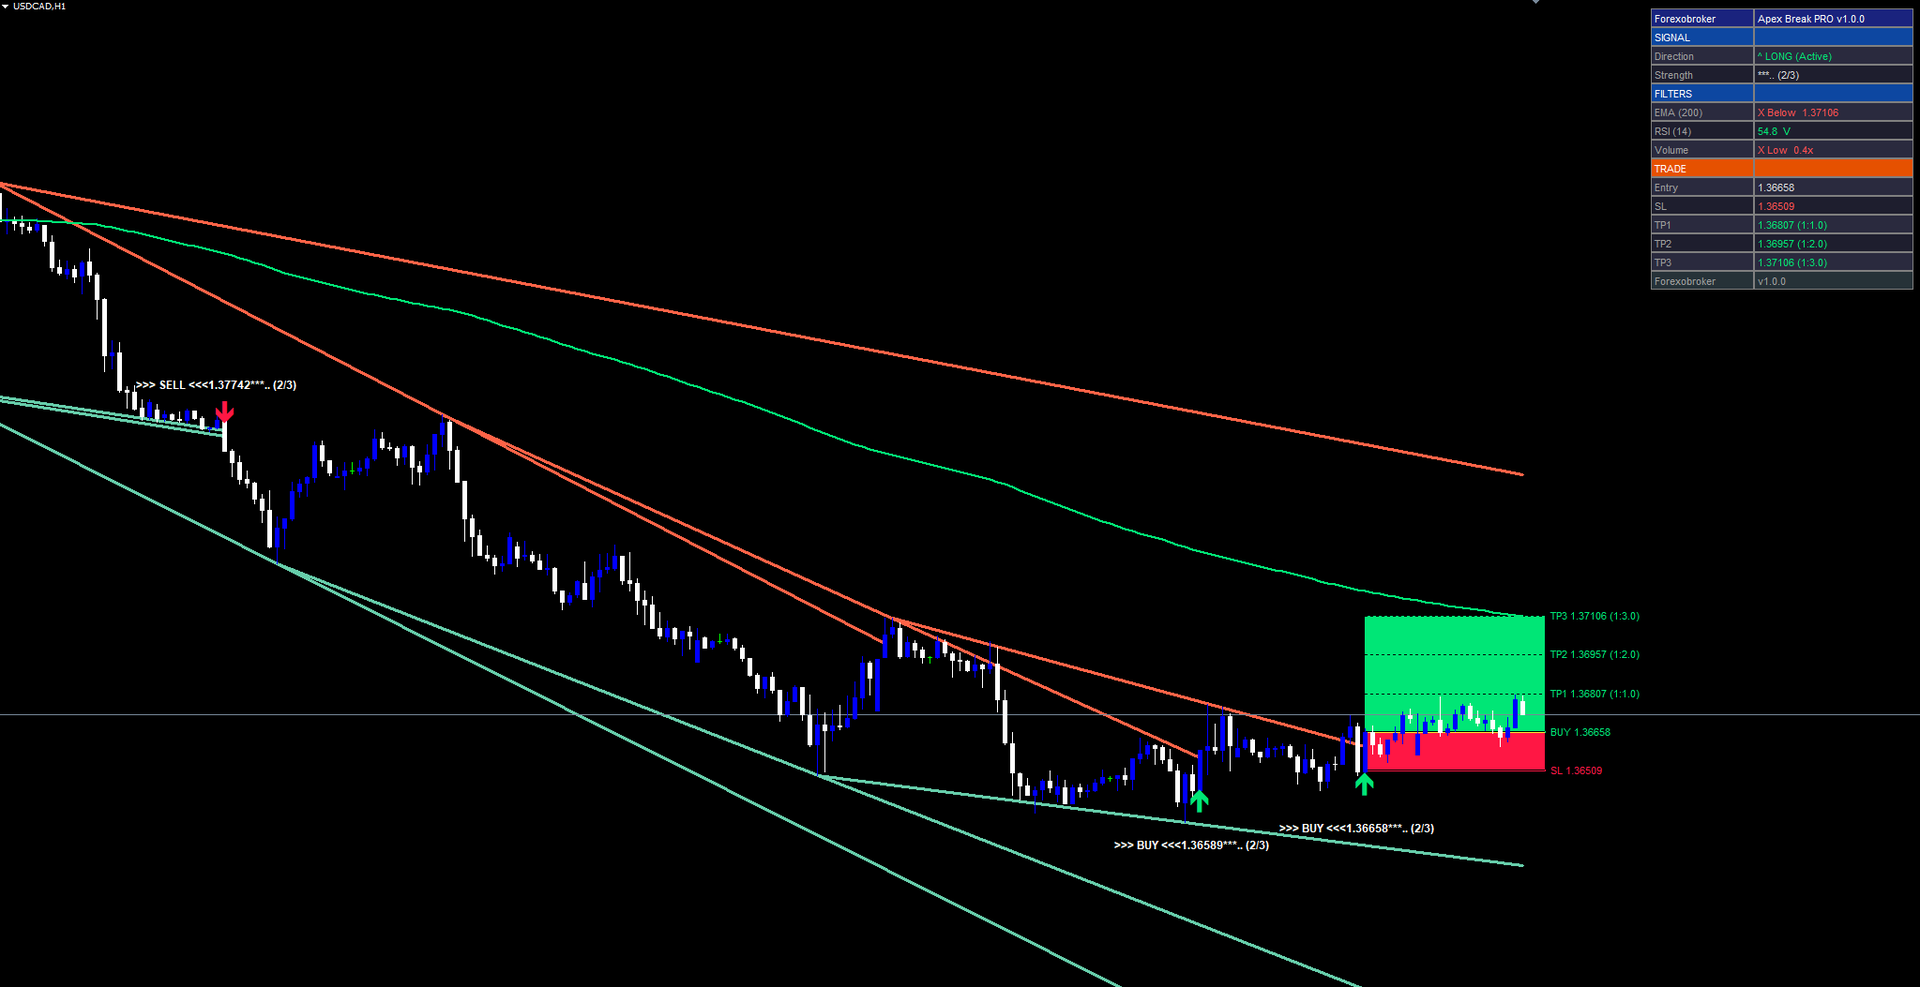
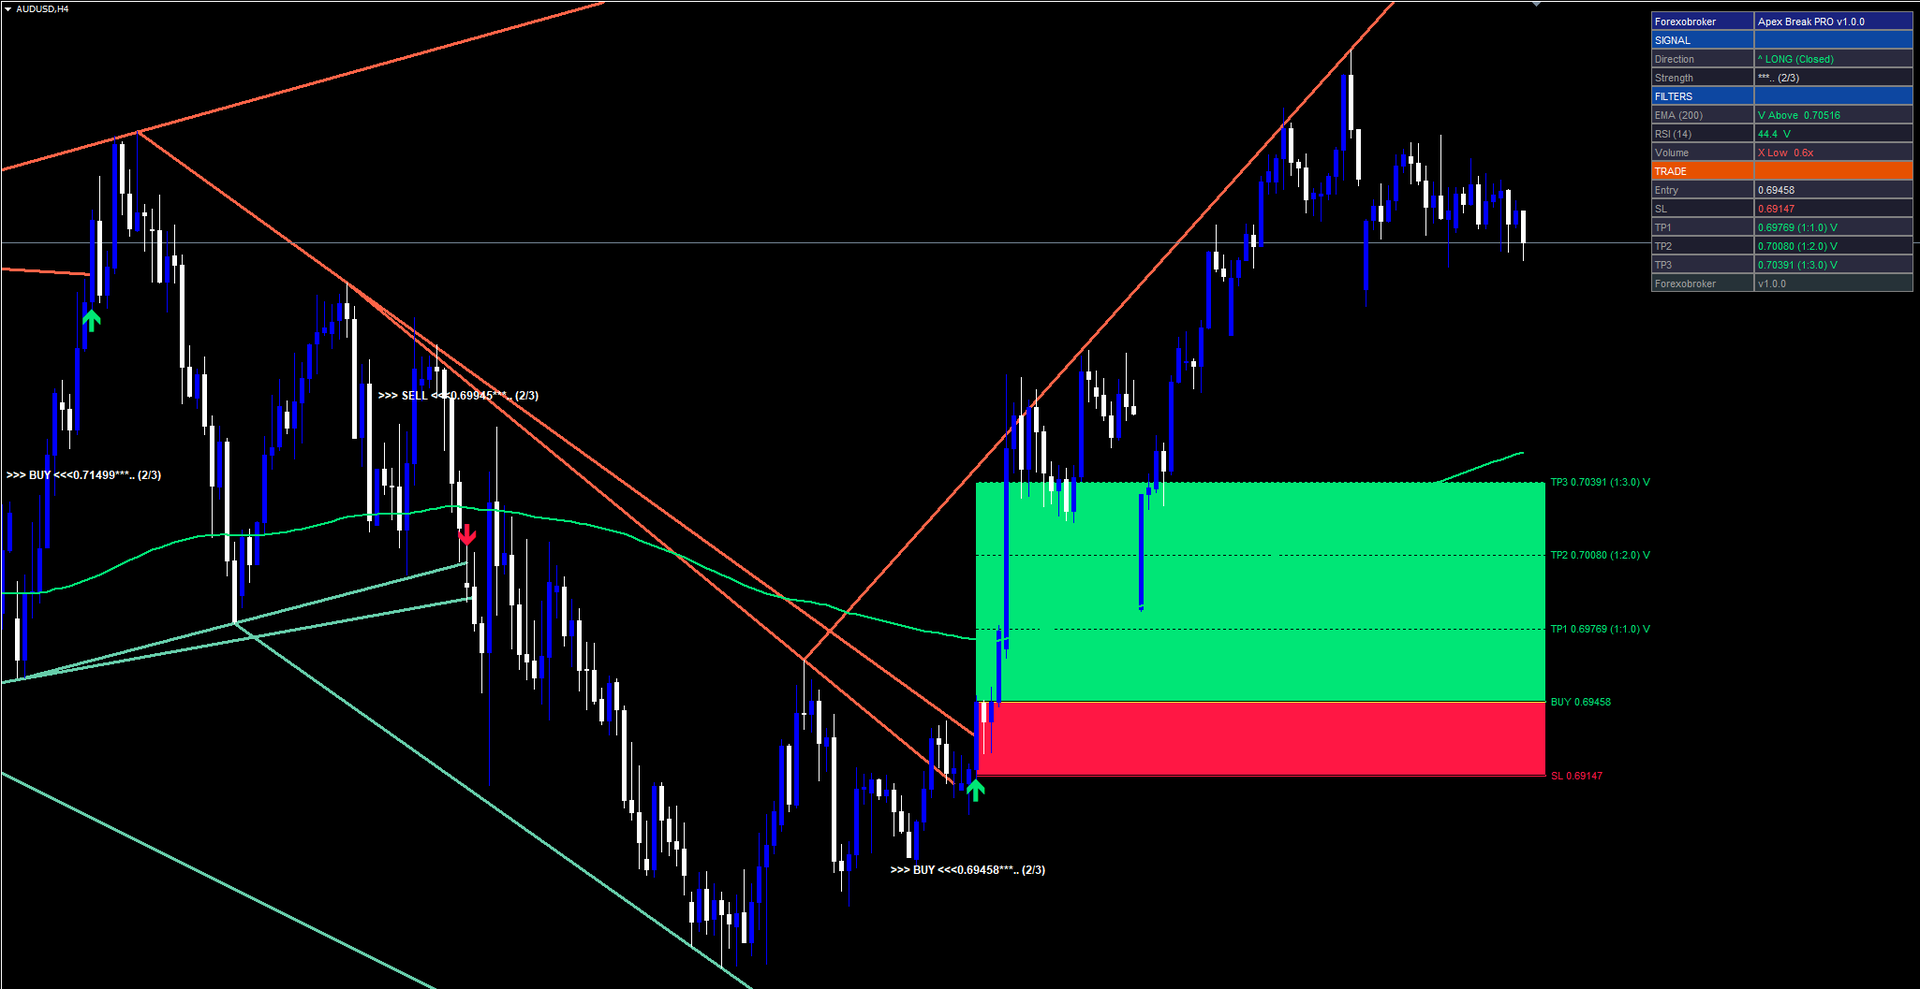
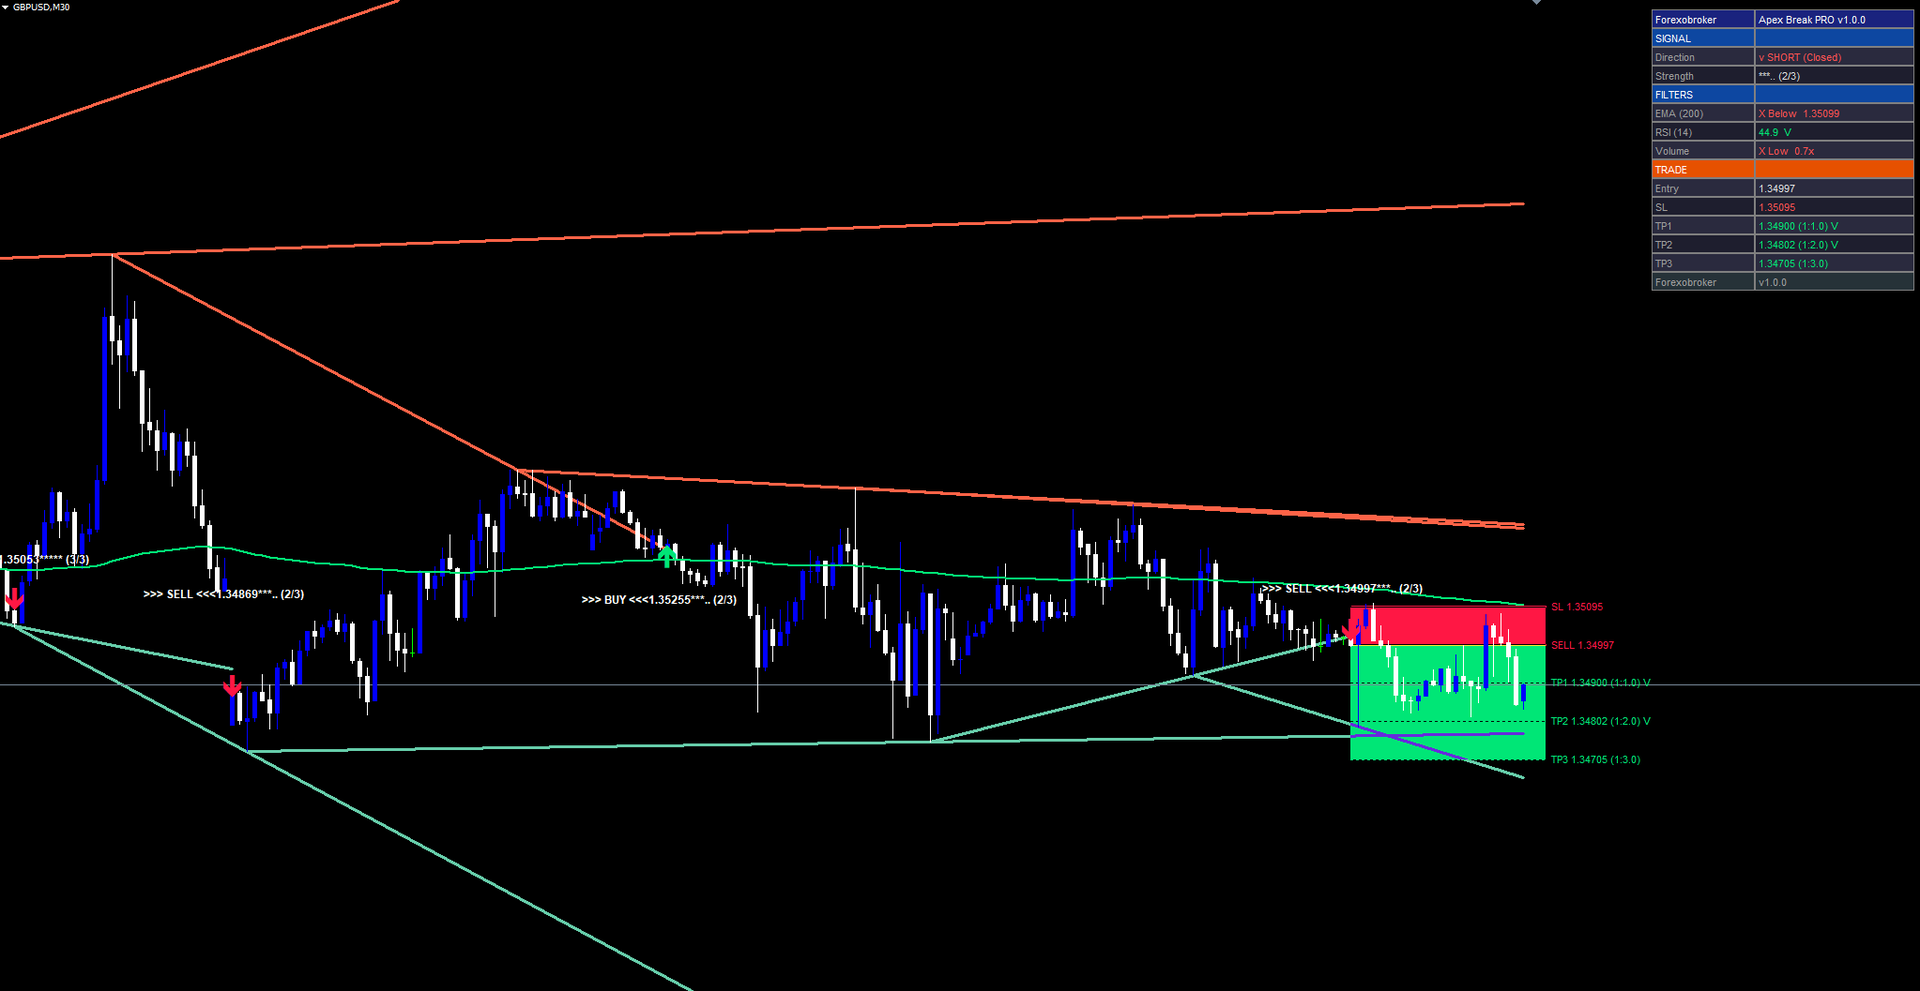
Apex Break PRO automates your entire course of. It detects pivot highs and pivot lows in actual time, connects consecutive pivots with dynamically sloped trendlines, and fires breakout alerts solely when a confirmed bar shut exceeds the trendline by a significant margin. Each sign should additionally go by way of a 4-layer confluence scoring system that evaluates pattern course, momentum boundaries, quantity participation, and pattern energy earlier than the indicator prints an arrow on the chart.
The indicator is accessible for each MetaTrader 4 and MetaTrader 5.
Product Hyperlinks
The non-repainting structure ensures that each sign printed on the chart is everlasting — it evaluates situations solely on closed bars and by no means modifies or removes historic arrows. The built-in threat administration module calculates ATR-based cease loss and three take revenue ranges for every sign, with computerized hit detection and color-coded chart zones. An actual-time dashboard shows the present sign course, filter standing, and commerce administration information in a persistent on-chart panel.
This text explains the technical ideas behind pivot trendline buying and selling, walks by way of every element of the indicator, and supplies a whole parameter reference in order that readers can configure it for their very own markets and timeframes.
What Is Pivot Trendline Buying and selling
A pivot excessive is a bar whose excessive is larger than the highs of all surrounding bars inside an outlined lookback window. A pivot low is the mirror: a bar whose low is decrease than the lows of all surrounding bars. These pivots mark the factors the place value briefly reversed, and so they function structural anchors for the market.
Contemplate a day by day chart of any forex pair. Over the previous 100 bars, there could also be 4 or 5 distinct swing highs the place value peaked and pulled again. Every of these peaks is a candidate pivot excessive. Equally, there might be a number of swing lows the place value bottomed and bounced. Every of these troughs is a candidate pivot low. The important thing phrase is “candidate” — a real pivot requires affirmation from the bars that observe it, not simply the bars that precede it.
When two consecutive pivot highs are linked by a straight line, the result’s a resistance trendline. It slopes upward if highs are rising and downward if highs are falling. The identical logic applies to pivot lows, which produce help trendlines. The slope of every line captures the speed at which patrons or sellers are gaining or dropping floor.
A breakout happens when value closes decisively past certainly one of these trendlines. A detailed above a resistance trendline means that patrons have overcome promoting stress at that slope, probably initiating a brand new bullish leg. A detailed under a help trendline means that sellers have damaged by way of shopping for stress, probably beginning a bearish transfer.
The rationale pivot trendline breakouts carry weight is that they symbolize a shift within the structural steadiness of provide and demand. In contrast to a response to a hard and fast value stage, a trendline breakout implies that the speed of change in market construction has been disrupted. A rising help line that will get damaged implies that patrons are not prepared to defend progressively greater costs, which regularly precedes a extra vital decline.
Conversely, when value breaks above a falling resistance trendline (a line connecting decrease highs), it alerts that sellers are dropping their grip available on the market. Every failed try and push value decrease was much less profitable than the final, and the breakout represents the purpose the place patrons lastly overwhelmed the declining promoting stress. These moments of structural change are exactly what Apex Break PRO is designed to establish and sign.
The Drawback with Static Help and Resistance
Horizontal help and resistance ranges are the most typical device in technical evaluation. A dealer identifies a value stage the place the market beforehand reversed, attracts a horizontal line, and watches for a response when value returns to that zone. This technique works effectively in ranging markets the place value oscillates between fastened boundaries.
Nonetheless, this strategy has a elementary limitation: markets in developments don’t transfer horizontally. An uptrend creates rising flooring and falling ceilings. A inventory in a sustained uptrend will print greater lows over time, which means the related help stage rises with every swing. A horizontal line drawn at an earlier low turns into more and more irrelevant because the pattern progresses — value might by no means return to check it.
The issue is symmetric in downtrends. Resistance ranges established throughout a decline change into out of date because the market strikes decrease. By the point a correction brings value again towards an outdated resistance stage, the dominant sellers could also be working at totally completely different value zones.
Static ranges additionally fail to seize the speed of change in market construction. Two markets might each have help at 1.2000, however one might have pivots rising at 10 pips per day whereas the opposite has pivots rising at 2 pips per day. This distinction in slope carries essential details about momentum and purchaser conviction {that a} horizontal line can’t symbolize.
There’s additionally a temporal drawback. A horizontal stage drawn at a pivot from 200 bars in the past carries no details about what has occurred within the intervening interval. The market might have examined that stage zero instances or twenty instances because it was drawn. A sloped trendline, against this, is constantly projected ahead and constantly examined by incoming value information, making it inherently extra responsive.
Sloped trendlines clear up these issues. They transfer with the market, monitoring the evolving construction of upper lows or decrease highs. They encode each the extent and the rate of structural change, giving merchants a extra correct image of the place provide and demand are prone to work together subsequent.
The problem, nonetheless, is that drawing trendlines manually introduces the very subjectivity that technical evaluation seeks to eradicate. Which two pivot factors ought to be linked? How far ought to the road prolong? Ought to or not it’s redrawn when a brand new pivot types? Automating this course of with clear guidelines — particular pivot detection parameters, an outlined extension restrict, and goal breakout standards — removes ambiguity and makes the tactic testable and repeatable.
Dynamic Sloped Trendlines Defined
Apex Break PRO identifies pivots utilizing a configurable lookback window. By default, the indicator makes use of 20 bars on both sides (PivotLeftBars = 20, PivotRightBars = 20), which means a pivot excessive is confirmed solely when the bar’s excessive exceeds the highs of the 20 bars earlier than it and the 20 bars after it. This requirement for 20 bars of affirmation on the precise aspect ensures that pivots are by no means recognized prematurely.
The selection of 20 bars for each left and proper parameters creates a steadiness between sensitivity and reliability. Smaller values (akin to 5 or 10) detect extra pivots, together with minor swings, which produces extra trendlines and extra frequent alerts. Bigger values (akin to 30 or 50) detect solely main structural pivots, producing fewer however higher-significance trendlines. Merchants engaged on decrease timeframes like M15 might choose smaller pivot values to seize intraday swings, whereas these on H4 or D1 might hold the defaults or improve them.
When a brand new pivot excessive is detected, the indicator checks whether or not a earlier pivot excessive exists. If it does, a resistance trendline is drawn from the earlier pivot excessive to the brand new one. The slope is calculated as the value distinction divided by the bar distance between the 2 pivots. A constructive slope means resistance is rising (greater highs); a destructive slope means resistance is falling (decrease highs). The road then extends ahead by as much as 500 bars (MaxLineExtension = 500) to mission the place resistance might seem sooner or later.
The identical course of applies to pivot lows. Every new pivot low generates a help trendline connecting it to the earlier pivot low, with the road extending ahead. A rising help line (constructive slope) signifies an uptrend with greater lows, whereas a falling help line signifies a downtrend with decrease lows.
Lively trendlines are drawn as strong strains with a configurable width (LineWidth = 3). When a trendline is damaged by a value shut or when it reaches its most extension of 500 bars, it transitions to a dashed type. This visible distinction permits merchants to see at a look which trendlines are nonetheless in play and which have been invalidated. Resistance strains use the ResistanceColor (default: clrTomato) and help strains use SupportColor (default: clrMediumAquamarine), creating a direct visible separation between promoting stress and shopping for stress on the chart.
The indicator maintains a most of 5 resistance strains and 5 help strains by default (MaxResistanceLines = 5, MaxSupportLines = 5). When a brand new trendline is created and the restrict has been reached, the oldest line is faraway from the chart. This computerized cleanup retains the chart readable by stopping an accumulation of dozens of outdated strains. Setting both parameter to 0 removes the restrict totally and shows all detected strains, which might be helpful for evaluation functions however might make the chart visually busy on decrease timeframes with frequent pivot formation.
Non-Repainting Breakout Detection
Repainting is without doubt one of the commonest issues with breakout indicators, and it’s also some of the misunderstood. An indicator that evaluates situations on the present, still-forming bar can present a sign that disappears when the bar closes at a distinct value. In the course of the bar’s formation, value might briefly breach a trendline, inflicting the indicator to show a purchase arrow. If value then pulls again earlier than the bar closes, the arrow vanishes as if it by no means existed. This creates a misunderstanding of accuracy in backtesting — each sign on the chart seems to have been completely positioned, as a result of all of the “improper” alerts had been silently eliminated.
Apex Break PRO eliminates repainting by way of a strict analysis rule: breakout alerts are calculated solely on confirmed (closed) bars. The indicator checks whether or not the shut of a accomplished bar has exceeded the projected trendline value at that bar. If the bar remains to be forming (the rightmost bar on the chart), no sign analysis happens. As soon as a sign is printed, it by no means strikes, modifications, or disappears.
This design has an essential sensible consequence: the sign seems on the shut of the breakout bar, not in the intervening time value first crosses the trendline. A dealer will see the arrow on the bar that simply accomplished. The entry value proven within the dashboard corresponds to the shut of that confirmed bar. This one-bar delay relative to the preliminary cross is the price of non-repainting integrity, and it’s a trade-off that severe merchants universally choose over alerts that look excellent in hindsight however shift throughout reside buying and selling.
Along with the confirmed-bar requirement, the indicator applies a breakout margin. Somewhat than triggering on any shut past the trendline, the shut should exceed the road by a minimum of 0.1 instances the present ATR worth (MarginMultiplier = 0.1). This margin filters out marginal touches and false breaks that usually happen when value merely grazes a trendline with out committing to a real breakout. On a pair like EURUSD with an ATR of fifty pips, the breakout margin can be 5 pips. On a extra unstable pair with an ATR of 150 pips, the margin can be 15 pips. This adaptive scaling ensures that the margin is significant whatever the instrument or timeframe.
A sign cooldown of 5 bars (SignalCooldown = 5) prevents the indicator from firing a number of alerts in fast succession throughout uneven breakout situations. After a purchase sign fires, the subsequent purchase sign can solely seem a minimum of 5 bars later. The identical rule applies independently to promote alerts. Purchase and promote cooldowns are tracked individually, so a promote sign can fireplace instantly after a purchase sign if the market reverses sharply, however two consecutive purchase alerts should be spaced by a minimum of 5 bars. This cooldown eliminates whipsaw clusters that might in any other case make the indicator troublesome to commerce.
The 4-Layer Confluence Scoring System
A trendline breakout alone shouldn’t be enough for a high-quality commerce sign. Value can break by way of a trendline throughout low-volume intervals, in opposition to the dominant pattern, or at excessive momentum ranges the place a reversal is imminent. Many merchants have skilled the frustration of getting into a breakout solely to see value instantly reverse as a result of the transfer lacked institutional participation or occurred in an exhausted market.
The confluence scoring system addresses every of those failure modes with 4 unbiased filters. Every filter evaluates a distinct dimension of market context, and collectively they type a multi-factor validation gate that breakout alerts should go by way of earlier than reaching the chart.
Layer 1: EMA Development Filter (enabled by default). The indicator calculates a 200-period Exponential Transferring Common (EmaLength = 200) and optionally shows it on the chart (ShowEmaOnChart = true). Purchase alerts are solely permitted when the shut is above the EMA, confirming that the broader pattern helps lengthy entries. Promote alerts are solely permitted when the shut is under the EMA. The 200 EMA is broadly considered the institutional pattern benchmark, and this single filter eliminates counter-trend breakouts which have a statistically decrease success price. Merchants preferring a quicker pattern reference can scale back EmaLength to 100 or 50, although shorter intervals will enable extra counter-trend alerts by way of.
Layer 2: RSI Boundary Filter (enabled by default). A 14-period RSI (RsiLength = 14) screens momentum extremes. Purchase alerts are blocked when the RSI exceeds 75 (RsiOverbought = 75), indicating that momentum is overextended to the upside and a pullback is probably going. Promote alerts are blocked when the RSI falls under 25 (RsiOversold = 25), indicating oversold situations the place a bounce is possible. Notice that the RSI filter doesn’t require RSI to be trending within the sign course — it solely blocks alerts at excessive readings. A purchase sign with RSI at 60 passes the filter; a purchase sign with RSI at 78 doesn’t. This boundary strategy preserves mid-range breakouts whereas filtering out solely the statistically weakest momentum environments.
Layer 3: Quantity Spike Filter (enabled by default). Real breakouts are usually accompanied by above-average quantity, reflecting broad market participation within the transfer. The indicator calculates the 20-period Easy Transferring Common of tick quantity (VolumeAvgLength = 20) and requires present bar quantity to exceed 1.2 instances that common (VolumeMultiplier = 1.2). Breakouts on skinny quantity are sometimes false strikes pushed by a small variety of contributors slightly than broad market conviction. The 1.2x threshold is deliberately average — it doesn’t require a dramatic quantity spike, solely a significant improve above the current common. For devices the place tick quantity information shouldn’t be out there (quantity reads as zero), the filter mechanically passes in order that alerts should not blocked by lacking information.
Layer 4: ADX Development Energy Filter (disabled by default). When enabled, the indicator calculates the 14-period Common Directional Index (AdxLength = 14) and requires ADX to exceed 20.0 (AdxThreshold = 20.0). ADX measures the energy of a pattern with out regard to its course — a worth above 20 signifies that value is transferring directionally slightly than oscillating in a spread. This filter ensures that breakouts happen in trending environments slightly than throughout range-bound consolidation. The filter is disabled by default as a result of some merchants choose to establish breakouts on the very begin of a pattern, earlier than ADX has risen above the brink. Enabling it produces fewer however extra directionally dedicated alerts.
Every enabled filter that passes provides one level to the confluence rating. The sign fires solely when the entire rating meets or exceeds the minimal confluence threshold, which defaults to 2 (MinConfluence = 2). With three filters enabled by default (EMA, RSI, Quantity), a minimal of two out of three should go earlier than any arrow seems on the chart. Setting MinConfluence to three would require all three enabled filters to go, producing fewer however extra selective alerts. Setting it to 1 would enable alerts the place just one filter confirms, which will increase sign frequency at the price of decrease common high quality.
If all 4 filters are enabled, the utmost potential rating is 4, and MinConfluence = 2 implies that half the filters should agree. This flexibility permits merchants to tune the indicator’s selectivity to match their threat tolerance and buying and selling type.
The dashboard shows the confluence as a star ranking from 1 to five stars, scaled proportionally to the variety of enabled filters. The mapping works as follows: the uncooked rating (for instance, 2 out of three) is transformed to a 5-star scale utilizing the formulation spherical(rating * 5 / maxScore) . A sign that passes all enabled filters receives 5 stars and a “Sturdy” ranking. One which passes 80% or extra of enabled filters can also be “Sturdy.” Scores between 50% and 80% obtain “Reasonable,” and something under 50% is “Weak.”
This tiered strategy permits merchants to shortly distinguish between alerts the place each situation aligns and alerts that meet the minimal threshold however lack full conviction. Some merchants might select to take solely “Sturdy” alerts, whereas others use “Reasonable” alerts as secondary alternatives with diminished place sizes.
ATR-Based mostly Threat Administration
Each sign generated by Apex Break PRO features a full threat administration framework calculated from the Common True Vary. ATR measures the typical vary between the excessive and low of every bar over a given interval, factoring in gaps. This makes it an adaptive proxy for volatility that naturally adjusts to completely different devices and timeframes. A pair like GBPJPY with huge day by day ranges will produce bigger ATR values and correspondingly wider cease losses than a pair like EURGBP with slim ranges. Utilizing ATR for cease loss and take revenue ranges implies that the danger parameters mechanically alter to present market situations with out the dealer needing to manually recalculate distances for every instrument.
The cease loss is positioned at 1.5 instances the 14-period ATR from the entry value (SlMultiplier = 1.5, AtrPeriod = 14). For a purchase sign, the cease loss is under the entry; for a promote sign, it’s above. This distance is huge sufficient to keep away from being stopped out by regular market noise, whereas nonetheless limiting the utmost loss per commerce. For instance, if the ATR on EURUSD H1 is presently 30 pips, the cease loss can be positioned 45 pips from entry (1.5 x 30). On a extra unstable pair the place ATR is 80 pips, the cease can be 120 pips from entry. The multiplier might be elevated for wider stops on noisy devices or decreased for tighter threat on smooth-trending ones.
Three take revenue ranges are calculated utilizing fastened risk-reward ratios relative to the cease loss distance:
- TP1 at 1:1 risk-reward (TP1_RR = 1.0) — the take revenue distance equals the cease loss distance.
- TP2 at 1:2 risk-reward (TP2_RR = 2.0) — the take revenue is twice the cease loss distance.
- TP3 at 1:3 risk-reward (TP3_RR = 3.0) — the take revenue is 3 times the cease loss distance.
The indicator mechanically tracks whether or not every stage has been reached. When value touches TP1, TP2, or TP3, the dashboard marks that stage with a checkmark (V). If the cease loss is hit, the commerce is marked as closed. The commerce additionally closes mechanically when TP3 is reached.
Shade-coded fill zones present immediate visible suggestions on the chart. The world between entry and cease loss is shaded in purple (utilizing the SellSignalColor), representing the danger zone. The world between entry and the furthest seen take revenue is shaded in inexperienced (utilizing the BuySignalColor), representing the reward zone. These zones are drawn as rectangles that stretch from the sign bar to the present bar, making the risk-reward profile of every commerce seen at a look.
The visible ratio of inexperienced to purple instantly communicates the commerce’s asymmetry. With the default TP3 at 1:3 risk-reward, the inexperienced zone is at all times 3 times the peak of the purple zone, offering a continuing visible reminder of the favorable risk-reward construction.
This multi-target strategy helps a number of place administration methods. A dealer utilizing three equal parts might shut one-third at TP1 to lock in a breakeven commerce, transfer the cease loss to entry, shut one other third at TP2, and let the ultimate third run to TP3. Alternatively, a dealer who prefers simplicity can conceal TP1 and TP2 (ShowTP1 = false, ShowTP2 = false) and handle the commerce as a single entry with a 1:3 risk-reward goal.
If ATR-based cease loss shouldn’t be desired, the indicator can fall again to a percentage-based cease loss (SlPercent = 1.0), although ATR mode is enabled by default (UseAtrSL = true) and is advisable for many use instances.
The Actual-Time Dashboard
The dashboard is a persistent panel displayed within the top-right nook of the chart by default (DashCorner = CORNER_RIGHT_UPPER). It supplies a structured overview of the present sign state, filter situations, and commerce administration information with out requiring the dealer to interpret the chart visually. Somewhat than scanning the chart for the latest arrow and mentally reconstructing which filters handed, the dealer can take a look at a single panel and see each related information level.
The panel is organized right into a two-column structure with 4 sections. The left column accommodates labels and the precise column accommodates values. Colours are used persistently: inexperienced for passing situations and bullish states, purple for failing situations and bearish states, and muted grey for impartial or inactive gadgets.
Sign Part. Two rows show the present commerce course and sign energy. The course row reveals certainly one of three states: “^ LONG (Lively)” when a purchase commerce is open, “v SHORT (Lively)” when a promote commerce is open, “^ LONG (Closed)” or “v SHORT (Closed)” when a accomplished commerce’s TP3 or SL has been hit, and “- WAITING” when no sign has been generated. The energy row shows the star ranking (for instance, “*.. (3/3)”) alongside the confluence rating ratio.
Filters Part. Every enabled filter occupies one row, and disabled filters should not displayed. The EMA row reveals “V Above” or “X Under” alongside the present EMA value worth. The RSI row reveals the present RSI studying (for instance, “62.3”) with a go or fail marker. The Quantity row reveals “V Spike” or “X Low” with the present quantity ratio relative to its SMA (for instance, “1.8x”). The ADX row, when enabled, reveals the ADX worth with a go or fail indicator primarily based on the configured threshold. Go situations are displayed in inexperienced textual content; fail situations in purple textual content. This colour coding permits merchants to establish at a look which filters are aligned and which aren’t, serving to with discretionary selections about whether or not to take a sign that meets the minimal confluence however has particular filters failing.
Commerce Part. This part has its personal orange header to differentiate it from the filter part. 5 rows show the Entry value, Cease Loss value (proven in purple), TP1 value with its risk-reward ratio (1:1.0), TP2 value (1:2.0), and TP3 value (1:3.0). All TP values are proven in inexperienced. When a goal is hit in the course of the lifetime of the commerce, a “V” checkmark seems subsequent to the value. If no commerce is energetic, all fields show a splash. The commerce part updates on each tick, so the hit checkmarks seem in actual time as value reaches every stage.
Footer. A single row shows the writer branding (“Forexobroker”) and model quantity (“v1.0.0”).
The dashboard dynamically adjusts its row depend primarily based on which filters are enabled. If the ADX filter is disabled (the default), its row doesn’t seem, and the panel is shorter. If all 4 filters are enabled, the panel expands to accommodate the extra row. This prevents wasted area on the chart.
The dashboard repositions mechanically when the chart is resized or when the nook setting is modified. Internally, all objects are anchored to CORNER_LEFT_UPPER with absolute pixel coordinates computed from the chart width and peak. This strategy avoids the frequent MetaTrader pitfall the place objects anchored to CORNER_RIGHT_UPPER prolong off-screen on sure chart sizes. The DashCorner enter lets merchants select their most well-liked visible place (right-upper, left-upper, right-lower, or left-lower), however the underlying pixel calculation at all times produces right placement.
The Alert System
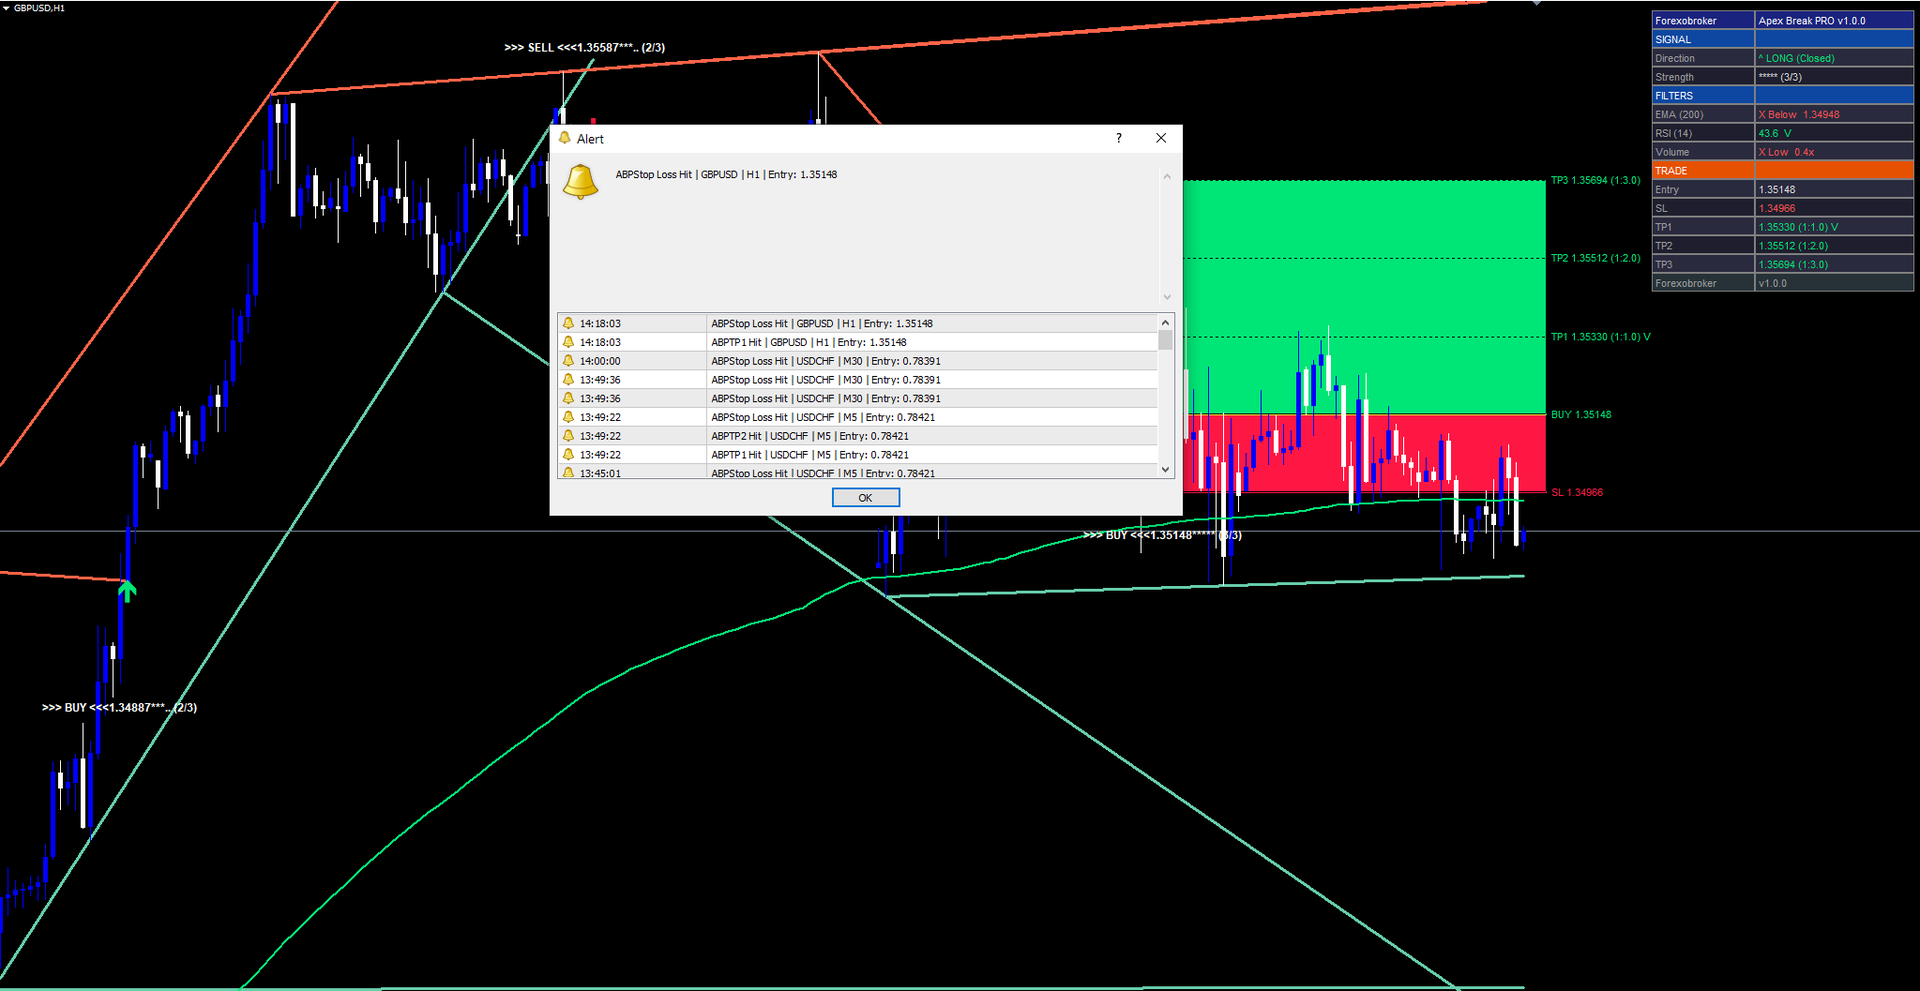
Automated alerts are important for merchants who monitor a number of devices or can’t watch charts constantly. Apex Break PRO helps six distinct alert situations, every protecting a vital second within the lifecycle of a commerce:
- Purchase Sign — fires when a brand new purchase breakout passes all confluence necessities.
- Promote Sign — fires when a brand new promote breakout passes all confluence necessities.
- TP1 Hit — fires when value reaches the primary take revenue stage.
- TP2 Hit — fires when value reaches the second take revenue stage.
- TP3 Hit — fires when value reaches the third take revenue stage.
- SL Hit — fires when value reaches the cease loss stage.
Every alert contains contextual info: the image, timeframe, entry value, and (for sign alerts) the confluence rating, star ranking, energy classification, cease loss, and all three take revenue costs.
Purchase and promote sign alerts comprise complete commerce info together with the confluence rating, star ranking, energy classification, and all 4 value ranges (SL, TP1, TP2, TP3). TP and SL hit alerts embody the unique entry value for reference. This permits merchants to behave on the data within the alert message alone, with no need to open the chart instantly.
4 supply channels might be configured independently:
| Channel | Default | Parameter |
|---|---|---|
| Popup (on-screen dialog) | Enabled | AlertPopup = true |
| Sound (alert.wav) | Enabled | AlertSound = true |
| Push notification (cellular) | Disabled | AlertPush = false |
| E mail | Disabled | AlertEmail = false |
All alerts are guarded by a once-per-bar mechanism. Every of the six situations shops the timestamp of the final bar on which it fired. If the identical situation triggers once more on the identical bar (for instance, throughout a unstable bar the place value crosses and recrosses a TP stage), the alert won’t fireplace a second time. This prevents duplicate notifications that might in any other case overwhelm the dealer on unstable bars.
The grasp swap (EnableAlerts = true) should be energetic for any alerts to fireside. When disabled, all six situations are suppressed no matter particular person channel settings. A advisable configuration for merchants who wish to be notified solely of recent entries can be to allow AlertPush for cellular notifications whereas preserving AlertPopup and AlertSound enabled for real-time desktop consciousness.
Sensible Buying and selling Workflow
Understanding every element of the indicator individually is essential, however making use of them in a structured workflow is what produces constant outcomes. The next six-step workflow describes find out how to use Apex Break PRO in day by day buying and selling.
Step 1: Add the indicator to a chart. Open any chart in MetaTrader 4 or MetaTrader 5. Discover Apex Break PRO within the Navigator panel underneath Indicators > Market. Drag it onto the chart. The default settings are designed to work on most devices with out modification. Begin with a 1-hour or 4-hour chart to see clearly outlined trendlines and well-spaced alerts.
Step 2: Configure filters to your market. Assessment the 4 confluence filters. For Foreign exchange majors on the 1H timeframe, the defaults (EMA 200, RSI 14, Quantity 1.2x) work effectively. For Crypto pairs, the place quantity patterns differ considerably and spikes are extra excessive, contemplate adjusting VolumeMultiplier to 1.5 or greater. For low-volatility devices like sure Foreign exchange crosses, allow the ADX filter (UseAdxFilter = true) to keep away from alerts throughout range-bound consolidation. For indices and commodities, the default settings typically produce good outcomes with out modification.
Step 3: Anticipate a sign. The indicator constantly screens for trendline breakouts. When a confirmed bar shut exceeds a resistance or help trendline and sufficient confluence filters go, a purchase or promote arrow seems on the chart. A textual content label accompanies the arrow displaying the entry value, star ranking, and confluence rating (for instance, “>>> BUY <<< 1.08523 *.. (3/3)”). Don’t anticipate alerts earlier than the bar closes — the indicator intentionally waits for bar affirmation to make sure non-repainting integrity.
Step 4: Test the dashboard. When a sign fires, evaluation the dashboard panel. Test the energy ranking — goal for “Reasonable” or “Sturdy” for higher-confidence trades. Assessment the Filters part to see which particular person filters handed (marked with “V” in inexperienced) and which failed (marked with “X” in purple). Look at the Commerce part for the precise Entry, SL, TP1, TP2, and TP3 costs to know the whole risk-reward profile earlier than committing capital.
Step 5: Set alerts for commerce administration. Allow push notifications (AlertPush = true) or e mail alerts (AlertEmail = true) for TP1 Hit, TP2 Hit, TP3 Hit, and SL Hit. This lets you monitor goal development with out watching the chart constantly. Contemplate scaling out at TP1 and TP2, with the ultimate portion focusing on TP3. The alert messages embody the image, timeframe, and entry value, so you possibly can establish which commerce and chart the notification refers to even if in case you have the indicator working on a number of charts concurrently.
Step 6: Monitor TP/SL development. The dashboard and chart fill zones replace in actual time. As every goal is reached, the dashboard shows a checkmark subsequent to that TP stage. The colour-coded fill zones on the chart present a direct visible abstract: purple for the danger zone between entry and cease loss, inexperienced for the reward zone between entry and TP3. If the cease loss is hit, the commerce course resets and the dashboard returns to the “Closed” state. If TP3 is reached, the commerce additionally closes. Assessment the end result and proceed to the subsequent sign.

Timeframe Issues
The indicator adapts to any timeframe, however completely different timeframes produce completely different sign traits.
On decrease timeframes (M5, M15), pivots type extra continuously, leading to extra trendlines and extra alerts. The EMA 200 covers a shorter absolute time interval (roughly 16 hours on M5), so pattern alignment shifts extra usually. Alerts on decrease timeframes are greatest suited to scalping or short-duration intraday trades.
On medium timeframes (M30, H1, H4), the indicator produces well-spaced alerts with significant trendlines that mirror multi-day or multi-week market construction. The EMA 200 on H1 covers roughly 8 buying and selling days, offering a strong pattern reference. These timeframes supply one of the best steadiness between sign frequency and sign high quality for swing merchants.
On greater timeframes (D1, W1), every sign carries vital weight however alerts are rare. The trendlines join main structural pivots, and breakouts are inclined to provoke giant strikes. Merchants utilizing day by day or weekly timeframes ought to be ready for wider ATR-based stops and longer holding intervals.
Multi-Chart Setup
As a result of the indicator operates independently on every chart, merchants can add it to a number of devices and timeframes concurrently. Every occasion maintains its personal trendline database, sign state, and dashboard. Mixed with push notification alerts, this permits monitoring of a watchlist of 10 or extra devices with out manually switching between charts.
A sensible strategy is to arrange the indicator on the 1-hour chart for every of your main buying and selling devices, with AlertPush enabled and AlertPopup disabled. This manner, you obtain a cellular notification when any instrument generates a sign, and you’ll then open MetaTrader to evaluation the dashboard and chart context earlier than deciding whether or not to enter the commerce. For devices you watch on a number of timeframes, contemplate including the indicator to each the H1 and H4 charts — a sign that seems on each timeframes concurrently carries further confluence past what the indicator’s inner filters present.
Parameter Reference
All 34 enter parameters are listed under, grouped by operate. Default values match the supply code precisely. Parameters might be modified by way of the indicator’s Enter tab when including it to a chart or by right-clicking the indicator and choosing Properties.
Pivot Detection
| Parameter | Default | Description |
|---|---|---|
| PivotLeftBars | 20 | Variety of bars to the left required for pivot affirmation |
| PivotRightBars | 20 | Variety of bars to the precise required for pivot affirmation |
| MaxLineExtension | 500 | Most variety of bars a trendline extends ahead |
Line Show
| Parameter | Default | Description |
|---|---|---|
| MaxResistanceLines | 5 | Most resistance strains displayed (0 = limitless) |
| MaxSupportLines | 5 | Most help strains displayed (0 = limitless) |
| LineWidth | 3 | Pixel width of trendlines |
| LineTransparency | 25 | Trendline transparency (0-100) |
Sign Filters
| Parameter | Default | Description |
|---|---|---|
| UseEmaFilter | true | Allow/disable the EMA pattern filter |
| EmaLength | 200 | Interval for the Exponential Transferring Common |
| ShowEmaOnChart | true | Draw the EMA line on the chart |
| UseVolumeFilter | true | Allow/disable the amount spike filter |
| VolumeMultiplier | 1.2 | Quantity should exceed this a number of of its SMA |
| VolumeAvgLength | 20 | Interval for the amount Easy Transferring Common |
| UseRsiFilter | true | Allow/disable the RSI boundary filter |
| RsiLength | 14 | Interval for the Relative Energy Index |
| RsiOverbought | 75 | RSI stage above which purchase alerts are blocked |
| RsiOversold | 25 | RSI stage under which promote alerts are blocked |
| UseAdxFilter | false | Allow/disable the ADX pattern energy filter |
| AdxLength | 14 | Interval for the Common Directional Index |
| AdxThreshold | 20.0 | Minimal ADX worth required for the filter to go |
| UseBreakoutMargin | true | Allow/disable the ATR-based breakout margin |
| MarginMultiplier | 0.1 | Breakout margin as a fraction of ATR |
| SignalCooldown | 5 | Minimal bars between same-direction alerts |
| MinConfluence | 2 | Minimal variety of filters that should go |
Sign Show
| Parameter | Default | Description |
|---|---|---|
| ShowArrows | true | Present purchase/promote arrow markers on the chart |
| ShowLabels | true | Present textual content labels with value and confluence at alerts |
Threat Administration
| Parameter | Default | Description |
|---|---|---|
| ShowTPSL | true | Show TP/SL strains and fill zones on the chart |
| UseAtrSL | true | Calculate cease loss from ATR (if false, makes use of SlPercent) |
| AtrPeriod | 14 | Interval for the ATR utilized in SL/TP calculations |
| SlMultiplier | 1.5 | Cease loss distance as a a number of of ATR |
| SlPercent | 1.0 | Cease loss as a share of entry value (when UseAtrSL = false) |
| TP1_RR | 1.0 | TP1 risk-reward ratio relative to cease loss distance |
| TP2_RR | 2.0 | TP2 risk-reward ratio relative to cease loss distance |
| TP3_RR | 3.0 | TP3 risk-reward ratio relative to cease loss distance |
TP/SL Show
| Parameter | Default | Description |
|---|---|---|
| ShowSL | true | Present the cease loss line and threat zone |
| ShowTP1 | true | Present the TP1 line and label |
| ShowTP2 | true | Present the TP2 line and label |
| ShowTP3 | true | Present the TP3 line and label |
Dashboard
| Parameter | Default | Description |
|---|---|---|
| ShowDashboard | true | Show the real-time dashboard panel |
| DashCorner | CORNER_RIGHT_UPPER | Chart nook for dashboard placement |
Alerts
| Parameter | Default | Description |
|---|---|---|
| EnableAlerts | true | Grasp swap for all alerts |
| AlertPopup | true | Present on-screen popup dialog |
| AlertSound | true | Play alert.wav sound file |
| AlertPush | false | Ship push notification to cellular |
| AlertEmail | false | Ship e mail notification |
Colours
| Parameter | Default | Description |
|---|---|---|
| ResistanceColor | clrTomato | Shade for resistance trendlines |
| SupportColor | clrMediumAquamarine | Shade for help trendlines |
| BuySignalColor | C’0,230,118′ | Shade for purchase arrows and labels |
| SellSignalColor | C’255,23,68′ | Shade for promote arrows and labels |
Really useful Configuration Profiles
Conservative (fewer alerts, greater high quality): Set MinConfluence = 3, allow all 4 filters (UseAdxFilter = true), improve PivotLeftBars and PivotRightBars to 30. This configuration produces fewer alerts however each has robust multi-factor affirmation.
Default (balanced): Use all default values. Three filters enabled (EMA, RSI, Quantity), MinConfluence = 2, PivotLeftBars = PivotRightBars = 20. Appropriate for many Foreign exchange pairs on H1 and H4.
Aggressive (extra alerts, broader seize): Set MinConfluence = 1, scale back PivotLeftBars and PivotRightBars to 10, scale back SignalCooldown to three. This produces extra frequent alerts with decrease particular person confluence however captures extra breakout alternatives.

Set up
Apex Break PRO is distributed by way of the MQL5.com Market and installs mechanically after buy.
- Buy the indicator from the MQL5.com Market product web page.
- The indicator downloads and installs mechanically into MetaTrader.
- Open the Navigator panel (Ctrl+N) and broaden the Indicators part.
- Discover Apex Break PRO underneath Indicators > Market.
- Drag the indicator onto any chart.
- Alter enter parameters if wanted, then click on OK.
The indicator works on all timeframes and all devices supported by your dealer. No guide file copying is required.
For greatest outcomes, enable the indicator just a few moments to load its historic trendline calculations the primary time it’s utilized to a chart. The warmup interval depends upon the EMA size and pivot detection parameters, however is often round 250 bars. After the preliminary calculation, subsequent ticks course of incrementally with no noticeable delay.
Be certain that the chart has enough historic information loaded. The indicator requires a minimum of the warmup interval plus further bars for pivot detection. In case your chart reveals fewer than 500 bars, contemplate scrolling again or growing the Max Bars in Chart setting in MetaTrader’s Choices menu. This ensures that trendlines are calculated from a consultant pattern of market construction.
The indicator makes use of roughly 4 indicator buffers and creates graphical objects for trendlines, TP/SL zones, sign labels, and the dashboard. All objects use the prefix “ABP_” and are mechanically cleaned up when the indicator is faraway from the chart.
Product Hyperlinks
Conclusion
Apex Break PRO replaces guide trendline drawing with an automatic, rule-based system that identifies pivot highs and lows, constructs sloped trendlines, detects breakouts on confirmed bar closes, and validates every sign by way of a multi-filter confluence scoring framework. By automating what’s historically some of the subjective duties in technical evaluation, the indicator removes inconsistency and permits merchants to strategy trendline breakouts with a repeatable course of.
The ATR-based threat administration module supplies predefined cease loss and three take revenue ranges for each sign, eliminating the necessity for guide calculation. The actual-time dashboard and six-condition alert system hold merchants knowledgeable with out requiring fixed chart monitoring. Collectively, these parts type a whole signal-to-management workflow inside a single indicator.
The indicator is designed for merchants who need a structured, repeatable strategy to trendline breakout buying and selling throughout Foreign exchange, Crypto, Shares, Commodities, and Indices. It performs effectively on the 15-minute, 1-hour, and 4-hour timeframes for swing entries, although it adapts to any timeframe by way of its ATR-based calculations.
All 34 enter parameters are totally configurable, permitting the indicator to be tuned from conservative setups with strict confluence necessities to aggressive configurations that fireplace on any trendline break with minimal filtering. Whether or not used as a main sign supply or as a affirmation device alongside different evaluation strategies, the systematic strategy to trendline detection and breakout validation supplies a basis for disciplined, rule-based buying and selling.
Threat Disclaimer. Buying and selling monetary devices carries a excessive stage of threat and might not be appropriate for all buyers. Previous indicator alerts don’t assure future outcomes. The knowledge supplied on this article and by the indicator is for academic and informational functions solely and shouldn’t be construed as funding recommendation. No indicator can predict future value actions with certainty, and all buying and selling entails the danger of loss. All the time use correct threat administration, place sizing acceptable to your account, and by no means threat greater than you possibly can afford to lose. Seek the advice of a certified monetary advisor earlier than making buying and selling selections. Check any new indicator totally on a demo account earlier than making use of it to reside buying and selling.

