
 – Buying and selling Programs – 27 April 2026")
Sensible Liquidity Matrix Indicator – Full Consumer Guide (MT4 & MT5)
Introduction
The Sensible Liquidity Matrix is a non-repainting ICT Sensible Cash overlay indicator for MetaTrader 4 and MetaTrader 5. It automates the detection of Order Blocks, Honest Worth Gaps, Market Construction (BoS/CHoCH), Equal Highs/Lows, Liquidity Sweeps, and Earlier Interval Ranges, and generates confluence-scored Purchase/Promote indicators with automated Cease Loss and Take Revenue calculation.
Key Options:
- Order Blocks: Bullish and bearish zones detected at confirmed pivot factors with automated invalidation
- Honest Worth Gaps: Three-bar imbalance zones with mitigation monitoring
- Market Construction: Break of Construction (BoS) and Change of Character (CHoCH) with color-coded labels
- Confluence Sign Engine: EMA 20/50 pattern, pivot zone retest, RSI filter, and one-trade-at-a-time administration
- 9-Timeframe Sign Scanner: Actual-time EMA pattern standing throughout M1 by MN in a single dashboard
- Premium Dashboard: 5-section panel with Market, Development Evaluation, Confluence Map, Lively Sign with dwell P&L, and Scanner
Obtain the indicator:
TIP: This indicator is designed for merchants who use ICT Sensible Cash Ideas and need automated detection of institutional footprints with structured, non-repainting indicators. It really works on any image and any timeframe accessible in MetaTrader.
Understanding ICT Sensible Cash Alerts
Sensible Liquidity Matrix generates purchase and promote indicators by a multi-step confluence course of. Understanding every step helps you interpret the indicators and handle trades successfully.
How indicators are generated (6-step course of):
- The indicator detects swing pivots utilizing the configurable SwingLen parameter, requiring equal affirmation bars on either side of every pivot excessive and pivot low
- Order blocks are created at confirmed pivots by scanning for the final opposing candle inside OBScanBars of the pivot level
- The sign engine evaluates EMA 20/50 alignment on the chart timeframe — purchase entries require EMA 20 above EMA 50, promote entries require EMA 20 beneath EMA 50
- The engine checks for a pivot zone retest: the bar’s wick should attain inside 0.3 ATR of the latest pivot, with the shut confirming the anticipated course (bullish candle for purchase, bearish candle for promote)
- The RSI filter verifies that momentum just isn’t at an excessive (beneath 70 for purchase, above 30 for promote)
- If all situations go and the engine is within the flat state (no lively commerce), the sign fires, SL/TP are calculated, and the arrow seems on the chart
NOTE: All sign analysis happens on confirmed (closed) bars solely. The sign arrow seems on the shut of the bar that triggers the entry situations. This one-bar delay relative to the preliminary situation match is the price of non-repainting integrity — what you see on historic information is strictly what would have appeared in actual time.
Set up Information
Sensible Liquidity Matrix is distributed by the MQL5.com Market. Set up is automated.
Steps:
- Buy the indicator from the MQL5 Market product web page
- The indicator downloads and installs routinely into your MetaTrader terminal
- Open MetaTrader and press Ctrl+N to open the Navigator panel
- Develop Indicators > Market
- Find Smart_Liquidity_Matrix within the listing
- Drag the indicator onto any chart, or double-click its identify
After loading, you will notice:
- Order Block rectangular zones (cyan for bullish, tomato for bearish)
- Honest Worth Hole dashed zones (inexperienced for bullish, purple for bearish)
- Construction traces with BoS/CHoCH labels at structural break factors
- Sign arrows (inexperienced up arrow for BUY, purple down arrow for SELL)
- SL/TP traces extending ahead from the sign bar (when a commerce is lively)
- Equal Excessive/Low dotted horizontal traces (when detected)
- Earlier Interval excessive/low/equilibrium ranges
- Dashboard panel with 5 sections (if enabled)
IMPORTANT: Don’t manually copy recordsdata to the information folder. The MQL5 Market handles all file placement and updates routinely.
Sign System Overview
Every sign consists of visible parts on the chart that talk course, confluence high quality, and danger administration ranges.
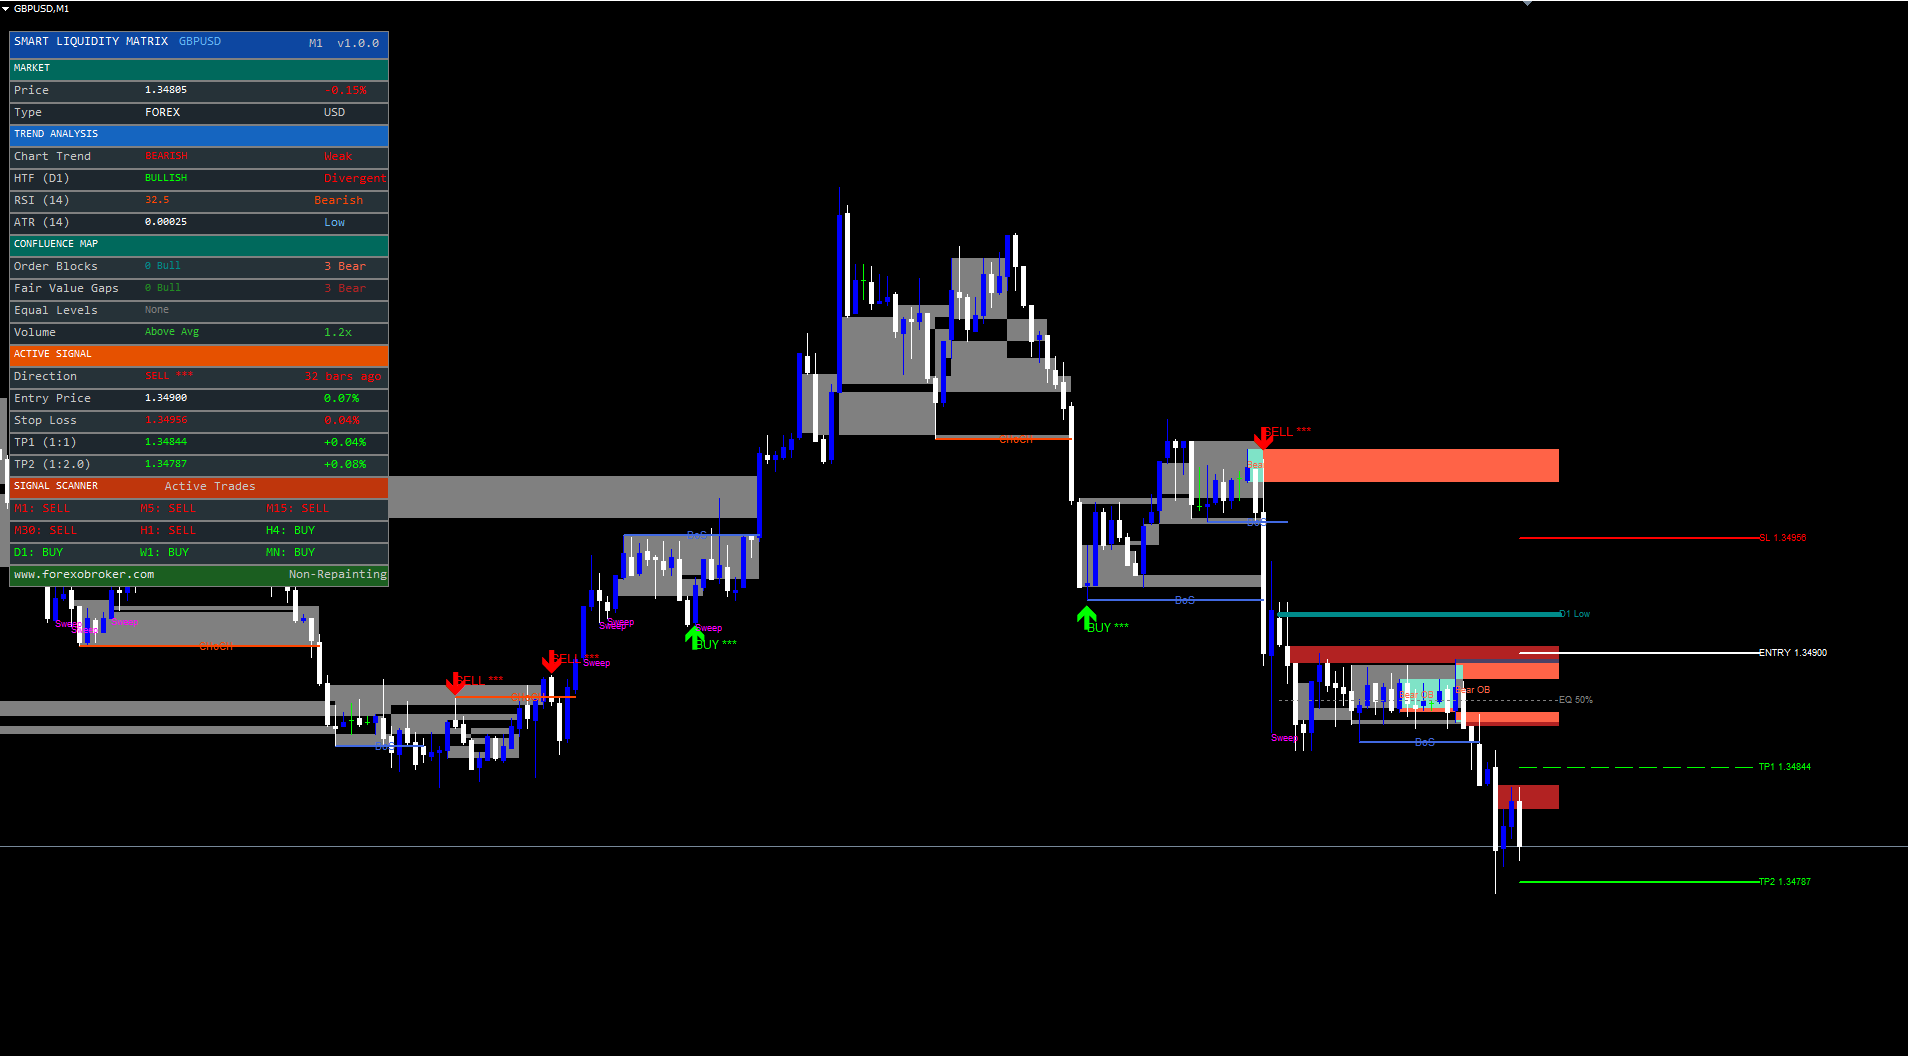
Sign Arrow. BUY indicators show a inexperienced upward arrow (Wingding 233) beneath the sign bar. SELL indicators show a purple downward arrow (Wingding 234) above the sign bar. Arrows seem solely on confirmed (closed) bars and by no means transfer or disappear as soon as printed.
Sign Label. Adjoining to the arrow, a textual content label exhibits the course (“BUY” or “SELL”) adopted by a star ranking representing the confluence rating. For instance, “BUY *” signifies a purchase sign with a rating of three out of 5.
Confluence Rating. The rating displays what number of confluence situations align in the mean time of entry. The sign engine evaluates EMA alignment, pivot retest proximity, candle course, and RSI situations. Greater scores point out stronger confluence. A rating of three is normal; scores of 4 or 5 point out distinctive alignment throughout a number of Sensible Cash parts.
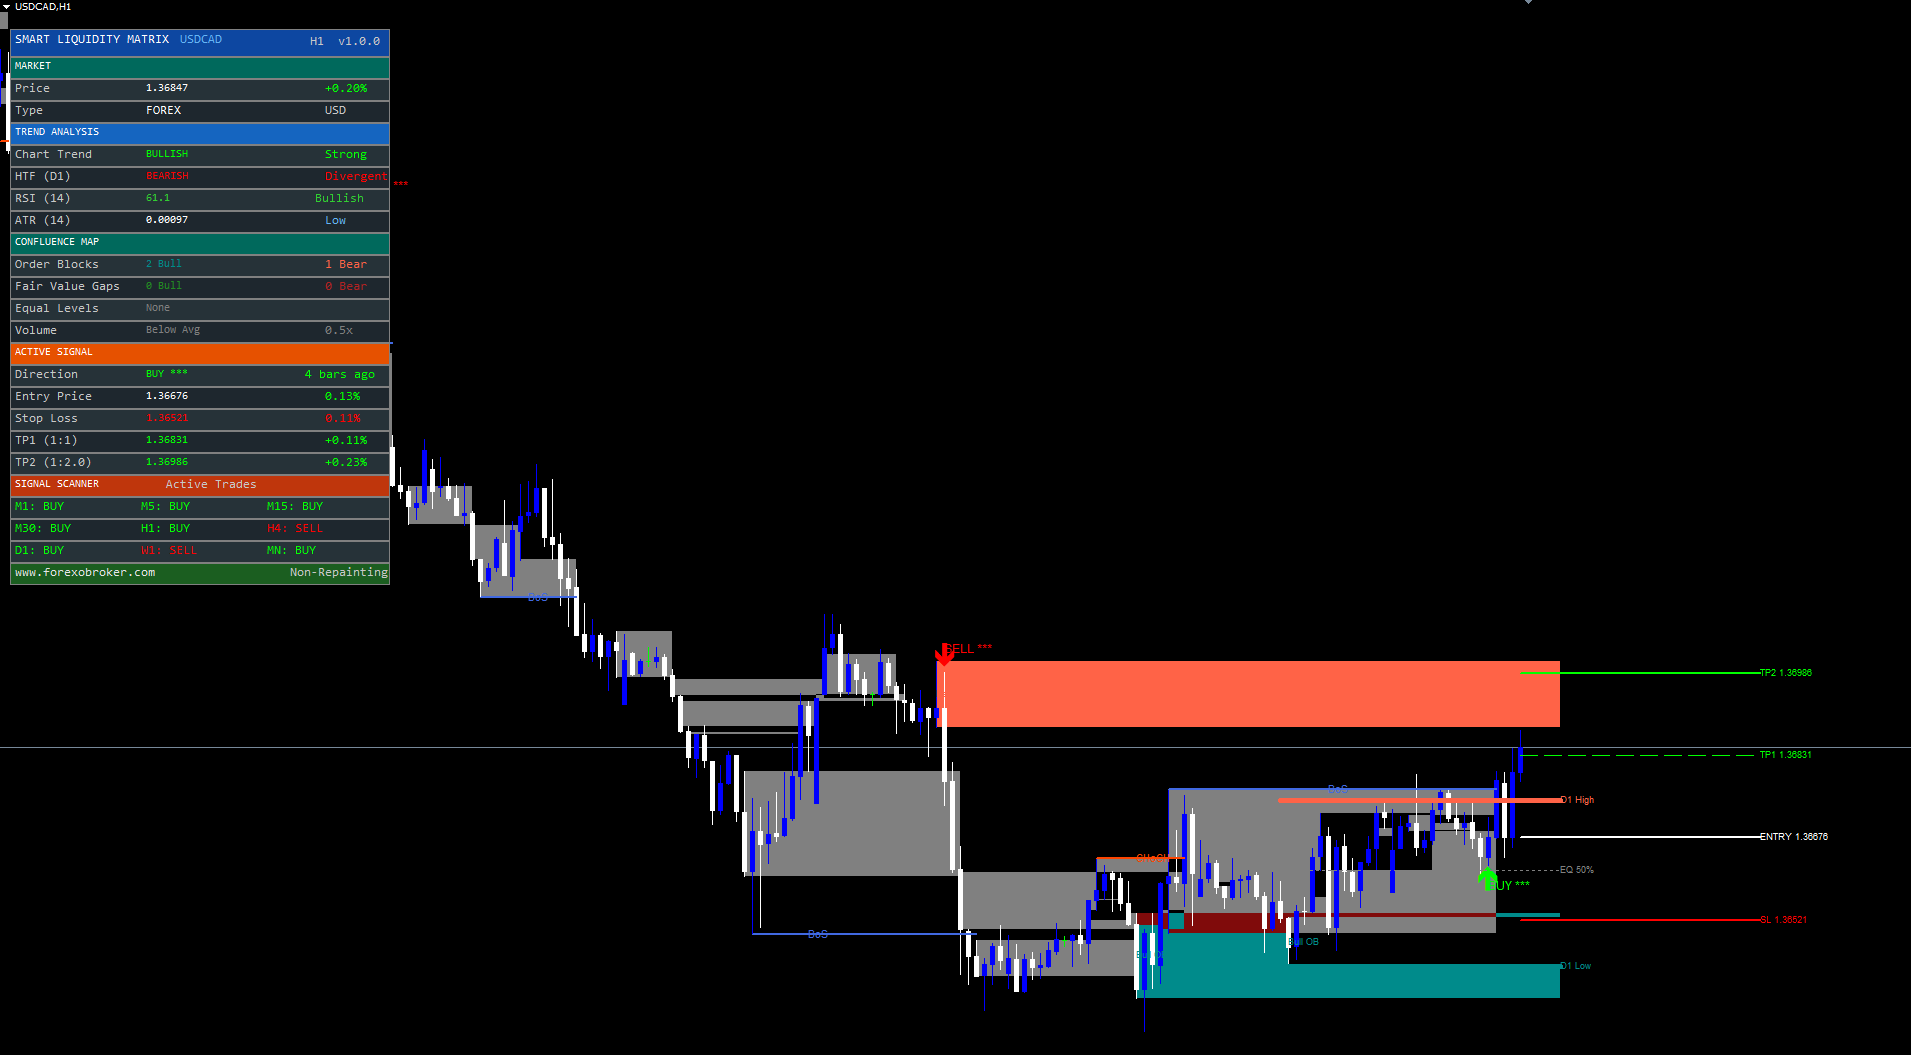
SL/TP Strains. When a sign fires, horizontal traces are drawn on the entry worth (white strong), cease loss (purple dashed), TP1 at 1:1 risk-reward (inexperienced dashed, skinny), and TP2 on the configured risk-reward ratio (inexperienced dashed, thick). These traces prolong ahead from the sign bar to supply ongoing visible reference.
Market Construction Settings
These parameters management swing detection and the show of Break of Construction and Change of Character occasions.
| Parameter | Default | Description |
|---|---|---|
| SwingLen | 5 | Variety of bars on both sides required for pivot affirmation. Decrease values (3-4) detect extra pivots on decrease timeframes. Greater values (8-10) detect solely main pivots for swing/place buying and selling |
| ShowBoS | true | Show Break of Construction traces on the chart. BoS occasions affirm pattern continuation |
| BosColor | clrRoyalBlue | Colour for BoS traces and labels |
| ShowCHoCH | true | Show Change of Character traces on the chart. CHoCH occasions sign potential pattern reversals |
| ChochColor | clrOrangeRed | Colour for CHoCH traces and labels |
| MaxStructLines | 5 | Most variety of construction traces displayed concurrently. Oldest traces are eliminated first when the restrict is reached |
How market construction works:
- When a brand new pivot excessive is confirmed, the present swing low is locked because the structural low
- When a brand new pivot low is confirmed, the present swing excessive is locked because the structural excessive
- A bullish break happens when a bar closes above the locked structural excessive
- If the earlier pattern was bearish, the break is assessed as CHoCH (reversal); in any other case it’s BoS (continuation)
- The identical logic applies in reverse for bearish breaks beneath the locked structural low
TIP: For M15-H1 charts, SwingLen = 5 offers a superb steadiness between sensitivity and reliability. For D1 and above, enhance to 8-10 to filter out minor swings and concentrate on vital structural pivots.
Order Block Settings
Order blocks are detected at confirmed pivot factors and drawn as rectangular zones extending ahead on the chart.
| Parameter | Default | Description |
|---|---|---|
| ShowBullOB | 3 | Variety of bullish order blocks to show (0 = disabled, max 10). Oldest blocks are eliminated when this restrict is reached |
| BullOBColor | clrDarkCyan | Colour for bullish order block borders and labels |
| ShowBearOB | 3 | Variety of bearish order blocks to show (0 = disabled, max 10) |
| BearOBColor | clrTomato | Colour for bearish order block borders and labels |
| OBScanBars | 5 | Variety of candles earlier than the pivot to scan for the OB candle. The indicator seems for the final opposing candle inside this vary |
Detection logic:
- At a confirmed pivot low, the indicator scans as much as OBScanBars candles earlier than the pivot for the primary bearish candle (shut < open). The excessive and low of that candle outline the bullish OB zone
- At a confirmed pivot excessive, the indicator scans for the primary bullish candle. Its excessive and low outline the bearish OB zone
- If no opposing candle is discovered throughout the scan vary, the pivot bar itself is used
Invalidation: A bullish OB is invalidated when a confirmed bar closes beneath its backside boundary. A bearish OB is invalidated when a bar closes above its high boundary. Invalidated blocks are grayed out and faraway from the lively depend.
NOTE: Setting ShowBullOB or ShowBearOB to 0 utterly disables detection for that facet. That is helpful if you wish to focus solely on FVGs or market construction with out OB muddle.
Honest Worth Hole Settings
Honest Worth Gaps are three-bar patterns the place the wicks of bar one and bar three don’t overlap, creating an untraded worth zone.
| Parameter | Default | Description |
|---|---|---|
| ShowBullFVG | 3 | Variety of bullish FVGs to show (0 = disabled, max 10) |
| BullFVGColor | clrForestGreen | Colour for bullish FVG zone borders |
| ShowBearFVG | 3 | Variety of bearish FVGs to show (0 = disabled, max 10) |
| BearFVGColor | clrFireBrick | Colour for bearish FVG zone borders |
Detection logic:
- Bullish FVG: The low of the present bar is greater than the excessive of two bars in the past, creating an upward hole
- Bearish FVG: The excessive of the present bar is decrease than the low of two bars in the past, making a downward hole
FVG zones are drawn as dashed rectangular outlines extending ahead from the center bar of the sample.
Invalidation: A bullish FVG is invalidated when a bar closes beneath its backside boundary. A bearish FVG is invalidated when a bar closes above its high boundary. Invalidated FVGs are grayed out and eliminated.
Sign Engine Configuration
The sign engine generates purchase and promote arrows based mostly on multi-condition confluence. These parameters management its conduct.
Core Sign Settings
| Parameter | Default | Description |
|---|---|---|
| EnableSignals | true | Grasp swap for the sign engine. Set to false to make use of Sensible Cash parts as pure evaluation instruments with out indicators |
| MinConfluence | 2 | Minimal confluence rating required to fireplace a sign (vary: 2-5). Greater values produce fewer however extra selective indicators |
| SignalCooldown | 20 | Minimal variety of bars between consecutive indicators. Prevents rapid-fire indicators throughout uneven situations |
Greater Timeframe Filter
| Parameter | Default | Description |
|---|---|---|
| UseHTF | true | Allow the upper timeframe EMA pattern filter. When enabled, the dashboard exhibits whether or not the HTF pattern aligns with or diverges from the chart pattern |
| HTFTF | PERIOD_D1 | The timeframe used for greater timeframe pattern analysis |
| HTFEmaLen | 50 | EMA interval on the upper timeframe. Value above this EMA = bullish HTF, beneath = bearish HTF |
How the HTF filter works: The indicator calculates an EMA of HTFEmaLen durations on the HTFTF timeframe. If the present worth is above this EMA, the HTF is assessed as bullish. If beneath, bearish. The dashboard shows “Aligned” (inexperienced) when the HTF agrees with the chart pattern course and “Divergent” (purple) after they battle.
TIP: For chart timeframes of M15-H1, use HTFTF = D1 with HTFEmaLen = 50. For H4 charts, think about HTFTF = W1. The HTF filter offers directional context however doesn’t instantly gate sign technology — it’s displayed within the dashboard for discretionary use.
Threat Administration
Sensible Liquidity Matrix calculates cease loss and take revenue ranges routinely for every sign based mostly on the structural context of the entry.
| Parameter | Default | Description |
|---|---|---|
| ShowSLTP | true | Show SL/TP/Entry traces on the chart when a commerce is lively |
| RRRatio | 2.0 | Threat-reward ratio for TP2 (vary: 1.0-5.0). TP1 is at all times at 1:1 |
| SLPadding | 0.2 | ATR multiplier for padding beneath/above the pivot used as SL anchor |
Cease Loss Validation Logic
The cease loss just isn’t positioned at a set distance from entry. As an alternative, it makes use of the structural pivot as an anchor:
- For BUY indicators: SL is positioned beneath the latest pivot low, minus SLPadding x ATR for respiration room
- For SELL indicators: SL is positioned above the latest pivot excessive, plus SLPadding x ATR
- Validation verify: If the pivot is on the incorrect facet of entry (pivot low above entry for a purchase, or pivot excessive beneath entry for a promote), the indicator falls again to 1.5 ATR from entry
- ATR cap: The utmost SL distance is capped at 2.0 ATR from entry, stopping excessively vast stops on devices with distant pivots
Take Revenue Calculation
| Stage | Formulation | Instance (SL distance = 50 pips) |
|---|---|---|
| TP1 | Entry + 1 x danger | 50 pips from entry |
| TP2 | Entry + RRRatio x danger | 100 pips from entry (at RRRatio = 2.0) |
The “danger” is the gap from entry to SL. A dealer can scale out at TP1 (shut half the place and transfer SL to breakeven) and let the rest run to TP2.
IMPORTANT: The cease loss validation ensures that the SL is at all times on the right facet of entry. A purchase sign won’t ever have a cease loss above the entry worth, and a promote sign won’t ever have a cease loss beneath entry. That is enforced programmatically within the sign engine.
Liquidity and Equal Ranges Settings
Equal highs, equal lows, and liquidity sweeps are key parts of the Sensible Cash framework. These parameters management their detection and show.
| Parameter | Default | Description |
|---|---|---|
| ShowEqLevels | true | Show Equal Highs and Equal Lows traces on the chart |
| EqHighColor | clrTomato | Colour for equal excessive traces and labels |
| EqLowColor | clrDarkCyan | Colour for equal low traces and labels |
| ShowLiqSweep | true | Spotlight liquidity sweep occasions with textual content labels |
| LiqSweepColor | clrMagenta | Colour for sweep labels |
Equal Ranges Detection: When the 2 most up-to-date swing highs are inside 0.1 ATR of one another, the indicator attracts a dotted horizontal line at their common worth, labeled “EQH.” The identical logic applies to equal lows, labeled “EQL.” These traces symbolize liquidity swimming pools the place cease orders cluster above (equal highs) or beneath (equal lows) the extent.
Liquidity Sweep Detection: A sweep happens when worth briefly exceeds an equal degree or earlier interval excessive/low however closes again on the unique facet. An upside sweep is detected when the bar’s excessive exceeds the extent however the shut is beneath it. A draw back sweep is the mirror. When detected, the indicator locations a “Sweep” label on the sweep level and fires an alert if alerts are enabled.
Earlier Interval Ranges
| Parameter | Default | Description |
|---|---|---|
| PrevPeriodTF | PERIOD_D1 | Timeframe for earlier interval excessive/low calculation |
| ShowPPH | true | Present earlier interval excessive line |
| PPHColor | clrTomato | Colour for earlier interval excessive |
| ShowPPL | true | Present earlier interval low line |
| PPLColor | clrDarkCyan | Colour for earlier interval low |
| ShowEquilibrium | true | Present 50% equilibrium degree between swing excessive and swing low |
The earlier interval ranges are drawn as horizontal traces extending throughout the chart. They use the finished bar (bar index 1) of the configured timeframe, so on a D1 setting they symbolize yesterday’s excessive and low. The equilibrium line is drawn on the midpoint between the present swing excessive and swing low, representing the 50% retracement degree.
NOTE: Earlier interval ranges function key reference factors for institutional buying and selling. Sweeps of the day prior to this’s excessive or low usually precede reversals, as establishments use these ranges to gather cease orders earlier than initiating directional strikes.
Dashboard Information
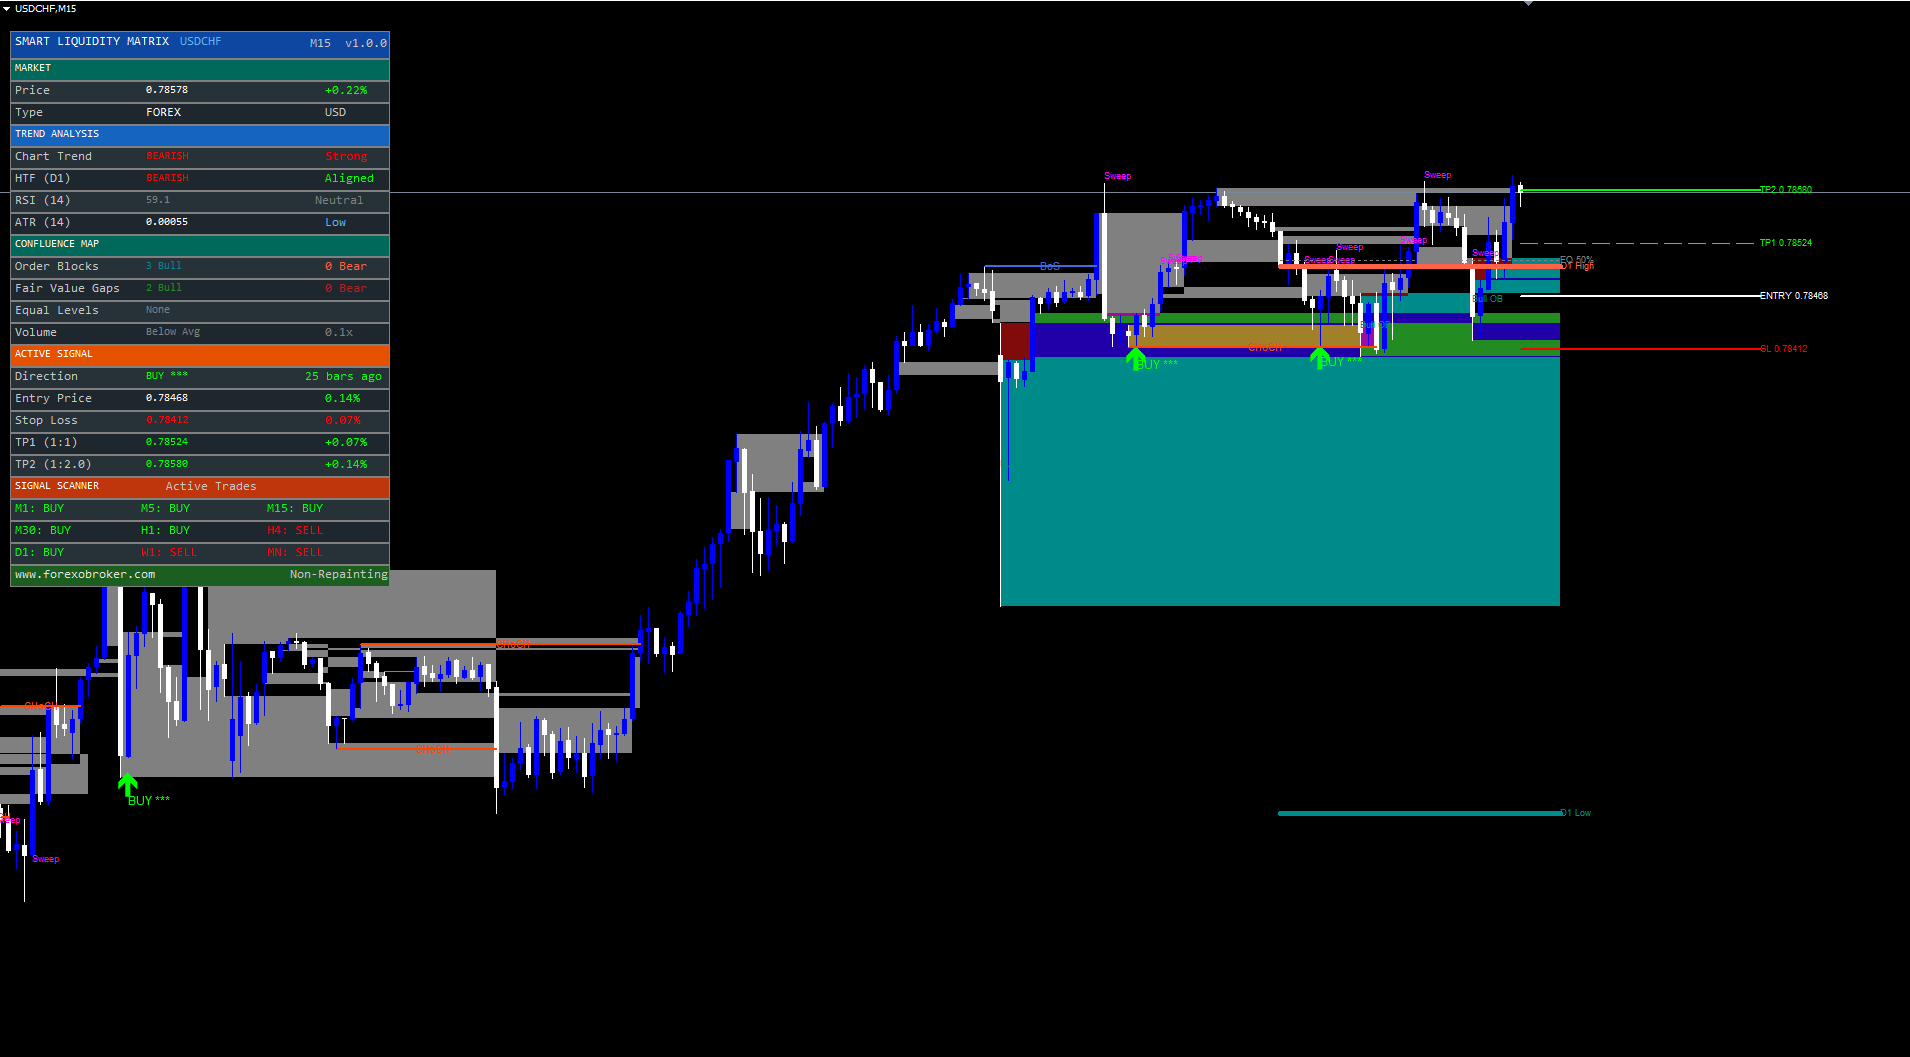
The premium dashboard is a five-section on-chart panel that gives a complete real-time overview of indicator state with out requiring visible chart interpretation.
Dashboard Settings
| Parameter | Default | Description |
|---|---|---|
| ShowDashboard | true | Present or cover the dashboard panel |
| DashPosition | Prime Left | Dashboard placement. Choices: Prime Proper, Prime Left, Backside Proper, Backside Left, Center Proper, Center Left |
Part 1: Market
| Row | Description |
|---|---|
| Value | Present shut worth with each day change proportion (inexperienced = optimistic, purple = unfavorable) |
| Kind | Instrument sort and account forex |
Part 2: Development Evaluation
| Row | Description |
|---|---|
| Chart Development | Market construction course (BULLISH / BEARISH / NEUTRAL) with power evaluation (Robust / Weak / Flat based mostly on EMA 20 vs EMA 50) |
| HTF Development | Greater timeframe EMA pattern (BULLISH / BEARISH / OFF) with alignment standing (Aligned / Divergent) |
| RSI (14) | Present RSI worth with zone label (Overbought / Oversold / Bullish / Bearish / Impartial) |
| ATR (14) | Present ATR worth with volatility classification (HIGH / Regular / Low) |
Part 3: Confluence Map
| Row | Description |
|---|---|
| Order Blocks | Depend of lively bullish and bearish OBs (e.g., “2 Bull” and “1 Bear”) |
| Honest Worth Gaps | Depend of lively bullish and bearish FVGs |
| Equal Ranges | Exhibits “EQH” and/or “EQL” when equal highs/lows are detected, with “Liquidity” tag |
| Quantity | Quantity standing relative to 20-bar SMA (HIGH / Above Avg / Under Avg) with multiplier ratio (e.g., “1.8x”) |
Part 4: Lively Sign
| Row | Description |
|---|---|
| Course | BUY (inexperienced), SELL (purple), or WAITING (grey), with star ranking and bars-since-signal depend |
| Entry Value | Sign entry worth with dwell P&L proportion |
| Cease Loss | SL worth (purple) with distance as proportion of entry |
| TP1 (1:1) | TP1 worth (inexperienced) with proportion achieve |
| TP2 (1:R) | TP2 worth (inexperienced) with proportion achieve, the place R = configured RRRatio |
Part 5: Sign Scanner
A 3×3 grid displaying EMA 20/50 pattern course for all 9 normal timeframes:
| Row | Timeframes |
|---|---|
| Row 1 | M1, M5, M15 |
| Row 2 | M30, H1, H4 |
| Row 3 | D1, W1, MN |
Every cell shows “BUY” (inexperienced) or “SELL” (purple) based mostly on whether or not EMA 20 is above or beneath EMA 50 on that timeframe.
The dashboard footer shows the Forexobroker web site URL and a “Non-Repainting” affirmation label.
TIP: If the dashboard overlaps with worth motion, change DashPosition to a special nook or facet. On decrease timeframes with frequent worth motion, Prime Left or Center Left retains the dashboard away from the latest candles.
Alert Configuration
Sensible Liquidity Matrix helps three alert supply channels and 11 distinct alert occasions.
Alert Channels
| Parameter | Default | Description |
|---|---|---|
| EnableAlerts | true | Grasp swap for all alerts (popup + sound) |
| EnablePush | true | Ship push notifications to the MetaTrader cellular app |
| EnableEmail | false | Ship e mail notifications |
Alert Occasions
The indicator fires alerts for the next occasions (dwell bars solely, one alert per occasion per bar):
| Alert Occasion | Instance Message | ||
|---|---|---|---|
| Purchase Sign | `Sensible Liquidity Matrix: BUY sign on EURUSD H1 | Rating: 3/5 | Value: 1.08542` |
| Promote Sign | `Sensible Liquidity Matrix: SELL sign on EURUSD H1 | Rating: 3/5 | Value: 1.08542` |
| Bullish BoS | SLM: Bullish BoS on EURUSD H1 | ||
| Bearish BoS | SLM: Bearish BoS on EURUSD H1 | ||
| Bullish CHoCH | SLM: Bullish CHoCH on EURUSD H1 | ||
| Bearish CHoCH | SLM: Bearish CHoCH on EURUSD H1 | ||
| Upside Sweep | SLM: Upside liquidity sweep on EURUSD H1 | ||
| Draw back Sweep | SLM: Draw back liquidity sweep on EURUSD H1 | ||
| TP1 Hit | Fires when worth reaches the primary take revenue degree | ||
| TP2 Hit | Fires when worth reaches the second take revenue degree | ||
| SL Hit | Fires when the cease loss is reached |
Webhook JSON Instance
For third-party platforms that settle for webhook payloads, the alert messages might be parsed from the usual alert textual content. A typical webhook integration would extract:
{ “indicator”: “Sensible Liquidity Matrix”, “sign”: “BUY”, “image”: “EURUSD”, “timeframe”: “H1”, “rating”: “3/5”, “worth”: 1.08542 }
Enabling Push Notifications
- Set up the MetaTrader cellular app in your cellphone (iOS or Android)
- Open the app and navigate to Settings > Messages
- Copy your MetaQuotes ID
- Within the desktop MetaTrader, go to Instruments > Choices > Notifications
- Enter your MetaQuotes ID and allow notifications
- Guarantee EnablePush = true within the indicator settings
Enabling E mail Notifications
- In MetaTrader, go to Instruments > Choices > E mail
- Test Allow
- Enter your SMTP server, port, login, password, and vacation spot e mail handle
- Click on Take a look at to confirm the configuration
- Set EnableEmail = true within the indicator settings
Lite Mode
The LiteMode parameter (default: false) reduces the visible complexity of the indicator for cleaner chart show, particularly helpful on decrease timeframes the place many components can overlap.
When Lite Mode is enabled:
- Order block borders are drawn with 1-pixel width as a substitute of two
- Equal excessive/low traces use solely the dotted fashion with out the thick background line
- Earlier interval degree traces use dashed fashion with 1-pixel width as a substitute of strong with 2-pixel width
- Construction traces are drawn at 1-pixel width
- All core detection and sign logic stays unchanged — solely the visible weight of drawn objects is lowered
TIP: Allow Lite Mode on M5 and M15 charts the place order blocks, FVGs, and construction traces can create visible muddle. Disable it on H4 and D1 the place fewer components seem and the thicker traces enhance visibility.
Troubleshooting and FAQ
Q: Does the indicator repaint?
A: No. All indicators, order blocks, FVGs, and construction traces are calculated on confirmed (closed) bars solely. As soon as a component seems on the chart, it’s everlasting. The indicator evaluates bar information at shift = 1 (probably the most just lately accomplished bar) and by no means modifies objects positioned on earlier bars. On first load, a historical past scan processes all accessible bars to reconstruct the state, which produces the identical outcomes as if the indicator had been working dwell all through the whole chart historical past.
Q: What markets does it work on?
A: Sensible Liquidity Matrix works on any instrument accessible in MetaTrader: Foreign exchange pairs, Crypto CFDs, Shares, Indices, Commodities, and Metals. The indicator makes use of ATR-based calculations that routinely adapt to every instrument’s volatility and worth scale. No guide adjustment is required when switching between devices.
Q: What timeframes work greatest?
A: The indicator is purposeful on all timeframes from M1 to MN. For the sign engine, M15, H1, and H4 present the most effective steadiness between sign frequency and sign high quality. For the visible Sensible Cash parts (order blocks, FVGs, construction), H1 and H4 produce probably the most clearly outlined zones. Decrease timeframes (M5, M15) could profit from Lite Mode and lowered OB/FVG counts to keep away from chart muddle.
Q: No indicators are showing on my chart.
A: Test the next so as:
- Guarantee EnableSignals = true within the settings
- The sign engine requires EMA 20/50 alignment plus a pivot zone retest — these situations could not have occurred within the seen chart vary. Scroll again in historical past to verify for indicators on earlier bars
- Confirm the chart has adequate historic information. The indicator requires at the least 60 bars plus the warmup interval for EMA and ATR calculations. If the chart is usually empty, enhance the Max Bars in Chart setting in MetaTrader’s Choices
- The SignalCooldown parameter (default: 20) prevents indicators for 20 bars after every sign. On greater timeframes, this may imply a number of days between indicators
- The one-trade-at-a-time rule means a brand new sign can not fireplace till the present commerce closes through SL, TP, or EMA crossover reversal
Q: Why do some timeframes present indicators however others do not?
A: That is regular and by design. The sign engine requires ALL of the next situations to align concurrently on a confirmed (closed) bar:
- EMA Development: EMA(20) have to be clearly above EMA(50) for BUY, or beneath for SELL. On timeframes the place the market is ranging or the EMAs are flat/crossing, no sign can fireplace.
- Pivot Zone Retest: Value should pull again to inside 0.3 x ATR of the final swing low (for BUY) or swing excessive (for SELL). In robust momentum strikes with no pullback, no entry zone is reached.
- Confirming Candle: The bar should shut bullish (Shut > Open) for BUY or bearish (Shut < Open) for SELL.
- RSI Filter: RSI(14) should not be overbought (< 70 for BUY) or oversold (> 30 for SELL).
- No Lively Commerce: Just one commerce is tracked at a time. A brand new sign can not fireplace till the earlier commerce closes through SL hit, TP hit, or EMA pattern reversal.
Completely different timeframes have completely different market situations. A 15-minute chart would possibly present a transparent downtrend with SELL indicators whereas the 4-hour chart continues to be ranging with no indicators. Use the Sign Scanner within the dashboard to see which timeframes presently have lively indicators with out switching charts manually.
Q: Order blocks seem however are instantly grey.
A: Grey order blocks have been invalidated. A bullish OB is invalidated when a bar closes beneath its backside boundary. Test the historic bars after the OB was created — if worth moved by the zone, invalidation is right. Enhance SwingLen to detect OBs at extra vital pivots which can be much less more likely to be instantly invalidated.
Q: The dashboard just isn’t seen or is off-screen.
A: Strive altering DashPosition to Prime Left . The dashboard computes its place from chart dimensions and adjusts routinely on resize. If the chart window could be very small, the dashboard could not match. Resize the chart to at the least 400 pixels vast and 600 pixels tall. You can too briefly disable the dashboard with ShowDashboard = false to confirm that the indicator itself is working appropriately.
Q: Can I exploit this indicator for automated buying and selling (EA)?
A: Sensible Liquidity Matrix is a customized indicator, not an Knowledgeable Advisor. It doesn’t execute trades. Nonetheless, you should use the sign arrows and SL/TP ranges as the premise for a separate EA. The indicator writes to 2 buffers: buffer 0 for purchase indicators and buffer 1 for promote indicators. An EA can learn these buffers utilizing iCustom() to detect indicators programmatically.
Q: Why does the scanner present completely different outcomes than anticipated?
A: The scanner makes use of EMA 20/50 crossover standing on confirmed bars (bar index 1) for every timeframe. In case you are trying on the present forming bar on a type of timeframes, the EMA relationship could change earlier than the bar closes. The scanner intentionally makes use of bar 1 (confirmed) information for consistency with the indicator’s non-repainting structure.
Obtain the indicator:

