

About:
The Elder-Ray indicator is among the most neglected but highly effective instruments in a dealer’s arsenal.
It really works like an X-ray machine for markets—permitting you to see beneath the floor worth actions to know the true battle between consumers and sellers.
At its core, Bull Energy measures how strongly consumers push costs upward from a baseline, whereas Bear Energy reveals how aggressively sellers push costs downward.
By monitoring these forces, you achieve perception into market management that straightforward worth motion alone can’t present. This information will enable you perceive how the Elder Ray Index Indicator works, how you can interpret it successfully, and how you can use it as a part of your buying and selling technique.

Options Overview
- Bull and Bear Energy Visualization: Histograms or Strains or Bands
- Mixed Bull/Bear Energy (BBP) Mode: To see the web energy steadiness
- Customise Colours: for fast sample recognition
- Smoothing (Elective): reduces noise for cleaner alerts
- Further Filter Choices:
- Value Divergence visualization to identify potential reversals
- Linear Regression smoothing for pattern affirmation
- Coloured DMI integration for pattern power validation
- Customizable Alerts: Get notified when Bull and Bear Energy cross
What’s Bull and Bear Energy?
The Idea: X-Ray Imaginative and prescient for Markets
Think about markets as a tug-of-war between two forces: consumers (bulls) and sellers (bears). The day by day excessive worth reveals the utmost energy consumers achieved, and the day by day low reveals the utmost energy sellers achieved. However how do we all know if these costs are literally sturdy? Dr. Elder solved this by evaluating highs and lows in opposition to a 13-period Exponential Transferring Common (EMA)—which represents the market’s consensus of truthful worth. Here is the easy method:
- Bull Energy = Each day Excessive − 13-period EMA
- Bear Energy = Each day Low − 13-period EMA
What This Tells You
- Optimistic Bull Energy: Patrons are pushing costs above what the market considers truthful worth
- Destructive Bull Energy: Patrons have misplaced management; costs cannot even attain the consensus worth
- Optimistic Bear Energy: Sellers have taken over; costs are beneath truthful worth (uncommon state of affairs)
- Destructive Bear Energy: That is regular; sellers are pushing costs beneath the consensus (anticipated)
When Bull Energy is optimistic and Bear Energy is detrimental—that is a wholesome, trending market. When these flip, it alerts weak spot or potential reversals.
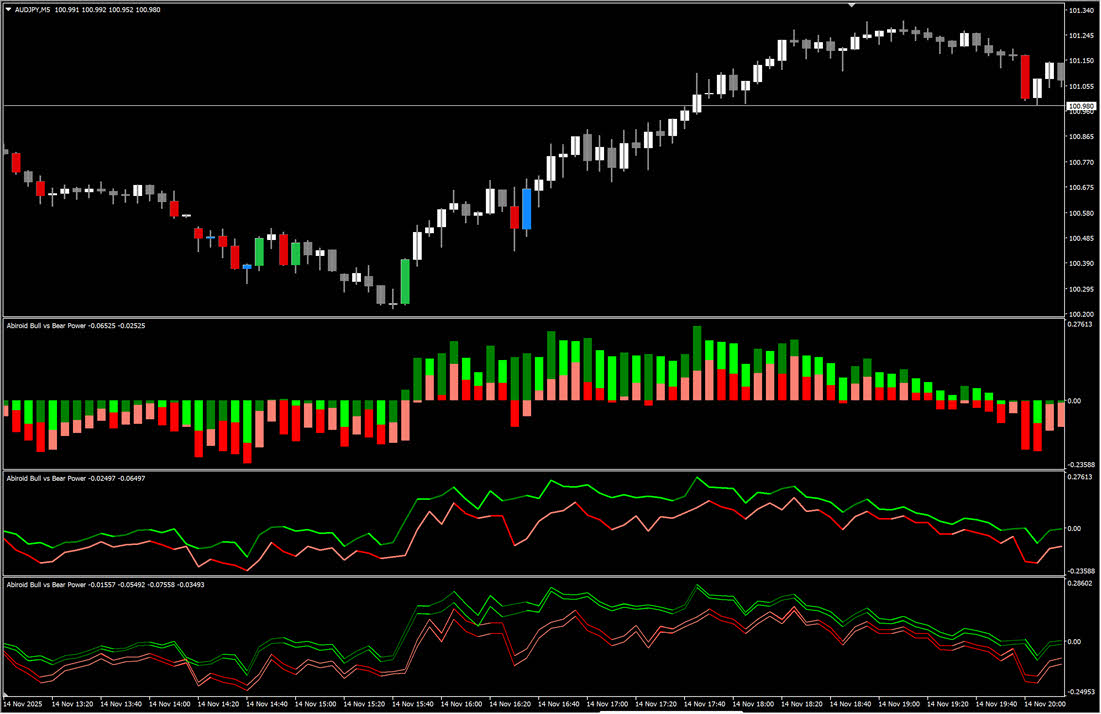
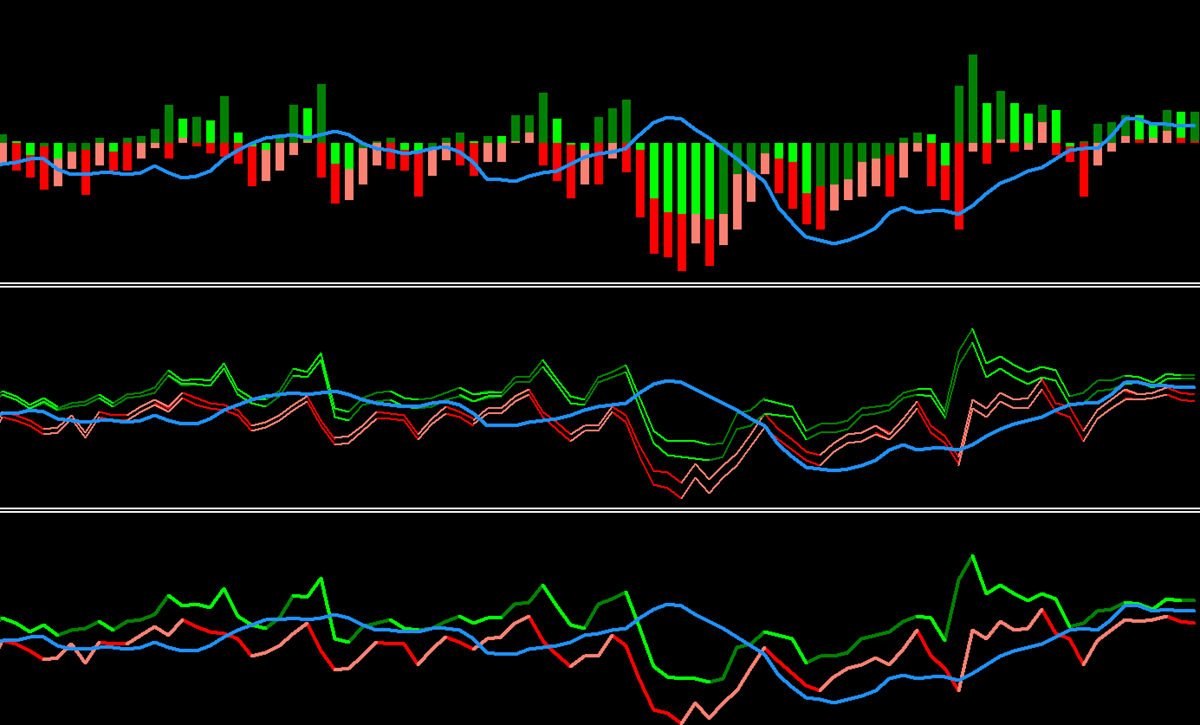
Further Indicators (Blue Line):
1. ADX Coloured DMI Line
Goal: Exhibits the route of market momentum (bull vs bear pattern power)
What it reveals: A blue line that goes optimistic when bulls are pushing up, detrimental when bears are pushing down. The road itself signifies momentum route with out requiring the primary Bull/Bear Energy traces.
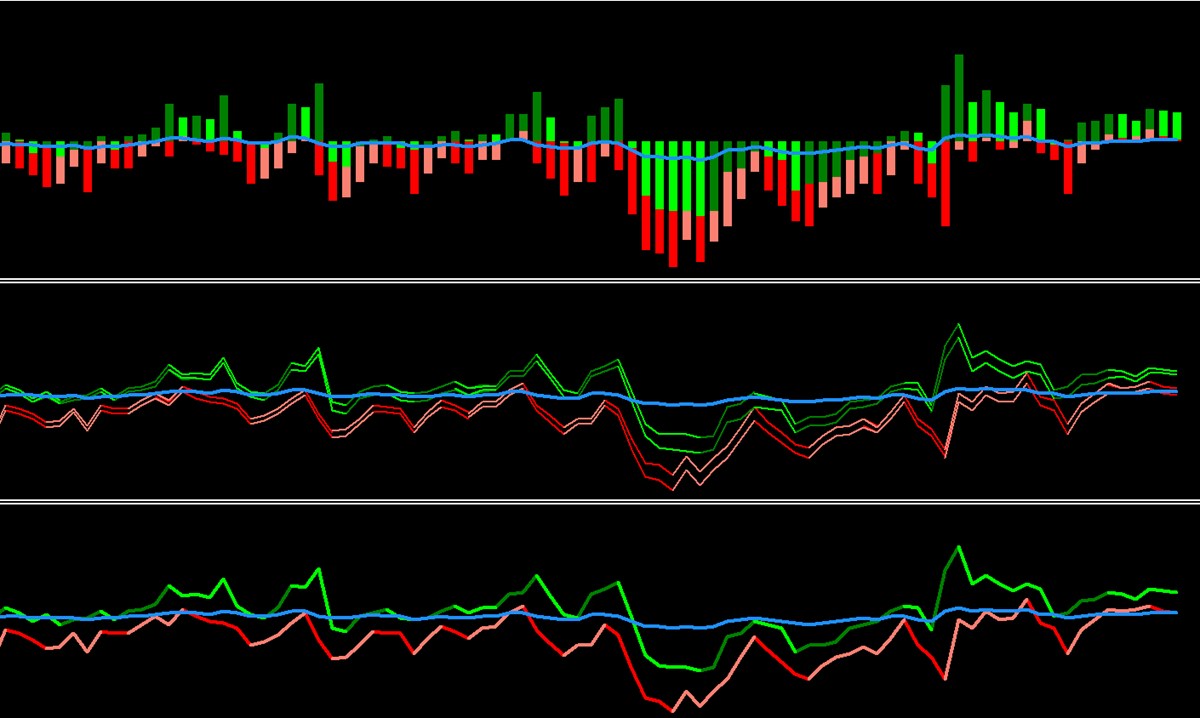
2. Value Divergence/Convergence
Goal: Exhibits how far the present worth has moved away from its “truthful worth”
What it reveals: Optimistic values = worth above truthful worth (overbought), Destructive values = worth beneath truthful worth (oversold). Extra reactive and responsive to cost modifications.
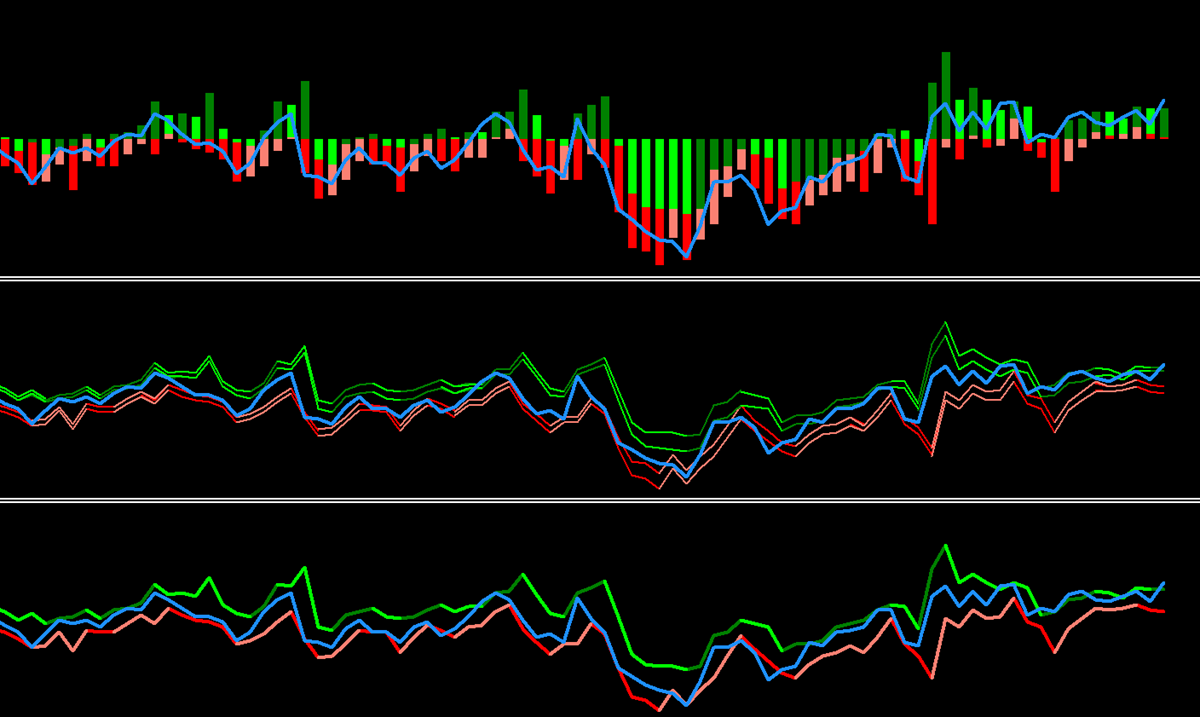
3. Least Squares Value Divergence
Goal: Identical as #2 however smoothed utilizing a pattern line to filter out noise
What it reveals: Identical idea as #2, however the linear regression removes short-term noise and reveals the underlying pattern extra clearly. Much less reactive however cleaner.
Key Variations:
DMI: Exhibits momentum route (which approach worth is transferring)
Value Div: Uncooked “how removed from truthful worth” – responsive however noisy
Least Squares Div: Smoothed “how removed from truthful worth” – cleaner however slower to react
Essentially the most used of those settings have predefined presets that you need to use.
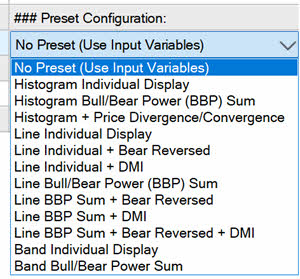
Show Presets:
No Preset: means use Enter Variables
Vital Screenshots to point out the variations – Preset Listing:
The best way to Use Bull and Bear Energy
Getting Began: The Fundamentals
- Load the indicator on any forex pair, inventory, or commodity chart
- Search for the horizontal zero line—that is your reference level (create a degree 0 in properties)
- Observe the colours: Inexperienced/mild colours present power, Purple/darkish colours present weak spot or transitions
- Verify positioning:
- Bull Energy above zero = consumers in management
- Bear Energy beneath zero = sellers in management (regular state)
- Look ahead to excessive values: When both energy will get very excessive or very low, reversals usually comply with
Studying the Alerts: Three Key Insights
Sign 1: Energy Crossover When Bull Energy crosses above Bear Energy (particularly, Bull crosses above -Bear), that is an alignment sign. Patrons and sellers are shifting positions, creating potential commerce alternatives. Sign 2: Energy Power Adjustments Look ahead to rising or reducing depth within the colours. Darker/stronger colours imply energy is constructing. Lighter/weaker colours imply that energy is diminishing. This reveals if a transfer is accelerating or shedding steam. Sign 3: Excessive Divergence When Bull Energy varieties decrease highs whereas worth makes decrease lows, or Bear Energy varieties greater lows whereas worth makes greater highs, divergences sign potential reversals.
Greatest Practices for Buying and selling
Cease Loss Placement:
- Place stops past current reversal factors the place the alternative energy (Bear for longs, Bull for shorts) reveals excessive power
- In pattern affirmation, place stops simply past the place the facility traits change coloration/route
- Regulate stops wider in high-volatility environments; tighter in low-volatility situations
Take Revenue Ranges:
- Scale out when the dominant energy begins exhibiting indicators of weak spot (coloration modifications from darkish to mild)
- Take partial income when Bear Energy (for lengthy trades) returns to zero—early warning of momentum loss
- Exit when the facility visibly exhausts (highest excessive/lowest low within the indicator)
Threat Administration:
- Use Bull and Bear Energy to measurement positions: stronger energy readings justify bigger positions
- Keep away from buying and selling when each powers are weak—this means indecision
- Be cautious when the facility indicators present excessive values; reversals usually comply with extremes
Fast Settings Cheat Sheet
| Buying and selling Type | Timeframe | Advisable Show | Smoothing | Key Perception |
|---|---|---|---|---|
| Scalping | 5m / 15m | Histogram | 1 (None) | React shortly to each energy shift; tight entries/exits |
| Day Buying and selling | 15m / 1h | Line | 1–3 | Steadiness responsiveness with noise filtering |
| Swing Buying and selling | 4h / Each day | Band | 3–5 | Use bands to gauge help/resistance from energy extremes |
| Place Buying and selling | Each day / Weekly | Band | 5+ | Deal with main energy reversals; ignore minor fluctuations |
| Contrarian/Reversal | 1h / 4h | Histogram | 1 | Search for excessive energy readings and divergences |
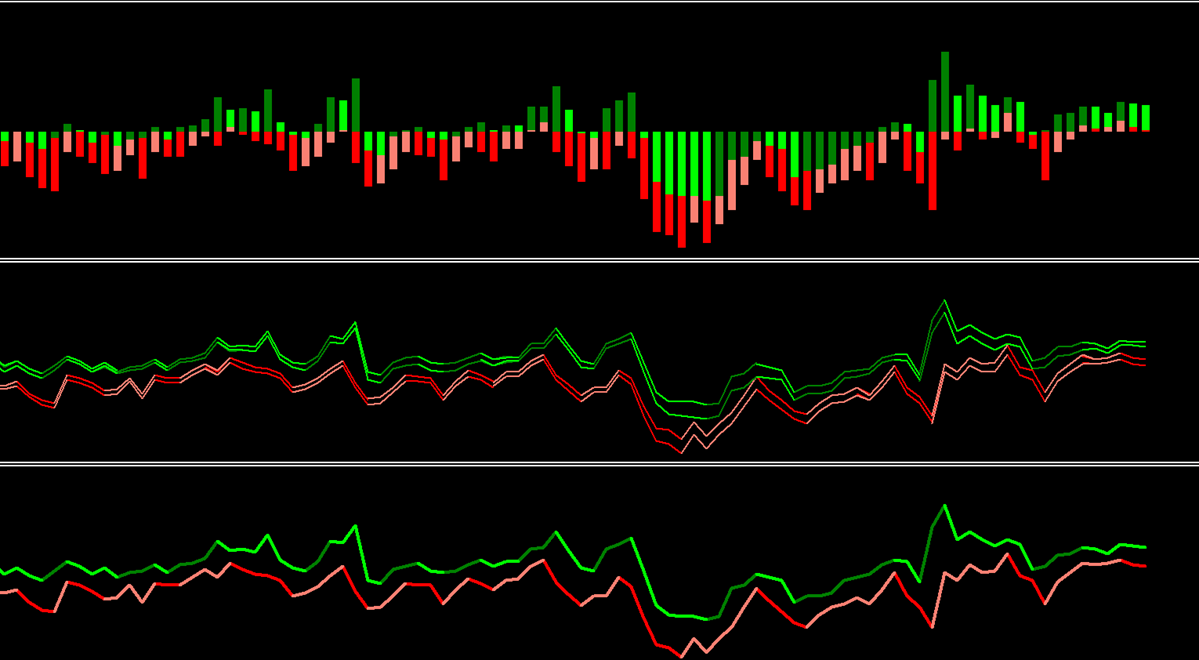
Show Mode Breakdown:
- Histogram: Greatest for seeing particular person bar power; best to identify modifications in depth
- Line: Greatest for monitoring easy traits and crossovers; much less visible muddle
- Band: Greatest for understanding volatility context; higher/decrease bands present potential extremes
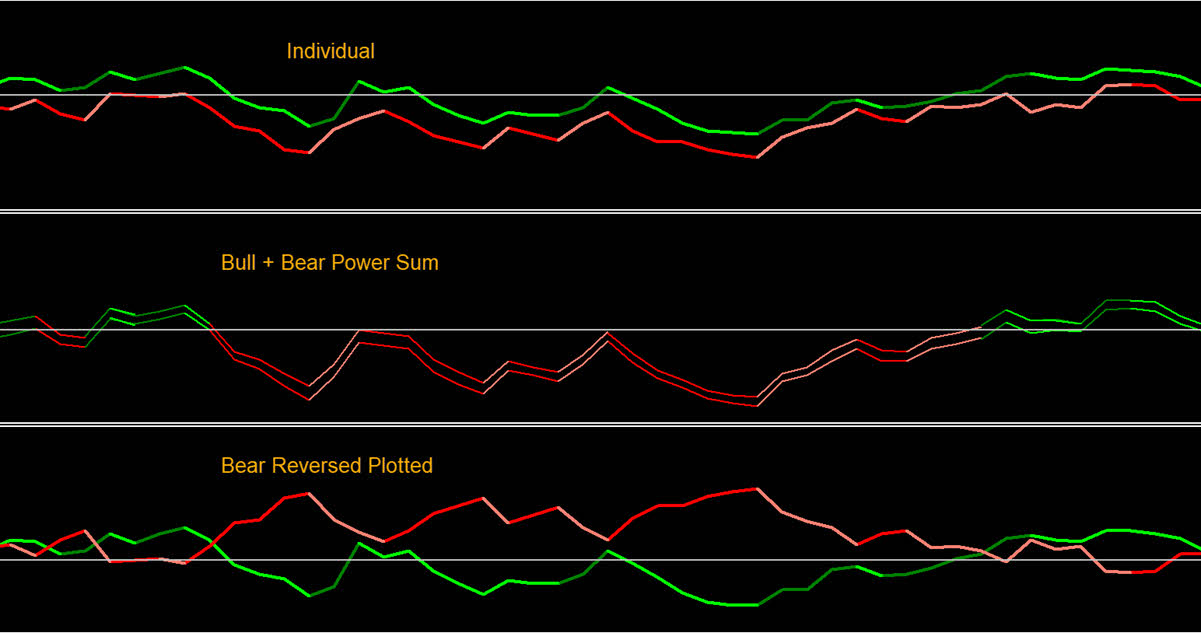
Histogram or Line or Bands – Particular person Show:
Variations: “Band Particular person Show” vs “Bull Bear energy Sum” vs “Reverse Bear Energy Plotting”:

Identical for line all 3 choices:
Widespread Buying and selling Situations
Situation 1: Confirming an Uptrend
- Market is in clear uptrend (EMA sloping up)
- Bull Energy constantly stays optimistic
- Bear Energy stays detrimental however enhancing (getting much less detrimental)
- Motion: Development-following longs on pull-backs the place Bear Energy bounces again into detrimental territory
Situation 2: Recognizing Weakening Bulls
- Bull Energy was sturdy however now exhibiting lighter colours / decrease highs
- Value nonetheless makes greater highs, however Bull Energy makes decrease highs
- Motion: Take income; this divergence alerts the bullish momentum is ending. Put together for reversal.
Situation 3: Reversal Sign – Bull/Bear Cross
- Bull Energy crosses above -Bear Energy
- Market was in downtrend; this crossover alerts transition
- Motion: Look ahead to pattern reversal; contemplate entry on the following Bull Energy affirmation bar
Situation 4: Vary-Certain Markets
- Each Bull and Bear Energy oscillate round zero
- No constant optimistic or detrimental values
- Colours consistently swap between rising and falling states
- Motion: Play bounces between extremes; use bands as resistance/help zones; skip if not a range-trader
How It Works: Calculations Defined
The Three Core Elements
Element 1: The EMA Basis (13-Interval) The indicator begins by calculating a 13-period Exponential Transferring Common of closing costs. This represents the market’s consensus of truthful worth—a “center floor” each bulls and bears are combating round. In easy phrases: Think about 13 merchants pooling their opinions on what the truthful worth must be. This EMA is their collective conclusion. Element 2: Bull Energy (Excessive − EMA) As soon as now we have the consensus worth, we ask: “How far above this consensus did the day by day excessive attain?”
- Excessive EMA values = Patrons pushed strongly above consensus (conviction)
- Low/Destructive values = Patrons could not overcome the consensus (weak spot)
In easy phrases: In the event you anticipate milk to price $2 (consensus), however it prices $2.50 (excessive), that is sturdy bull energy. If it prices $1.80, consumers have misplaced management. Element 3: Bear Energy (Low − EMA) Equally, we ask: “How far beneath consensus did the day by day low attain?”
- Very Destructive values = Sellers pushed strongly beneath consensus (sturdy promoting conviction)
- Much less Destructive or Optimistic values = Sellers are weakening
In easy phrases: If the identical milk reaches $1.50 in low buying and selling (consensus is $2), that is sturdy bear energy at work. If it solely drops to $1.90, sellers are weak.
How These Elements Work Collectively
Here is the whole stream:
- Calculate the 13-period EMA from closing costs = Market Consensus
- Calculate Bull Energy from at this time’s excessive in comparison with that consensus
- Calculate Bear Energy from at this time’s low in comparison with that consensus
- Apply non-obligatory smoothing (default = no smoothing) to filter noise
- Calculate Mixed BBP (non-obligatory) = Bull Energy + Bear Energy (reveals web steadiness)
- Show utilizing your chosen visualization (histogram/line/band)
The great thing about this method: It robotically normalizes to the market’s present worth degree. A 5-point transfer has completely different that means in a $100 asset vs. a $10 asset, however Bull/Bear Energy robotically adjusts by the EMA comparability.
Filtering and Smoothing
Why Smoothing? Uncooked energy values will be uneven, creating false alerts. Elective smoothing applies an EMA to the facility values themselves, making a cleaner image.
- No smoothing (size = 1): Each bar’s energy change is straight away seen; helpful for scalpers
- Gentle smoothing (size = 3–5): Filters very minor fluctuations; good for day merchants
- Heavy smoothing (size = 10+): Exhibits solely main energy shifts; helpful for place merchants
Commerce-off: Extra smoothing = fewer false alerts BUT delayed sign recognition.
Sensitivity and Adjustment
Altering EMA Size (default = 13):
- Shorter EMA (e.g., 9): Sooner-moving consensus; energy values react faster to current worth motion
- Longer EMA (e.g., 21): Slower-moving consensus; energy values easy naturally with out express smoothing
Altering Smoothing Size (default = 1):
- Enhance smoothing: Cleaner, slower alerts
- Lower smoothing (or set to 1): Sooner, noisier alerts
Identical chart proven twice—one with default settings, one with longer EMA/smoothing. Exhibits how alerts differ in timing and readability
Superior Function: Value Divergence/Convergence
The indicator can optionally present “Value Divergence”—the space of present worth from the market consensus. This helps visualize if worth is stretched removed from truthful worth (more likely to revert) or near consensus (balanced).
Settings Defined

Major Settings
EMA Size
- Default: 13
- Vary: 2–50 (really useful)
- What it controls: How shortly the “consensus worth” responds to market modifications
- When to regulate:
- Use 9 for sooner markets (5m/15m scalping)
- Use 21 for slower-moving markets (day by day swing buying and selling)
- Use 13 as a impartial/normal setting
- Impact: Shorter = extra unstable energy readings; Longer = smoother readings
Plot as Sum of Bull and Bear Energy (DispBbp)
- Default: Off (disabled)
- What it controls: Whether or not to show Bull/Bear individually or mixed as one line (BBP)
- When to make use of:
- Off: Higher for understanding particular person purchaser/vendor power (conventional view)
- On: Higher for seeing web energy steadiness; cleaner chart with single line
- Impact: Adjustments from 2 indicators to 1; visible simplification
Show As
- Histogram: Visible bars above/beneath zero
- Line: Linked line chart
- Band: Higher and decrease channel exhibiting volatility context
- Which to make use of:
- Histogram: Best to see particular person bar power; finest for entry/exit timing
- Line: Cleanest chart; simpler to identify crossovers and traits
- Band: See volatility extremes; helpful for cease/revenue goal placement
Reverse Bear Energy Plotting (RevBear)
- Default: Off
- What it controls: Flips Bear Energy the wrong way up for some visible evaluation preferences
- When to make use of: In the event you want Bear Energy to reflect Bull Energy (each above zero when in energy steadiness)
- Impact: Purely visible; does not change calculations
Smoothing Size
- Default: 1 (no smoothing)
- Vary: 1–20
- What it controls: How a lot EMA smoothing is utilized to the ultimate energy values
- When to regulate:
- 1 (no smoothing): Quick, responsive alerts; good for energetic buying and selling
- 3–5: Balanced; good for day buying and selling
- 7+: Filters out noise; good for swing buying and selling and figuring out main reversals
- Impact: Larger = smoother, slower alerts; Decrease = noisy, sooner alerts
Further Indicator Possibility
- ADDINDI_NONE (Default)
- Simply Bull/Bear Energy; no further overlays
- ADDINDI_PRICE_DIV
- Exhibits distance of worth from consensus (blue line)
- Use to determine if worth is stretched (more likely to revert) or balanced
- Enhances Bull/Bear Energy properly
- ADDINDI_LINREG_DIV
- Linear regression of worth divergence; smoother model
- Greatest for swing merchants who need trend-smoothed divergence view
Shade Settings
- Bull Shade Rising: Inexperienced for rising Bull Energy (consumers strengthening)
- Bull Shade Falling: Gentle inexperienced for falling Bull Energy (consumers weakening)
- Bear Shade Rising: Purple for rising Bear Energy power (sellers energetic)
- Bear Shade Falling: Gentle purple for falling Bear Energy (sellers weakening)
- DMI Development Power: Further coloring if utilizing CDMI filter
Customise colours to match your chart theme and private choice.
Alert Settings
Alerts when Bull/Bear Energy cross (Bull crosses -Bear)
And alerts for crossing 0.
Ideas for Most Effectiveness
Widespread Errors to Keep away from
Mistake 1: Buying and selling on Energy Values Alone Bull/Bear Energy reveals power, not route. A powerful Bull Energy studying can nonetheless result in losses if:
- Value is already at an excessive (reversal probably)
- The pattern is about to interrupt
- Answer: Mix with pattern affirmation (EMA slope, current worth motion, greater timeframe context)
Mistake 2: Ignoring the Zero Line The zero line is essential context. Buying and selling Bull Energy when it is optimistic is sensible; when it is detrimental, purchaser conviction is missing.
- Answer: Let zero line be your information. Optimistic Bull Energy = purchaser management. Destructive = vendor management or transition.
Mistake 3: Utilizing Default EMA Size With out Testing The 13-period EMA is normal, however not optimum for all devices/timeframes.
- Answer: Check completely different EMA lengths (9, 13, 21) in your most popular timeframe/instrument. Use the one that provides clearest alerts.
Mistake 4: Over-Smoothing and Lacking Entries An excessive amount of smoothing delays alerts, inflicting you to overlook early entries.
- Answer: Discover the steadiness—use simply sufficient smoothing to remove apparent false alerts however not a lot that entries lag.
Mistake 5: Buying and selling When Energy Indicators Are Weak Low, flat Bull/Bear Energy readings point out indecision. Buying and selling right here usually results in whipsaws.
- Answer: Look forward to energy to construct conviction earlier than buying and selling. Clear, rising energy = clear commerce setup.
Combining with Different Ideas
With Development Affirmation:
- Use EMA slope as your major pattern filter
- Use Bull/Bear Energy to determine pullback entry factors
- Instance: Uptrend (EMA rising) + Bear Energy bouncing from beneath zero = potential lengthy
With Assist/Resistance:
- Use Band show mode to determine excessive energy zones
- High of higher band = potential resistance
- Backside of decrease band = potential help
With Divergences:
- Value makes decrease lows, however Bull/Bear Energy makes greater lows = reversal sign (bullish divergence)
- Value makes greater highs, however Bull/Bear Energy makes decrease highs = reversal sign (bearish divergence)
Market Situations
Works Effectively:
- Trending Markets (sturdy, constant energy): Trip the dominant energy; commerce in its route
- Unstable Markets: Band mode helps determine extremes for reversal buying and selling
- Liquid Markets (foreign exchange, main indices): Energy readings are clearer, fewer gaps
Be Cautious:
- Vary-bound/Uneven Markets: Energy oscillates randomly; whipsaws probably
- Low-Liquidity Markets: Spikes and gaps distort energy readings
- Round Main Information Occasions: Volatility spikes can create false energy extremes
- Gaps at Open/Shut: Can skew day by day energy readings; contemplate intraday timeframes as a substitute
Conclusion
Bull and Bear Energy is an easy but highly effective indicator for understanding market dynamics. Reasonably than simply taking a look at worth, you are seeing the underlying battle between consumers and sellers—providing you with an edge in timing entries, managing danger, and figuring out reversals. The important thing takeaways:
- Bull Energy > 0 = Patrons in management | Bear Energy < 0 = Sellers energetic (wholesome pattern state)
- Look ahead to coloration modifications to identify energy shifts earlier than they totally develop
- Use divergences for highest-probability reversal trades
- Mix with pattern context to keep away from false alerts
Bear in mind: No single indicator is ideal. Deal with Bull and Bear Energy as a part of a whole buying and selling system, not as a standalone resolution. Mix it with correct danger administration, place sizing, and commerce planning for one of the best outcomes. Begin with the default settings, observe how the indicator behaves in actual markets for a number of weeks, then optimize to your particular buying and selling type and timeframe.
FAQ
Q: Ought to I take advantage of Bull/Bear Energy individually or mixed (BBP)? A: Individually provides you extra element on particular person purchaser/vendor power. Mixed (BBP) provides a cleaner single-line view. Use separate for energetic buying and selling; use mixed for broader pattern evaluation.
Q: Why is my Bull/Bear Energy studying completely different from one other supply? A: Most definitely distinction is the EMA size or the extra smoothing utilized. Confirm the settings match. The default 13-period EMA is normal, however some merchants use 9 or 21.
Q: Can I take advantage of this on timeframes shorter than 1H? A: Sure, however use shorter EMA lengths (9 as a substitute of 13) to make the indicator extra responsive. On 5M/15M, the 13-period EMA could be too gradual.
Q: How do I do know when energy is “sturdy” vs. “weak”? A: No absolute quantity—it is relative to every instrument. A 50-point Bull Energy studying on ES (S&P 500) is completely different from 50-point on a small-cap inventory. Watch the current highs/lows of the indicator itself to gauge relative power.
Q: Ought to I commerce each crossover? A: No. Use crossovers as setups to look at, not computerized entries. Affirm with pattern route, help/resistance, and better timeframe context earlier than buying and selling.
Q: Works higher on trending or ranging markets? A: Trending markets: Bull/Bear Energy is clearer and extra dependable. Ranging markets: Energy oscillates randomly; higher to skip or use for mean-reversion performs solely.
Not A Bug:
If indicator doesn’t load correctly, then simply look ahead to a refresh. Or manually refresh it once more. Indicator will run solely as soon as per given variety of ticks.
Suppose Refresh After ticks is 50, indicator will refresh each 50 ticks.
Typically in case your chart doesn’t have sufficient bars already loaded, like if it is a new pair, then indicator will present clean first time.
As soon as bars are loaded, it’ll begin working after subsequent refresh.

