Market Profile MetaTrader indicator — is a traditional Market Profile implementation that may present the value density over time, outlining an important worth ranges, worth space, and management worth of a given buying and selling session. This indicator will be hooked up to any timeframe and helps a number of session lengths, together with a free-draw rectangle session to create a customized market profile of arbitrary size. Decrease timeframes provide increased precision. Larger timeframes are advisable for higher visibility. Six totally different colour schemes can be found to attract the profile’s blocks. Drawing profiles as a plain colour histogram can be attainable. Alternatively, you could select to paint the profile primarily based on bullish/bearish bars. This indicator relies on naked worth motion and doesn’t use any normal indicators. It’s obtainable for MetaTrader 4, MetaTrader 5, and cTrader platforms.
A system of alerts is offered for worth crossing the degrees of Worth Space excessive and low, Median, and Single Print zones.
The next periods are supported:
- Each day: the frequent 24-hour session widespread in Foreign currency trading. By default, it makes use of your dealer’s timezone for day begin and day finish, however you’ll be able to set your individual time shift to vary that.
- Weekly: a session size that works nicely for each Foreign exchange and shares evaluation as each asset varieties have clear weekly begin and finish.
- Month-to-month: will be helpful to investigate long-term actions in any monetary asset.
- Quarterly: this session size is meant largely for evaluation of the inventory market with its quarterly firm stories.
- Semiannual: one other long-term session, which will be helpful for belongings that present excessive seasonality.
- Annual: the final word long-term session, which may help with evaluation of any asset, be it Foreign exchange, commodities, equities, or cryptocurrencies.
- Intraday: with this session, you’ll be able to break down the day into 4 or much less sections to investigate particular buying and selling periods, for instance, New York and Asian, collectively or individually.
- Rectangle: a free-form session, helpful whenever you would like to investigate some particular interval that has no fastened calendar counterpart.
Classes will be switched both through enter parameters or through the next keyboard shortcuts:
- Ctrl + 1 for Each day.
- Ctrl + 2 for Weekly.
- Ctrl + 3 for Month-to-month.
- Ctrl + 4 for Quarterly.
- Ctrl + 5 for Semiannual.
- Ctrl + 6 for Annual.
- Ctrl + 7 for Intraday.
- Ctrl + 8 for Rectangle.
Enter parameters
Principal
- Session (default = Each day) — a buying and selling session for market profile: Each day, Weekly, Month-to-month, Quarterly, Semiannual, Annual, Intraday, and Rectangle. For a rectangle session to get calculated, a rectangle chart object with the identify beginning with MPR needs to be added to the chart. Urgent ‘r’ on the keyboard will add a correctly named rectangle object mechanically.
- StartFromDate (default = __DATE__) — if StartFromCurrentSession is false, then the indicator will begin drawing profiles from this date. It attracts to the previous. For instance, should you set it 2018-01-20 and SessionsToCount is 2, then it can draw the profiles for 2018-01-20 and 2018-01-19.
- StartFromCurrentSession (default = true) — if true, then the indicator begins drawing from as we speak, else — from the date given in StartFromDate.
- SessionsToCount (default = 2) — for what number of buying and selling periods to attract the market profiles.
- SeamlessScrollingMode (default = false) — if true, the StartFromDate and StartFromCurrentSession parameters are ignored; the periods are calculated and displayed ranging from the present chart place’s rightmost bar. This permits scrolling again in time indefinitely to view previous periods.
- EnableDevelopingPOC (default = false) — if true, a number of horizontal strains might be drawn to depict how the Level of Management developed via the session.
- EnableDevelopingVAHVAL (default = false) — if true, a number of horizontal strains might be drawn to depict how the Worth Space Excessive and Worth Space Low developed via the session.
- ValueAreaPercentage (default = 70) — a proportion share of the session’s TPOs to incorporate within the Worth Space.
Appears to be like and colours
- ColorScheme (default = Blue to Purple) — colour scheme for profile’s blocks:
- blue to pink
- pink to inexperienced
- inexperienced to blue
- yellow to cyan
- magenta to yellow
- cyan to magenta
- SingleColor (default = clrBlue) — if ColorScheme is about to Single Shade, this colour might be used to attract market profiles.
- ColorBullBear (default = false) — if true, the colour of the profile blocks relies upon not on the age of the origin bar however on its path.
- MedianColor (default = clrWhite) — the colour of the management worth (median).
- ValueAreaSidesColor (default = clrWhite) — the colour of the worth space aspect borders.
- ValueAreaHighLowColor (default = clrWhite) — the colour of the worth space high and backside borders.
- MedianStyle (default = STYLE_SOLID) — the Level of Management (median) line type.
- MedianRayStyle (default = STYLE_DASH) — the Level of Management (median) ray line type.
- ValueAreaSidesStyle (default = STYLE_SOLID) — the type of the worth space aspect borders.
- ValueAreaHighLowStyle (default = STYLE_SOLID) — the type of the worth space high and backside borders.
- ValueAreaRayHighLowStyle (default = STYLE_DOT) — the type of the worth space high and backside rays.
- MedianWidth (default = 1) — the Level of Management (median) line width.
- MedianRayWidth (default = 1) — the Level of Management (median) ray line width.
- ValueAreaSidesWidth (default = 1) — the width of the worth space aspect borders.
- ValueAreaHighLowWidth (default = 1) — the width of the worth space high and backside borders.
- ValueAreaRayHighLowWidth (default = 1) — the width of the worth space high and backside rays.
- ShowValueAreaRays (default = None) — will be set in order that the worth space’s Excessive and Low worth ranges are projected to the fitting aspect of the chart. Might be set to earlier session, present, earlier and present, all earlier, or all.
- ShowMedianRays (default = None) — will be set in order that the median is projected to the fitting aspect of the chart. Might be set to earlier session, present, earlier and present, all earlier, or all.
- RaysUntilIntersection (default = Stop_No_Rays) — defines the way in which median and worth space rays might be minimize off once they meet the subsequent buying and selling session’s worth vary:
- Stop_No_Rays — no rays are stopped wherever.
- Stop_All_Rays — all rays are stopped at an intersection with the value of one other session.
- Stop_All_Rays_Except_Prev_Session — all rays besides the earlier session’s rays are stopped at an intersection with the value of one other session.
- Stop_Only_Previous_Session — solely rays of the earlier session are stopped at an intersection with the value of one other session.
- HideRaysFromInvisibleSessions (default = false) — if true, rays from periods beginning behind the left fringe of the display screen will not be displayed till you scroll again to them.
- TimeShiftMinutes (default = 0) — time shift for the periods, in minutes. Optimistic worth will transfer the session begin to the left; damaging — to the fitting.
- ShowKeyValues (default = true) — if true, Worth Space Excessive, Worth Space Low, and Level of Management are displayed on the left of the market profile.
- KeyValuesColor (default = clrWhite) — the colour for Worth Space Excessive, Worth Space Low, and Level of Management printout.
- KeyValuesSize (default = 8) — the font measurement for Worth Space Excessive, Worth Space Low, and Level of Management printout.
- ShowSinglePrint (default = No) — will be set to Leftside or Rightside and can mark the only print profile — part of the profile, which is just one TPO extensive.
- SinglePrintRays (default = false) — if true, single print edges are marked with rays.
- SinglePrintColor (default = clrGold) — the colour for single print marking if ShowSinglePrint is not set to No.
- SinglePrintRayStyle (default = STYLE_SOLID) — the only print ray line type.
- SinglePrintRayWidth (default = 1) — the only print ray line width.
- ProminentMedianColor (default = clrYellow) — the colour for the outstanding median (PPOC) if ProminentMedianPercentage is about to 100 or much less.
- ProminentMedianStyle (default = STYLE_SOLID) — the type for the outstanding median (PPOC) if ProminentMedianPercentage is about to 100 or much less.
- ProminentMedianWidth (default = 4) — the width for the outstanding median (PPOC) if ProminentMedianPercentage is about to 100 or much less.
- ShowTPOCounts (default = false) — if true, TPO counts for the variety of TPOs above and beneath the median (POC) are exhibited to the fitting of the market profile.
- TPOCountAboveColor (default = clrHoneydew) — the colour for the TPO depend above the median (POC) if ShowTPOCounts is about to true.
- TPOCountBelowColor (default = clrMistyRose) — the colour for the TPO depend beneath the median (POC) if ShowTPOCounts is about to true.
- RightToLeft (default = false) — if true, the present session’s market profile has its histogram drawn from proper to left. In case Session is about to Rectangle, market profiles of all periods are drawn right-to-left.
Efficiency
- PointMultiplier (default = 0) — the upper it’s, the broader are the profile’s worth packing containers and the less are the chart objects. You should use it to scale back the indicator’s load on CPU. When the worth is zero, an adaptive multiplier is used — the indicator makes an attempt to calculate the optimum worth mechanically.
- ThrottleRedraw (default = 0) — a delay in seconds that might be utilized earlier than every redraw of the profiles. You should use it to scale back the indicator’s load on CPU.
- DisableHistogram (default = false) — if true, no market profile histogram is drawn, however Worth Space and Median are nonetheless marked. This makes indicator work extraordinarily quick, however is much less helpful for thorough market evaluation.
Alerts
- AlertNative (default = false) — if true, the indicator will concern the platform’s native pop-up alert when some alert circumstances are met.
- AlertEmail (default = false) — if true, MetaTrader’s electronic mail alerts might be despatched when some alert circumstances are met. E-mail needs to be correctly configured in MetaTrader through Instruments->Choices->E-mail
- AlertPush (default = false) — if true, MetaTrader’s push notification alerts might be despatched to your cellular system when some alert circumstances are met. Notifications needs to be correctly configured in MetaTrader through Instruments->Choices->Notifications. This alert sort isn’t obtainable within the cTrader model of the indicator.
- AlertArrows (default = false) — if true, MetaTrader will draw arrows on the chart when some alert circumstances are met.
- AlertCheckBar (default = Earlier) — controls the bar to test the alert circumstances on. Present — the indicator will test the present unfinished bar; count on a whole lot of alerts. Earlier — the indicator will test the earlier (closed) bar; alerts might be delayed however extra concise.
- AlertForValueArea (default = false) — if true, alerts might be issued every time a Worth Space ray (excessive or low) is crossed by the value.
- AlertForMedian (default = false) — if true, alerts might be issued every time a Median ray is crossed by the value.
- AlertForSinglePrint (default = false) — if true, alerts might be issued every time a Single Print ray is crossed by the value.
- AlertOnPriceBreak (default = false) — if true, alerts might be issued when the value breaks any of the set off ranges however then returns again behind it.
- AlertOnBarClose (default = false) — if true, alerts might be issued when the bar opens on one aspect the set off degree and closes on the opposite aspect of it.
- AlertOnGapCross (default = false) — if true, alerts might be issued when the set off degree seems inside a worth hole between the final two bars.
- AlertArrowCodePB (default = 108) — arrow code for worth break alert arrows.
- AlertArrowCodeCC (default = 110) — arrow code for candle shut alert arrows.
- AlertArrowCodeGC (default = 117) — arrow code for hole crossover alert arrows.
- AlertArrowColorPB (default = clrRed) — arrow colour for worth break alert arrows.
- AlertArrowColorCC (default = clrBlue) — arrow colour for candle shut alert arrows.
- AlertArrowColorGC (default = clrYellow) — arrow colour for hole crossover alert arrows.
- AlertArrowWidthPB (default = 1) — arrow width for worth break alert arrows.
- AlertArrowWidthCC (default = 1) — arrow width for candle shut alert arrows.
- AlertArrowWidthGC (default = 1) — arrow width for hole crossover alert arrows.
Intraday periods
- EnableIntradaySessionN (default = true) — if true and Session is about to Intraday, then the indicator will try and drawn the intraday market profile #N on the chart.
- IntradaySessionNStartTime (default = “HH:MM”) — begin time in HH:MM format for the intraday session #N.
- IntradaySessionNEndTime (default = “HH:MM”) — finish time in HH:MM format for the intraday session #N.
- IntradaySessionNColorScheme (default = Blue_to_Red) — colour scheme for the intraday session #N.
Miscellaneous
- SaturdaySunday (default = Regular periods) — how one can deal with Saturday and Sunday periods:
- Regular periods — Saturday and Sunday might be handled as regular periods with their very own day by day and intraday periods.
- Ignore Saturday and Sunday — Saturday and Sunday candlesticks might be ignored.
- Append Saturday and Sunday — Saturday candlesticks might be appended to the Friday session; Sunday candlesticks might be appended to the Monday session.
- DisableAlertsOnWrongTimeframes (default = false) — if true, no pop-up alerts will seem on utilizing Market Profile with improper timeframe/session mixture.
- ProminentMedianPercentage (default = 101) — proportion of TPOs out of all attainable that ought to happen inside a median for it to be thought of outstanding (PPOC). For instance, should you set it to 50%, a median might be marked as outstanding if it incorporates at the very least 24 TPOs in a day by day session on M30 timeframe. Whether it is set to 101, no outstanding median is feasible.
Each day periods
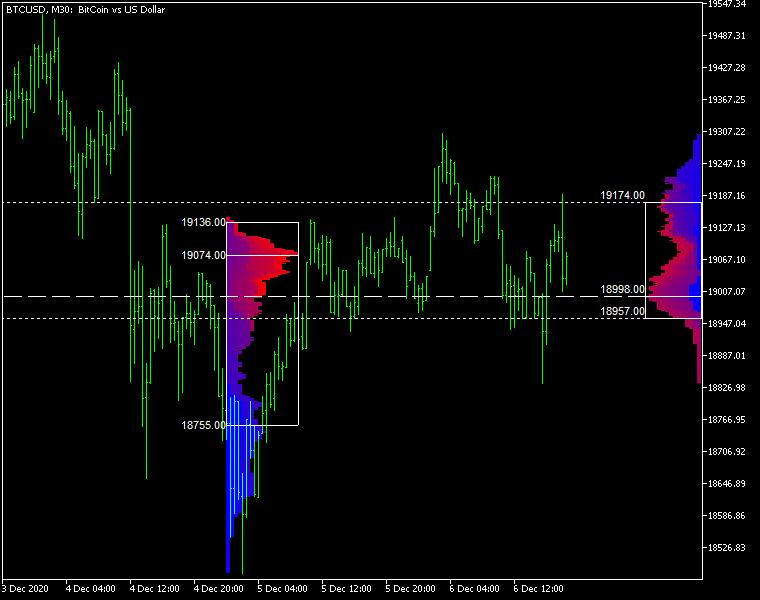
The chart screenshot reveals market profiles calculated and displayed for 2 day by day Foreign currency trading periods. The timeframe is M30 and the right-hand day by day session continues to be in progress. The earliest costs are blue and the most recent costs are pink. The medians and the worth areas are marked with the white strains and show an important worth areas. Merchants are inclined to return to these areas if the quantity of the breakout motion isn’t too excessive. Excessive-volume breakout out of those areas signifies an actual breakout. You possibly can learn extra about Market Profile on this brief e-book:
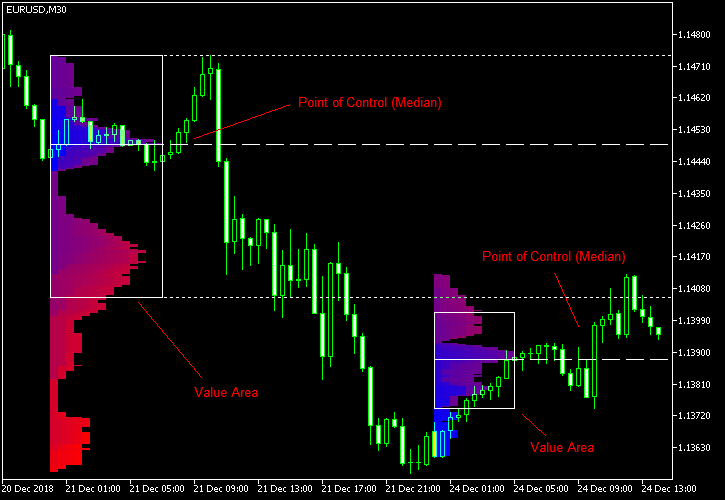
Bullish/bearish coloring
The instance beneath demonstrates how the Market Profile will be coloured in accordance with the path of every bar within the session relatively than its age. That is finished when ColorBullBear is about to true.
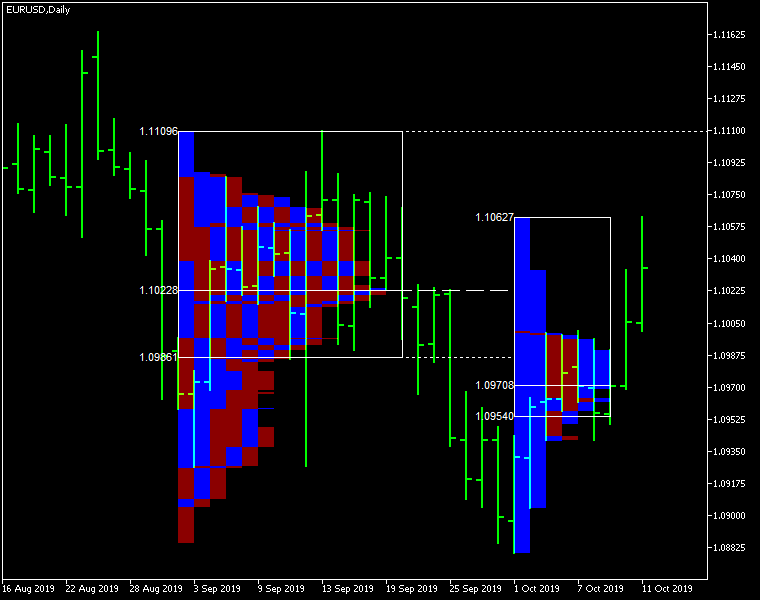
Rectangle periods
This instance demonstrates how the indicator can show a market profile primarily based on the rectangle chart objects freely drawn by a dealer. For this to work, a rectangle object’s identify has to start out with MPR and the Session enter parameter must be set to Rectangle. You possibly can press ‘r’ in your keyboard so as to add such a rectangle to the chart mechanically.
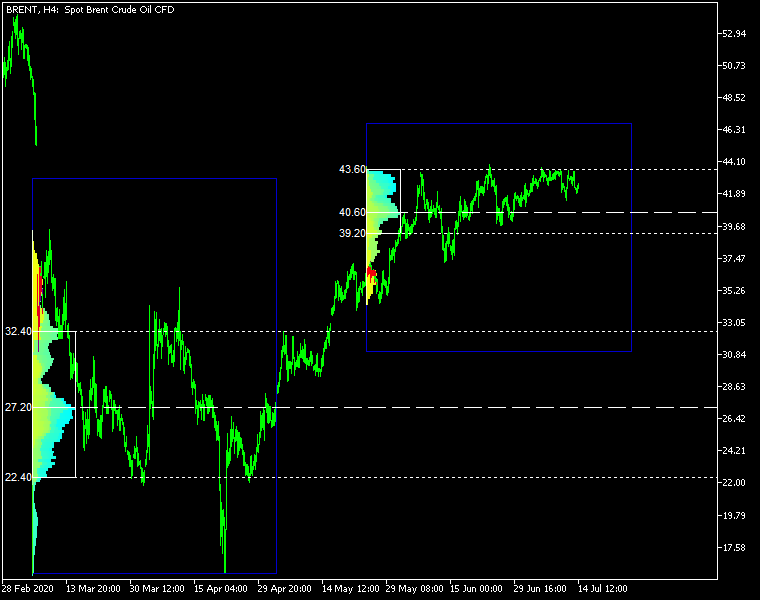
Proper-to-left show
Market Profile indicator may draw histogram from proper to left. Not like the normal left-to-right show, it may be useful to give attention to the present buying and selling session, with out obscuring its chart. You possibly can see how this works within the chart screenshot beneath.