
Picture by Editor
AWS, or Amazon Net Providers, is a cloud computing service utilized in many companies for storage, analytics, functions, deployment companies, and plenty of others. It’s a platform makes use of a number of companies to assist enterprise in a serverless means with pay-as-you-go schemes.
Machine studying modeling exercise can also be one of many actions that AWS helps. With a number of companies, modeling actions may be supported, reminiscent of creating the mannequin to creating it into manufacturing. AWS has proven versatility, which is crucial for any enterprise that wants scalability and pace.
This text will focus on deploying a machine studying mannequin within the AWS cloud into manufacturing. How may we try this? Let’s discover additional.
Earlier than you begin this tutorial, it’s essential to create an AWS account, as we would want them to entry all of the AWS companies. I assume that the reader would use the free tier to observe this text. Moreover, I assume the reader already is aware of the best way to use Python programming language and has primary data of machine studying. Additionally, we’ll deal with the mannequin deployment half and won’t focus on different elements of information science exercise, reminiscent of information preprocessing and mannequin analysis.
With that in thoughts, we’ll begin our journey of deploying your machine studying mannequin within the AWS Cloud companies.
On this tutorial, we’ll develop a machine-learning mannequin to foretell churn from the given information. The coaching dataset is acquired from Kaggle, which you’ll obtain right here.
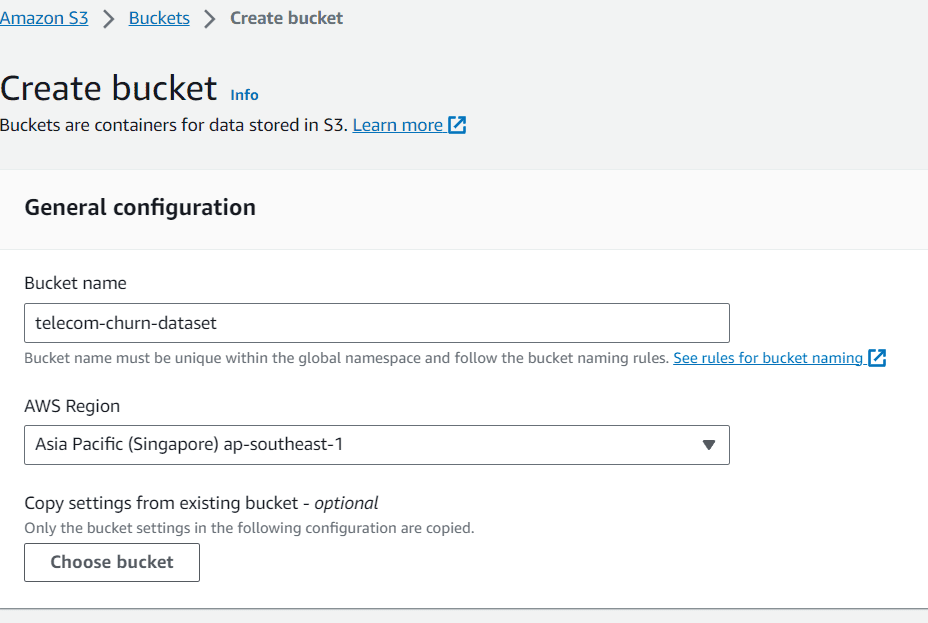
After we’ve acquired the dataset, we’d create an S3 bucket to retailer the dataset. Search the S3 within the AWS companies and make the bucket.
Picture by Writer
On this article, I named the bucket “telecom-churn-dataset” and positioned in Singapore. You’ll be able to change them in order for you, however let’s go together with this one for now.
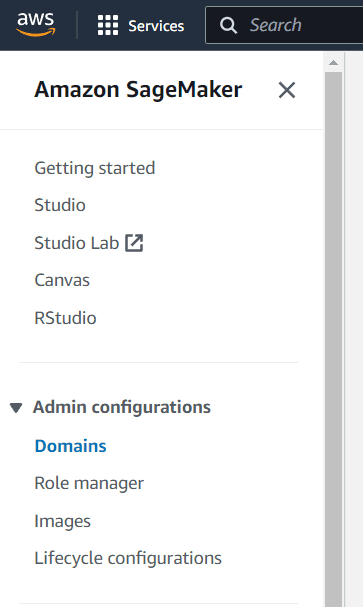
After you may have completed creating the bucket and importing the info into your bucket, we’ll go to the AWS SageMaker service. On this service, we’ll use the Studio as our working surroundings. If in case you have by no means used the Studio, let’s create a site and person earlier than continuing additional.
First, select the Domains inside the Amazon SageMaker Admin configurations.
Picture by Writer
Within the Domains, you’ll see a number of buttons to pick out. On this display, choose the Create area button.
Picture by Writer
Select the fast setup if you wish to pace up the creation course of. After it’s completed, it’s best to see a brand new area created within the dashboard. Choose the brand new area you simply created after which click on the Add person button.
Picture by Writer
Subsequent, it’s best to identify the person profile in line with your preferences. For the execution function, you’ll be able to go away it on default for now, because it’s the one which was created through the Area creation course of.
Picture by Writer
Simply click on subsequent till the canvas setting. On this part, I flip off a number of settings that we don’t want, reminiscent of Time Collection Forecasting.
After every thing is about, go to the studio choice and choose the Open studio button with the person identify you simply created.
Picture by Writer
Contained in the Studio, navigate to the sidebar that appears like a folder icon and create a brand new pocket book there. We are able to allow them to by default, just like the picture under.
Picture by Writer
With the brand new pocket book, we’d work to create a churn prediction mannequin and deploy the mannequin into API inferences that we are able to use in manufacturing.
First, let’s import the mandatory bundle and browse the churn information.
import boto3
import pandas as pd
import sagemaker

sagemaker_session = sagemaker.Session()
function = sagemaker.get_execution_role()

df = pd.read_csv('s3://telecom-churn-dataset/telecom_churn.csv')
Picture by Writer
Subsequent, we’d break up the info above into coaching information and testing information with the next code.
from sklearn.model_selection import train_test_split

practice, take a look at = train_test_split(df, test_size = 0.3, random_state = 42)
We set the take a look at information to be 30% of the unique information. With our information break up, we’d add them again into the S3 bucket.
bucket="telecom-churn-dataset"

practice.to_csv(f's3://{bucket}/telecom_churn_train.csv', index = False)
take a look at.to_csv(f's3://{bucket}/telecom_churn_test.csv', index = False)
You’ll be able to see the info inside your S3 bucket, which presently consists of three totally different datasets.
Picture by Writer
With our dataset prepared, we’d now develop a churn prediction mannequin and deploy them. Within the AWS, we frequently use a script coaching technique for machine studying coaching. That’s why we’d develop a script earlier than beginning the coaching.
For the subsequent step, we have to create a further Python file, which I known as practice.py, in the identical folder.
Picture by Writer
Inside this file, we’d set our mannequin growth course of to create the churn mannequin. For this tutorial, I might undertake some code from Ram Vegiraju.
First, we’d import all the mandatory packages for creating the mannequin.
import argparse
import os
import io
import boto3
import json
import pandas as pd

from sklearn.ensemble import RandomForestClassifier
from sklearn.metrics import accuracy_score
import joblib
Subsequent, we’d use the parser technique to regulate the variable that we are able to enter into our coaching course of. The general code that we’d put in our script to coach our mannequin is within the code under.
if __name__ == '__main__':

    parser = argparse.ArgumentParser()

    parser.add_argument('--estimator', sort=int, default=10)
    parser.add_argument('--sm-model-dir', sort=str, default=os.environ.get('SM_MODEL_DIR'))
    parser.add_argument('--model_dir', sort=str)
    parser.add_argument('--train', sort=str, default=os.environ.get('SM_CHANNEL_TRAIN'))

    args, _ = parser.parse_known_args()

    estimator = args.estimator
    model_dir = args.model_dir
    sm_model_dir = args.sm_model_dir
    training_dir = args.practice

    s3_client = boto3.shopper('s3')
    bucket="telecom-churn-dataset"

    obj = s3_client.get_object(Bucket=bucket, Key='telecom_churn_train.csv')
    train_data = pd.read_csv(io.BytesIO(obj['Body'].learn()))

    obj = s3_client.get_object(Bucket=bucket, Key='telecom_churn_test.csv')
    test_data = pd.read_csv(io.BytesIO(obj['Body'].learn()))

    X_train = train_data.drop('Churn', axis =1)
    X_test = test_data.drop('Churn', axis =1)

    y_train = train_data['Churn']
    y_test = test_data['Churn']

    rfc = RandomForestClassifier(n_estimators=estimator)
    rfc.match(X_train, y_train)
    y_pred = rfc.predict(X_test)

    print('Accuracy Rating: ',accuracy_score(y_test, y_pred))

    joblib.dump(rfc, os.path.be a part of(args.sm_model_dir, "rfc_model.joblib"))
Lastly, we have to put 4 totally different features that SageMaker requires to make inferences: model_fn, input_fn, output_fn, and predict_fn.
#Deserialized mannequin to load them

def model_fn(model_dir):
    mannequin = joblib.load(os.path.be a part of(model_dir, "rfc_model.joblib"))
    return mannequin
#The request enter of the appliance
def input_fn(request_body, request_content_type):
    if request_content_type == 'software/json':
        request_body = json.hundreds(request_body)
        inp_var = request_body['Input']
        return inp_var
    else:
        increase ValueError("This mannequin solely helps software/json enter")
#The prediction features
def predict_fn(input_data, mannequin):
    return mannequin.predict(input_data)

#The output perform
def output_fn(prediction, content_type):
    res = int(prediction[0])
    resJSON = {'Output': res}
    return resJSON
With our script prepared, we’d run the coaching course of. Within the subsequent step, we’d cross the script we created above into the SKLearn estimator. This estimator is a Sagemaker object that may deal with all the coaching course of, and we might solely must cross all of the parameters much like the code under.
from sagemaker.sklearn import SKLearn

sklearn_estimator = SKLearn(entry_point="practice.py",
                          function=function,
                          instance_count=1,
                          instance_type="ml.c4.2xlarge",
                          py_version='py3',
                          framework_version='0.23-1',
                          script_mode=True,
                          hyperparameters={
                              'estimator': 15})
sklearn_estimator.match()
If the coaching is profitable, you’ll find yourself with the next report.
Picture by Writer
If you wish to verify the Docker picture for the SKLearn coaching and your mannequin artifact location, you’ll be able to entry them utilizing the next code.
model_artifact = sklearn_estimator.model_data
image_uri = sklearn_estimator.image_uri

print(f'The mannequin artifact is saved at: {model_artifact}')
print(f'The picture URI is: {image_uri}')
With the mannequin in place, we’d then deploy the mannequin into an API endpoint that we are able to use for prediction. To try this, we are able to use the next code.
import time

churn_endpoint_name="churn-rf-model-"+time.strftime("%Y-%m-%d-%H-%M-%S", time.gmtime())

churn_predictor=sklearn_estimator.deploy(initial_instance_count=1,instance_type="ml.m5.massive",endpoint_name=churn_endpoint_name)
If the deployment is profitable, the mannequin endpoint is created, and you’ll entry it to create a prediction. You can too see the endpoint within the Sagemaker dashboard.
Picture by Writer
Now you can make predictions with this endpoint. To try this, you’ll be able to take a look at the endpoint with the next code.
shopper = boto3.shopper('sagemaker-runtime')
content_type = "software/json"

#exchange along with your supposed enter information
request_body = {"Enter": [[128,1,1,2.70,1,265.1,110,89.0, 9.87,10.0]]}

#exchange along with your endpoint identify
endpoint_name = "churn-rf-model-2023-09-24-12-29-04"
#Information serialization
information = json.hundreds(json.dumps(request_body))
payload = json.dumps(information)

#Invoke the endpoint
response = shopper.invoke_endpoint(
    EndpointName=endpoint_name,
    ContentType=content_type,
    Physique=payload)
end result = json.hundreds(response['Body'].learn().decode())['Output']
end result
Congratulation. You’ve now efficiently deployed your mannequin within the AWS Cloud. After you may have completed the testing course of, don’t overlook to scrub up the endpoint. You should use the next code to try this.
from sagemaker import Session

sagemaker_session = Session()
sagemaker_session.delete_endpoint(endpoint_name="your-endpoint-name")
Don’t overlook to close down the occasion you utilize and clear up the S3 storage if you happen to don’t want it anymore.
For additional studying, you’ll be able to learn extra concerning the SKLearn estimator and Batch Remodel inferences if you happen to choose to not have an endpoint mannequin.
AWS Cloud platform is a multi-purpose platform that many corporations use to assist their enterprise. One of many companies typically used is for information analytic functions, particularly mannequin manufacturing. On this article, we be taught to make use of AWS SageMaker and the best way to deploy the mannequin into the endpoint.
Cornellius Yudha Wijaya is an information science assistant supervisor and information author. Whereas working full-time at Allianz Indonesia, he likes to share Python and Information suggestions by way of social media and writing media.

