

Picture by Lucas Fonseca
On this tutorial, we’ll learn to construct a easy multi-classification mannequin utilizing the Glass Classification dataset. Our purpose is to develop and deploy an online software that may predict numerous sorts of glass, akin to:
- Constructing Home windows Float Processed
- Constructing Home windows Non-Float Processed
- Automobile Home windows Float Processed
- Automobile Home windows Non Float Processed (lacking within the dataset)
- Containers
- Tableware
- Headlamps
Furthermore, we’ll study:
- Skops: Share your scikit-learn based mostly fashions and put them in manufacturing.
- Gradio: ML net purposes framework.
- HuggingFace Areas: free machine studying mannequin and software internet hosting platform.
By the top of this tutorial, you should have hands-on expertise constructing, coaching, and deploying a primary machine studying mannequin as an online software.
On this half, we’ll import the dataset, break up it into coaching and testing subsets, construct the machine studying pipeline, practice the mannequin, assess mannequin efficiency, and save the mannequin.
Dataset
Now we have loaded the dataset after which shuffled it for an equal distribution of the labels.
import pandas as pd
glass_df = pd.read_csv("glass.csv")
glass_df = glass_df.pattern(frac = 1)
glass_df.head(3)
Our dataset
After that, we chosen the mannequin options and goal variables utilizing the dataset and break up them into coaching and testing datasets.
from sklearn.model_selection import train_test_split

X = glass_df.drop("Kind",axis=1)
y = glass_df.Kind

X_train, X_test, y_train, y_test = train_test_split(X, y, test_size=0.3, random_state=125)
Machine Studying Pipeline
Our mannequin pipeline is easy. First, we cross our characteristic by means of an imputer after which normalize it utilizing Commonplace Scaler. Lastly, we feed the processed knowledge right into a random forest classifier.
After becoming the pipeline on the coaching set, we use `.rating()` to generate the accuracy rating on the testing set.
The rating is common, and I’m happy with the efficiency. Whereas we might enhance the mannequin by ensembling or utilizing numerous optimization strategies, our purpose is completely different.
from sklearn.ensemble import RandomForestClassifier
from sklearn.preprocessing import StandardScaler
from sklearn.impute import SimpleImputer
from sklearn.pipeline import Pipeline


pipe = Pipeline(
    steps=[
        ("imputer", SimpleImputer()),
        ("scaler", StandardScaler()),
        ("model", RandomForestClassifier(n_estimators=100, random_state=125)),
    ]
)
pipe.match(X_train, y_train)

pipe.rating(X_test, y_test)
>>> 0.7538461538461538
The classification report additionally seems to be good.
from sklearn.metrics import classification_report

y_pred = pipe.predict(X_test)
print(classification_report(y_test,y_pred))
precision    recall  f1-score   help

           1       0.65      0.73      0.69        15
           2       0.82      0.79      0.81        29
           3       0.40      0.50      0.44         4
           5       1.00      0.80      0.89         5
           6       1.00      0.67      0.80         3
           7       0.78      0.78      0.78         9

    accuracy                           0.75        65
   macro avg       0.77      0.71      0.73        65
weighted avg       0.77      0.75      0.76        65
Saving the Mannequin
Skops is a good library to deploy scikit-learn fashions into merchandise. We’ll use it to avoid wasting the mannequin and later load it into manufacturing.
import skops.io as sio
sio.dump(pipe, "glass_pipeline.skops")
As we are able to see, with a single line of code, we are able to load the whole pipeline.
sio.load("glass_pipeline.skops", trusted=True)
On this half, we’ll learn to use Gradio to construct a easy classification person interface.
- Load the mannequin utilizing the skops.
- Create an array of sophistication names and depart the primary one empty or “None” as our numerical class starters from 1.
- Write a classification Python operate that takes inputs from the person and predicts the category utilizing the pipeline.
- Create the inputs for every characteristic utilizing the sliders. Customers can use a mouse to pick out the numerical values.
- Create the output utilizing the Label. It’s going to show the Label in daring textual content on the highest.
- Add the title and outline of the app.
- Lastly, mix all of it utilizing `gradio.Interface`
import gradio as gr
import skops.io as sio

pipe = sio.load("glass_pipeline.skops", trusted=True)

courses = [
    "None",
    "Building Windows Float Processed",
    "Building Windows Non Float Processed",
    "Vehicle Windows Float Processed",
    "Vehicle Windows Non Float Processed",
    "Containers",
    "Tableware",
    "Headlamps",
]


def classifier(RI, Na, Mg, Al, Si, Okay, Ca, Ba, Fe):
    pred_glass = pipe.predict([[RI, Na, Mg, Al, Si, K, Ca, Ba, Fe]])[0]
    label = f"Predicted Glass label: **{courses[pred_glass]}**"
    return label


inputs = [
    gr.Slider(1.51, 1.54, step=0.01, label="Refractive Index"),
    gr.Slider(10, 17, step=1, label="Sodium"),
    gr.Slider(0, 4.5, step=0.5, label="Magnesium"),
    gr.Slider(0.3, 3.5, step=0.1, label="Aluminum"),
    gr.Slider(69.8, 75.4, step=0.1, label="Silicon"),
    gr.Slider(0, 6.2, step=0.1, label="Potassium"),
    gr.Slider(5.4, 16.19, step=0.1, label="Calcium"),
    gr.Slider(0, 3, step=0.1, label="Barium"),
    gr.Slider(0, 0.5, step=0.1, label="Iron"),
]
outputs = [gr.Label(num_top_classes=7)]

title = "Glass Classification"
description = "Enter the small print to appropriately establish glass sort?"

gr.Interface(
    fn=classifier,
    inputs=inputs,
    outputs=outputs,
    title=title,
    description=description,
).launch()
Within the closing half, we’ll create the areas on the Hugging Face and add our mannequin and the app file.
To create the areas, it’s a must to check in to https://huggingface.co. Then, click on in your profile picture on the highest proper and choose “+ New Area”.
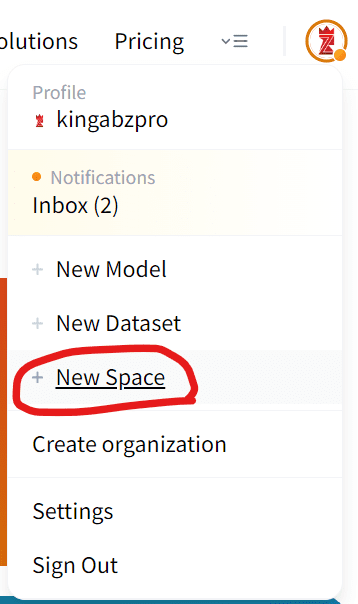
Picture from HuggingFace
Write the identify of your software, choose SDK, and click on on the Create Area button.
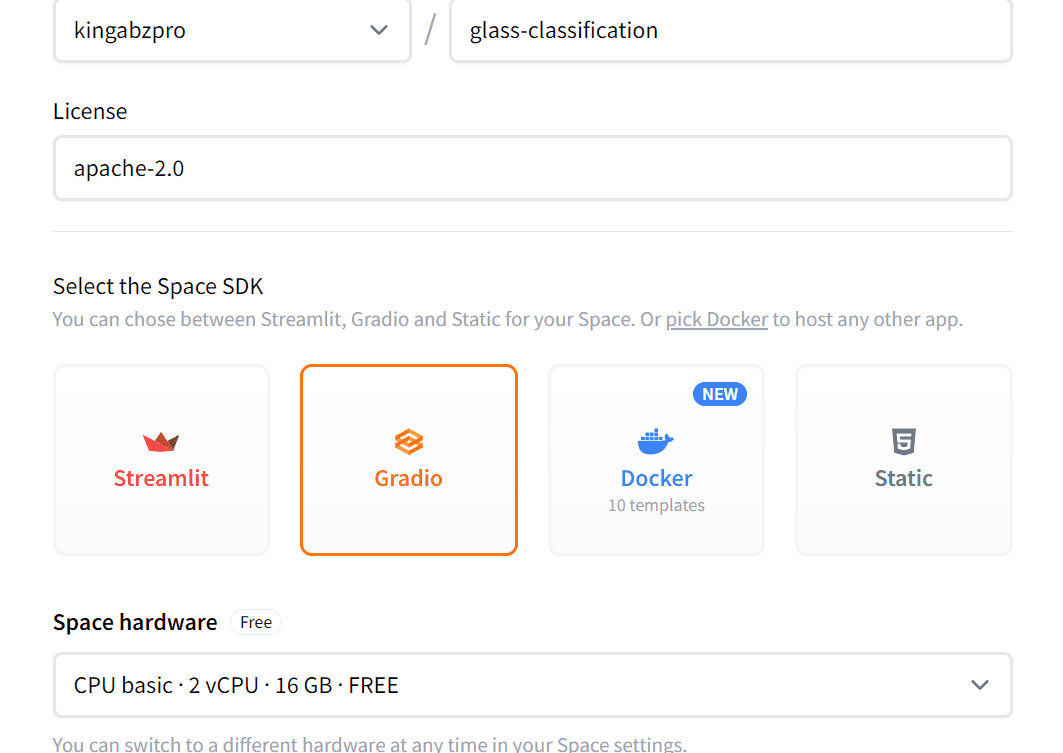
Picture from Areas
Then, create a `necessities.txt` file. You’ll be able to add or create a file by going to the “Information” tab and choosing the “+Add file” button.
Within the `necessities.txt` file, it’s a must to add skops and scikit-learn.
Picture from Areas
After that, add the mannequin and file by dragging and dropping them out of your native folder to the area. After that, commit.
Picture from Areas
It’s going to take a couple of minutes for the areas to put in the required packages and construct the container.
Picture from Areas
Ultimately, you may be greeted with a bug-free software which you could share with your loved ones and colleagues. You’ll be able to even try the dwell demo by clicking on the hyperlink: Glass Classification.
Picture from Glass Classification
On this tutorial, we walked by means of the end-to-end strategy of constructing, coaching, and deploying a machine studying mannequin as an online software. We used the glass classification dataset to coach a easy multi-class classification mannequin. After coaching the mannequin in scikit-learn, we leveraged skops and Gradio to bundle and deploy the mannequin as an online app on HuggingFace Areas.
There are numerous potentialities to construct on this starter challenge. You may incorporate extra options into the mannequin, strive completely different algorithms, or deploy the net app on different platforms. The necessary factor is that you simply now have hands-on expertise with an end-to-end machine studying workflow. You’ve got gotten publicity to coaching fashions, packaging them for manufacturing, and constructing net interfaces for interacting with mannequin predictions.
Thanks for following alongside! Let me know in case you have every other questions as you proceed your machine studying journey.
Abid Ali Awan (@1abidaliawan) is an authorized knowledge scientist skilled who loves constructing machine studying fashions. At the moment, he’s specializing in content material creation and writing technical blogs on machine studying and knowledge science applied sciences. Abid holds a Grasp’s diploma in Know-how Administration and a bachelor’s diploma in Telecommunication Engineering. His imaginative and prescient is to construct an AI product utilizing a graph neural community for college kids fighting psychological sickness.

