
Introduction
In at present’s fast-paced world, customer support is a vital facet of any enterprise. A Zendesk Reply Bot, powered by Massive Language Fashions (LLMs) like GPT-4, can considerably improve the effectivity and high quality of buyer assist by automating responses. This weblog put up will information you thru constructing and deploying your personal Zendesk Auto Responder utilizing LLMs and implementing RAG-based workflows in GenAI to streamline the method.

What are RAG primarily based workflows in GenAI
RAG (Retrieval Augmented Era) primarily based workflows in GenAI (Generative AI) mix the advantages of retrieval and technology to reinforce the AI system’s capabilities, notably in dealing with real-world, domain-specific knowledge. In easy phrases, RAG allows the AI to drag in related info from a database or different sources to assist the technology of extra correct and knowledgeable responses. That is notably useful in enterprise settings the place accuracy and context are essential.
What are the parts in an RAG primarily based workflow
- Information base: The data base is a centralized repository of data that the system refers to when answering queries. It may well embrace FAQs, manuals, and different related paperwork.
- Set off/Question: This part is accountable for initiating the workflow. It’s often a buyer’s query or request that wants a response or motion.
- Process/Motion: Primarily based on the evaluation of the set off/question, the system performs a selected process or motion, akin to producing a response or performing a backend operation.
Few examples of RAG primarily based workflows
- Buyer Interplay Workflow in Banking:
- Chatbots powered by GenAI and RAG can considerably enhance engagement charges within the banking business by personalizing interactions.
- By means of RAG, the chatbots can retrieve and make the most of related info from a database to generate personalised responses to buyer inquiries.
- As an example, throughout a chat session, a RAG-based GenAI system might pull within the buyer’s transaction historical past or account info from a database to offer extra knowledgeable and personalised responses.
- This workflow not solely enhances buyer satisfaction but in addition doubtlessly will increase the retention charge by offering a extra personalised and informative interplay expertise.
- E mail Campaigns Workflow:
- In advertising and gross sales, creating focused campaigns is essential.
- RAG may be employed to drag within the newest product info, buyer suggestions, or market tendencies from exterior sources to assist generate extra knowledgeable and efficient advertising / gross sales materials.
- For instance, when crafting an electronic mail marketing campaign, a RAG-based workflow might retrieve latest optimistic opinions or new product options to incorporate within the marketing campaign content material, thus doubtlessly enhancing engagement charges and gross sales outcomes.
- Automated Code Documentation and Modification Workflow:
- Initially, a RAG system can pull current code documentation, codebase, and coding requirements from the undertaking repository.
- When a developer wants so as to add a brand new function, RAG can generate a code snippet following the undertaking’s coding requirements by referencing the retrieved info.
- If a modification is required within the code, the RAG system can suggest adjustments by analyzing the prevailing code and documentation, making certain consistency and adherence to coding requirements.
- Publish code modification or addition, RAG can routinely replace the code documentation to replicate the adjustments, pulling in mandatory info from the codebase and current documentation.
Methods to obtain and index all Zendesk tickets for retrieval
Allow us to now get began with the tutorial. We are going to construct a bot to reply incoming Zendesk tickets whereas utilizing a customized database of previous Zendesk tickets and responses to generate the reply with the assistance of LLMs.
- Entry Zendesk API: Use Zendesk API to entry and obtain all of the tickets. Guarantee you’ve got the mandatory permissions and API keys to entry the information.
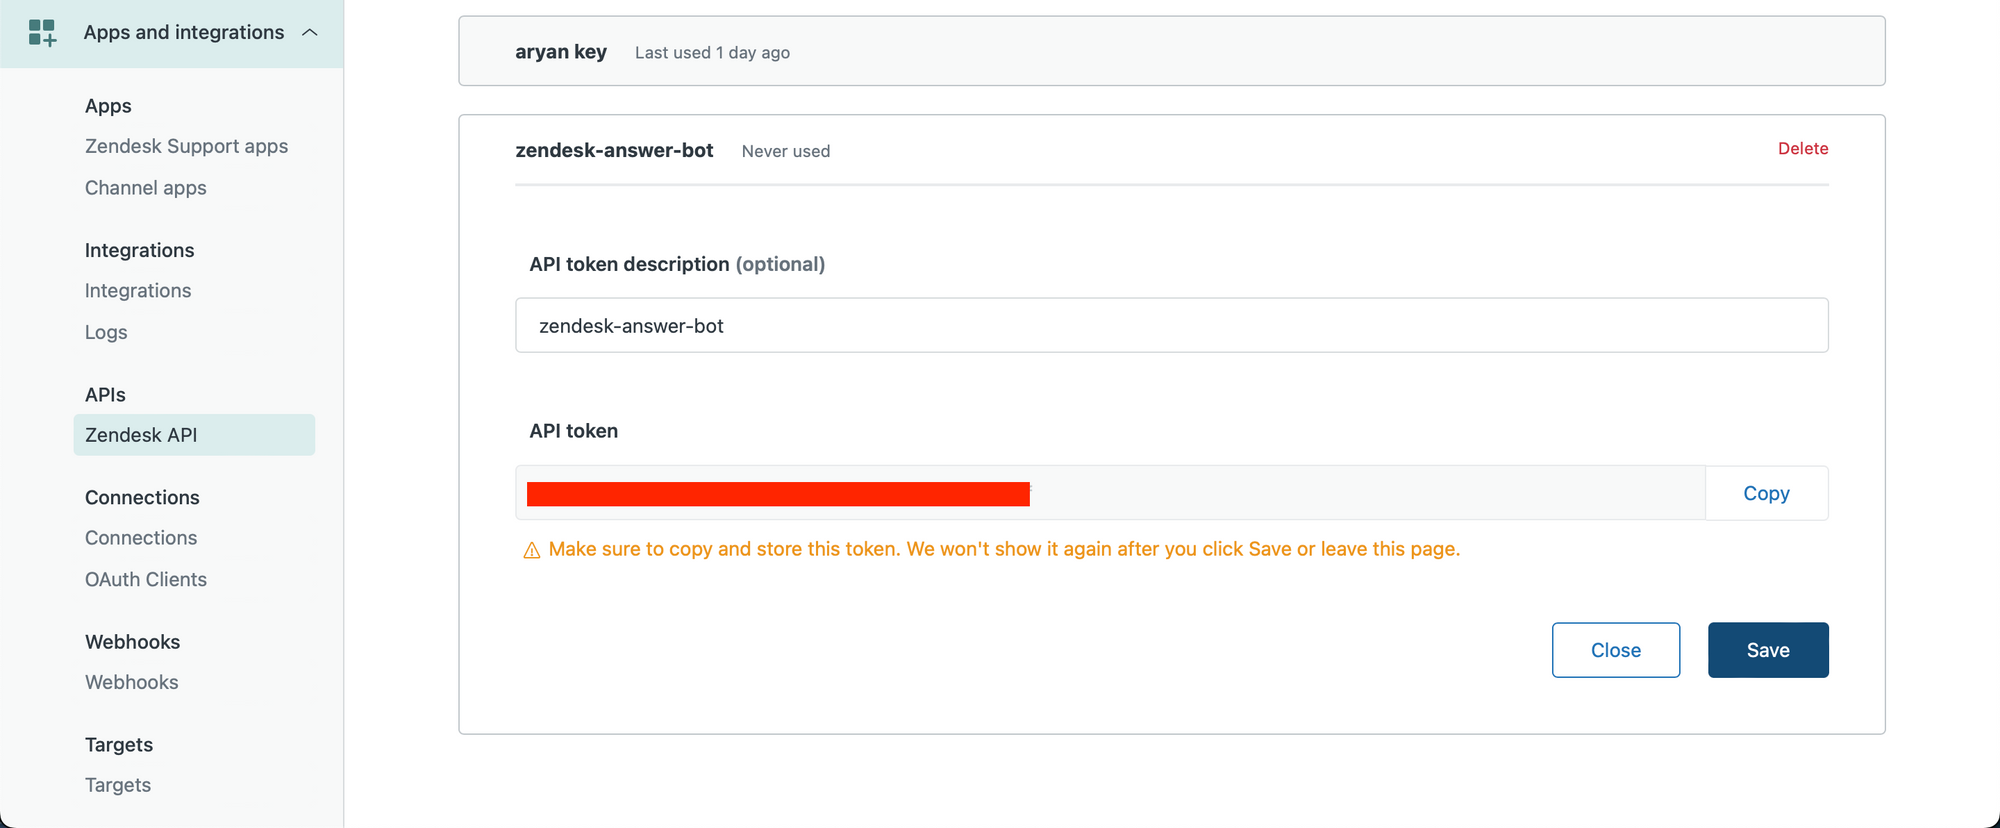
We first create our Zendesk API key. Ensure you are an Admin consumer and go to the next hyperlink to create your API key – https://YOUR_SUBDOMAIN.zendesk.com/admin/apps-integrations/apis/zendesk-api/settings/tokens
Create an API key and replica it to your clipboard.
Allow us to now get began in a python pocket book.
We enter our Zendesk credentials, together with the API key we simply obtained.
subdomain = YOUR_SUBDOMAIN
username = ZENDESK_USERNAME
password = ZENDESK_API_KEY
username="{}/token".format(username)
We now retrieve ticket knowledge. Within the beneath code, we have now retrieved queries and replies from every ticket, and are storing every set [query, array of replies] representing a ticket into an array referred to as ticketdata.
We’re solely fetching the most recent 1000 tickets. You may modify this as required.
import requests
ticketdata = []
url = f"https://{subdomain}.zendesk.com/api/v2/tickets.json"
params = {"sort_by": "created_at", "sort_order": "desc"}
headers = {"Content material-Kind": "utility/json"}
tickettext = ""
whereas len(ticketdata) <= 1000:
response = requests.get(
url, auth=(username, password), params=params, headers=headers
)
tickets = response.json()["tickets"]
for ticket in tickets:
ticketid = ticket["id"]
url = f"https://{subdomain}.zendesk.com/api/v2/tickets/{ticketid}/feedback.json"
headers = {
"Content material-Kind": "utility/json",
}
response2 = requests.get(url, auth=(username, password), headers=headers)
attempt:
feedback = response2.json()["comments"]
besides:
feedback = ["", ""]
ticketelement = [ticketid, comments]
ticketdata.append(ticketelement)
if response.json()["next_page"]:
url = response.json()["next_page"]
else:
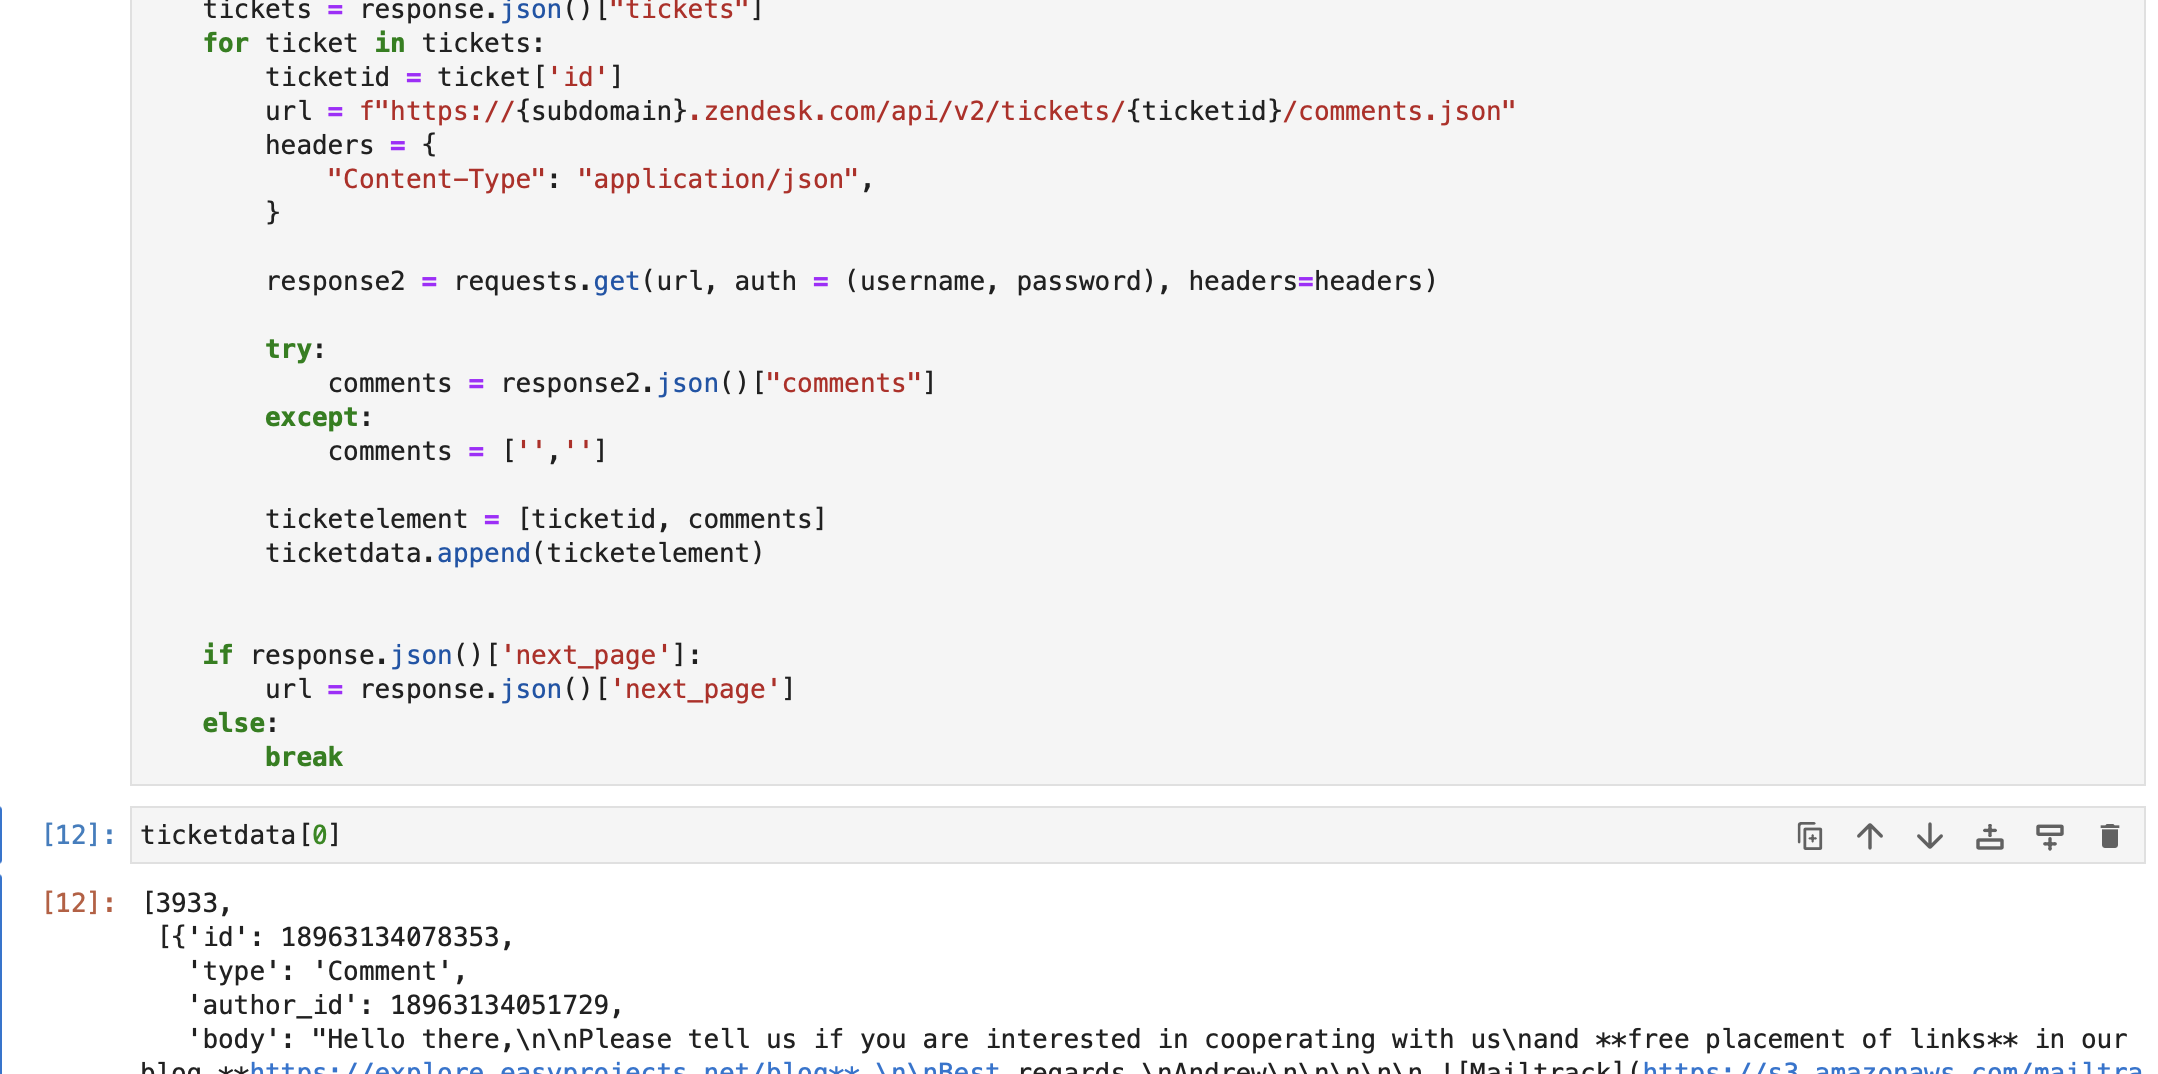
breakAs you possibly can see beneath, we have now retrieved ticket knowledge from the Zendesk db. Every ingredient in ticketdata accommodates –
a. Ticket ID
b. All feedback / replies within the ticket.
We then transfer on to create a textual content primarily based string having the queries and first responses from all retrieved tickets, utilizing the ticketdata array.
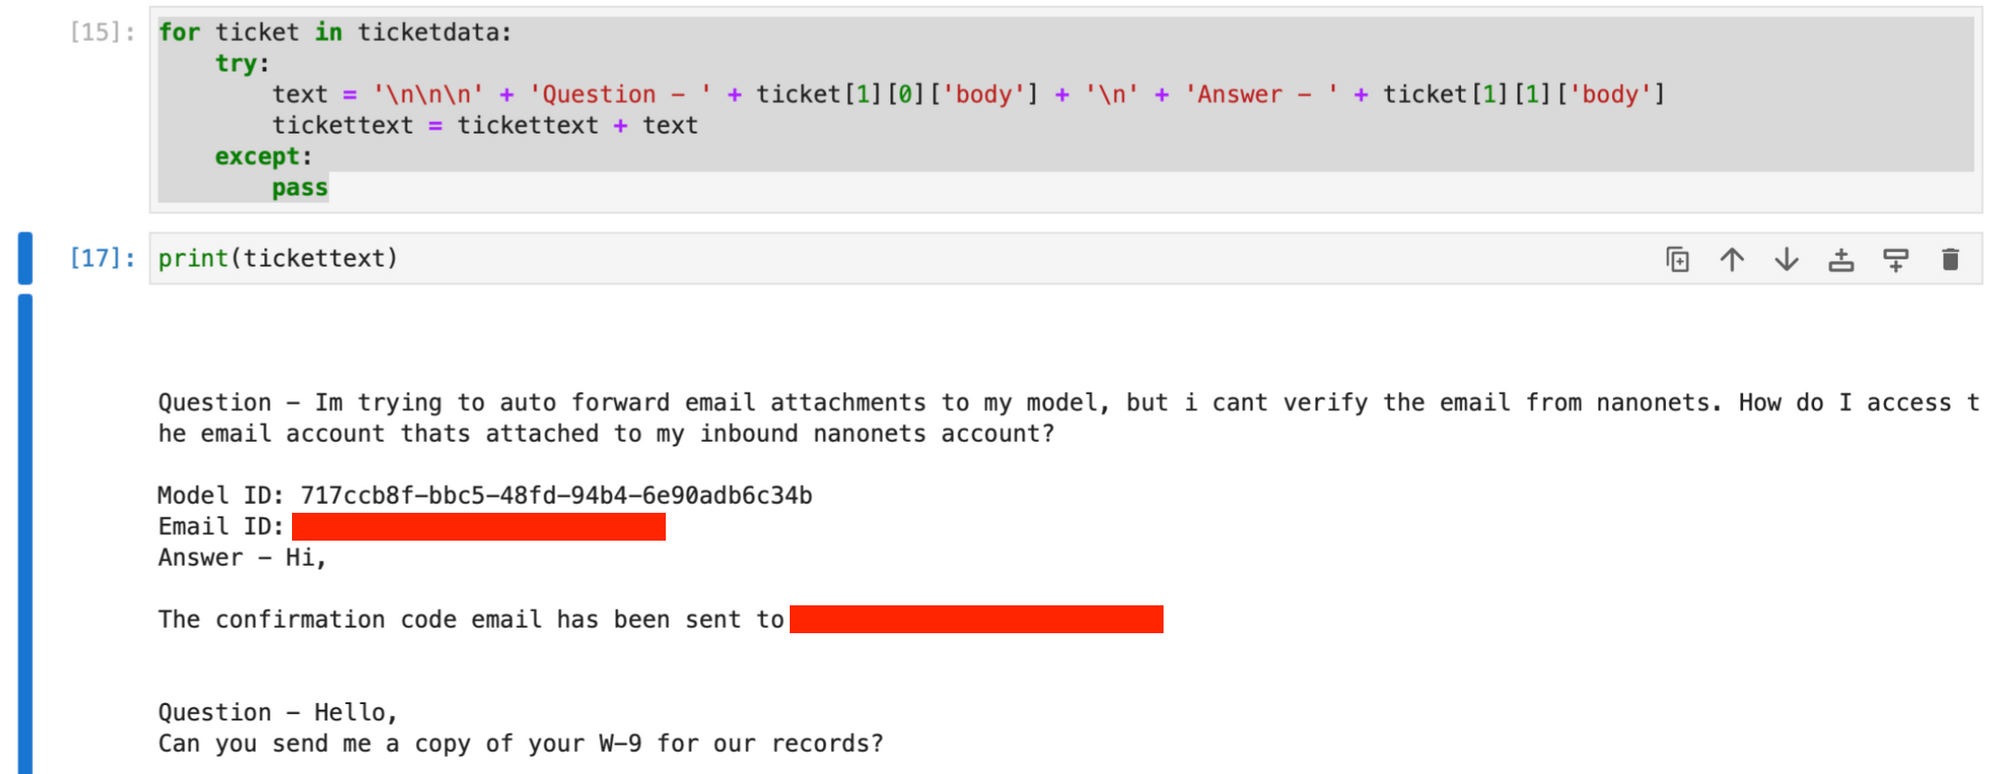
for ticket in ticketdata:
    attempt:
        textual content = (
            "nnn"
            + "Query - "
            + ticket[1][0]["body"]
            + "n"
            + "Reply - "
            + ticket[1][1]["body"]
        )
        tickettext = tickettext + textual content
    besides:
        go
The tickettext string now accommodates all tickets and first responses, with every ticket’s knowledge separated by newline characters.
Non-compulsory : You can even fetch knowledge out of your Zendesk Help articles to develop the data base additional, by operating the beneath code.
import re
def remove_tags(textual content):
clear = re.compile("<.*?>")
return re.sub(clear, "", textual content)
articletext = ""
attempt:
articledata = []
url = f"https://{subdomain}.zendesk.com/api/v2/help_center/en-us/articles.json"
headers = {"Content material-Kind": "utility/json"}
whereas True:
response = requests.get(url, auth=(username, password), headers=headers)
articles = response.json()["articles"]
for article in articles:
articledata.append([article["title"], article["html_url"], article["body"]])
if response.json()["next_page"]:
url = response.json()["next_page"]
else:
break
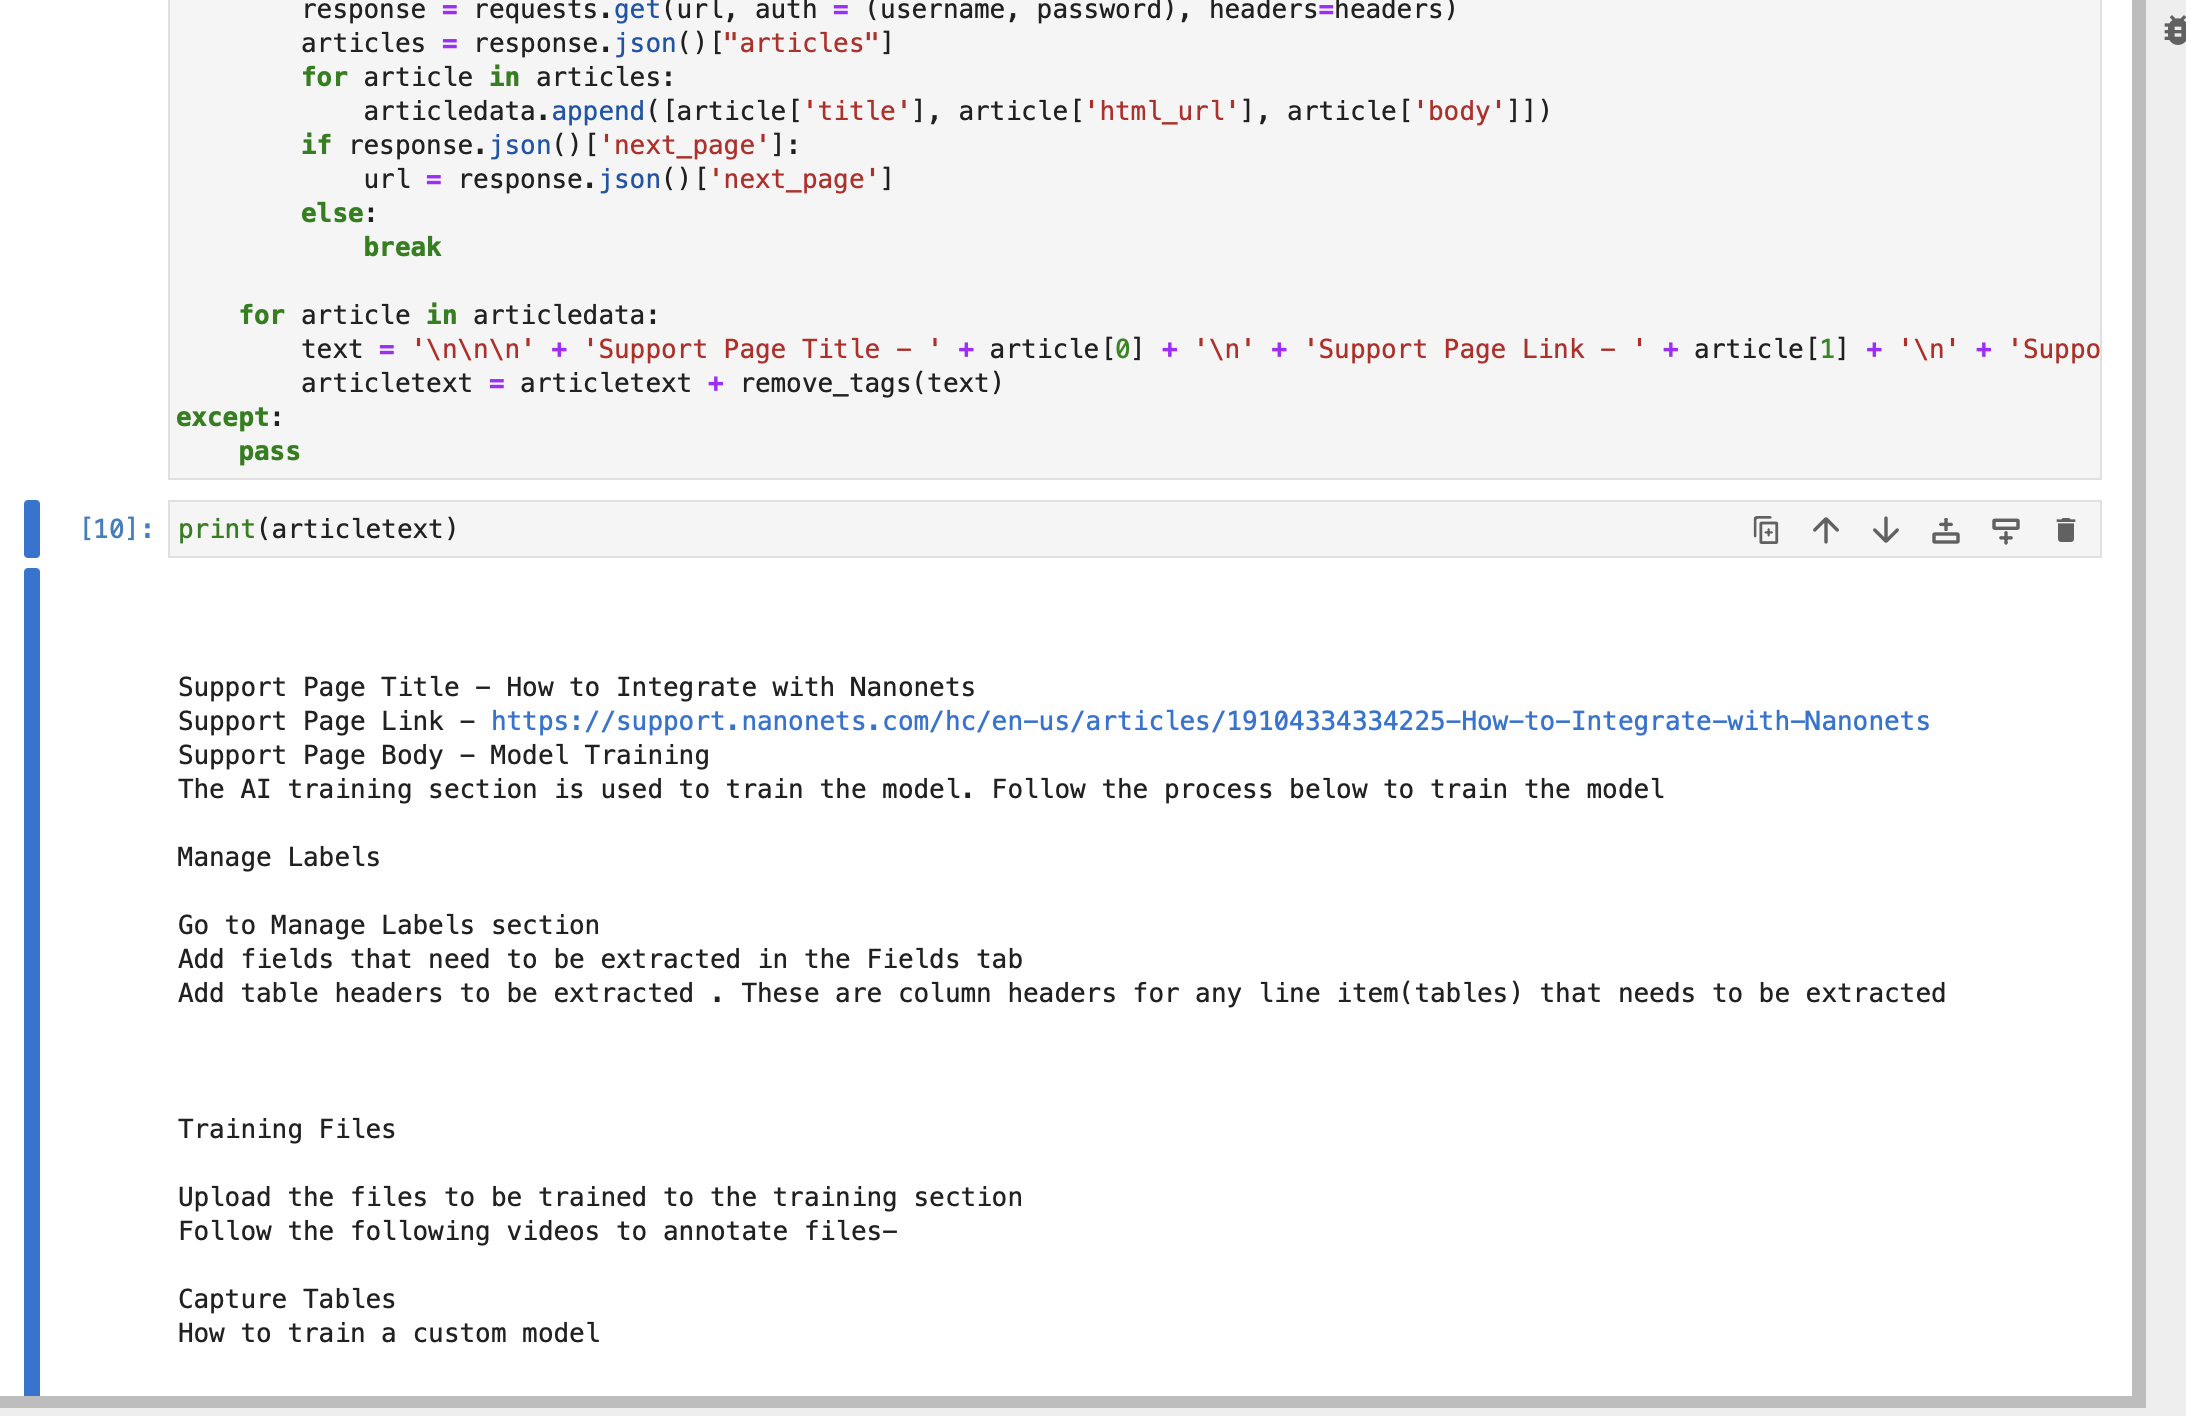
for article in articledata:
textual content = (
"nnn"
+ "Help Web page Title - "
+ article[0]
+ "n"
+ "Help Web page Hyperlink - "
+ article[1]
+ "n"
+ "Help Web page Physique - "
+ article[2]
)
articletext = articletext + remove_tags(textual content)
besides:
goThe string articletext accommodates title, hyperlink and physique of every article a part of your Zendesk assist pages.
Non-compulsory : You may join your buyer database or every other related database, after which use it whereas creating the index retailer.
Mix the fetched knowledge.
data = tickettext + "nnn" + articletext- Index Tickets: As soon as downloaded, index the tickets utilizing an acceptable indexing methodology to facilitate fast and environment friendly retrieval.
To do that, we first set up the dependencies required for creating the vector retailer.
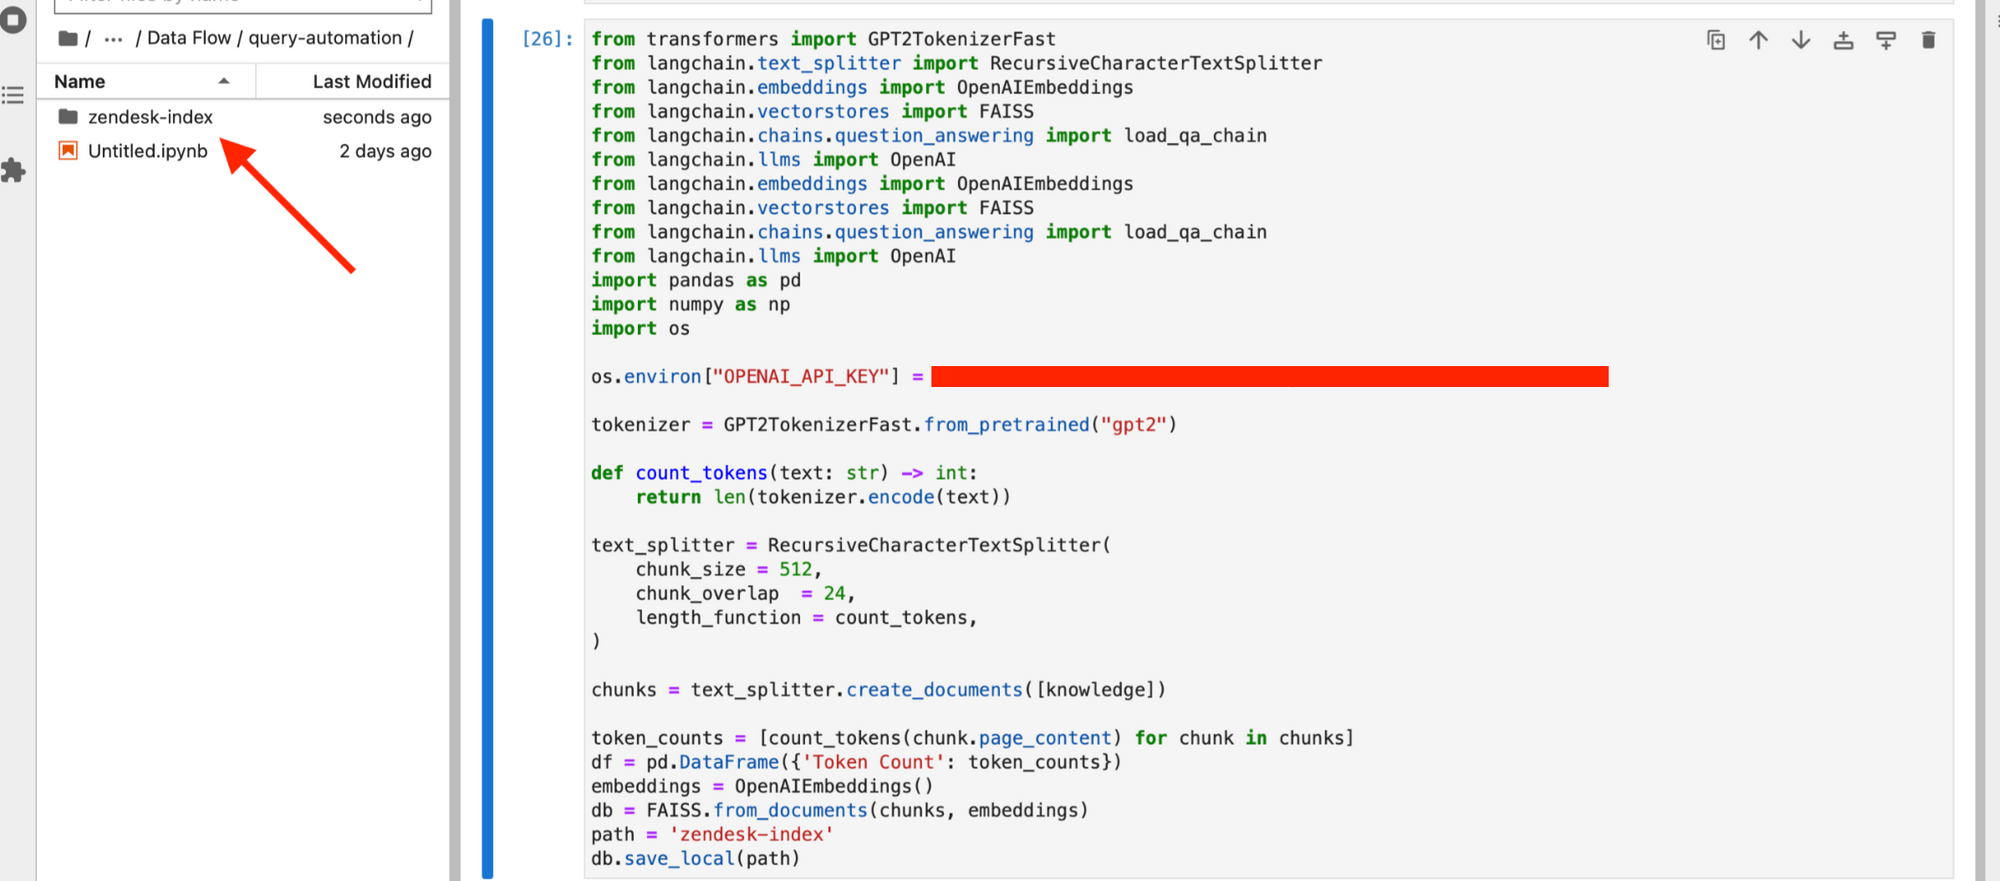
pip set up langchain openai pypdf faiss-cpuCreate an index retailer utilizing the fetched knowledge. This can act as our data base once we try to reply new tickets by way of GPT.
os.environ["OPENAI_API_KEY"] = "YOUR_OPENAI_API_KEY"

from langchain.document_loaders import PyPDFLoader
from langchain.vectorstores import FAISS
from langchain.chat_models import ChatOpenAI
from langchain.embeddings.openai import OpenAIEmbeddings
from langchain.text_splitter import RecursiveCharacterTextSplitter
from langchain.chains import RetrievalQA, ConversationalRetrievalChain
from transformers import GPT2TokenizerFast
import os
import pandas as pd
import numpy as np

tokenizer = GPT2TokenizerFast.from_pretrained("gpt2")


def count_tokens(textual content: str) -> int:
    return len(tokenizer.encode(textual content))


text_splitter = RecursiveCharacterTextSplitter(
    chunk_size=512,
    chunk_overlap=24,
    length_function=count_tokens,
)

chunks = text_splitter.create_documents([knowledge])

token_counts = [count_tokens(chunk.page_content) for chunk in chunks]
df = pd.DataFrame({"Token Depend": token_counts})
embeddings = OpenAIEmbeddings()
db = FAISS.from_documents(chunks, embeddings)
path = "zendesk-index"
db.save_local(path)
Your index will get saved in your native system.
- Replace Index Usually: Usually replace the index to incorporate new tickets and modifications to current ones, making certain the system has entry to essentially the most present knowledge.
We are able to schedule the above script to run each week, and replace our ‘zendesk-index’ or every other desired frequency.
Methods to carry out retrieval when a brand new ticket is available in
- Monitor for New Tickets: Arrange a system to watch Zendesk for brand new tickets constantly.
We are going to create a primary Flask API and host it. To get began,
- Create a brand new folder referred to as ‘Zendesk Reply Bot’.
- Add your FAISS db folder ‘zendesk-index’ to the ‘Zendesk Reply Bot’ folder.
- Create a brand new python file zendesk.py and replica the beneath code into it.
from flask import Flask, request, jsonify

app = Flask(__name__)

@app.route('/zendesk', strategies=['POST'])
def zendesk():
    return 'dummy response'

if __name__ == '__main__':
    app.run(port=3001, debug=True)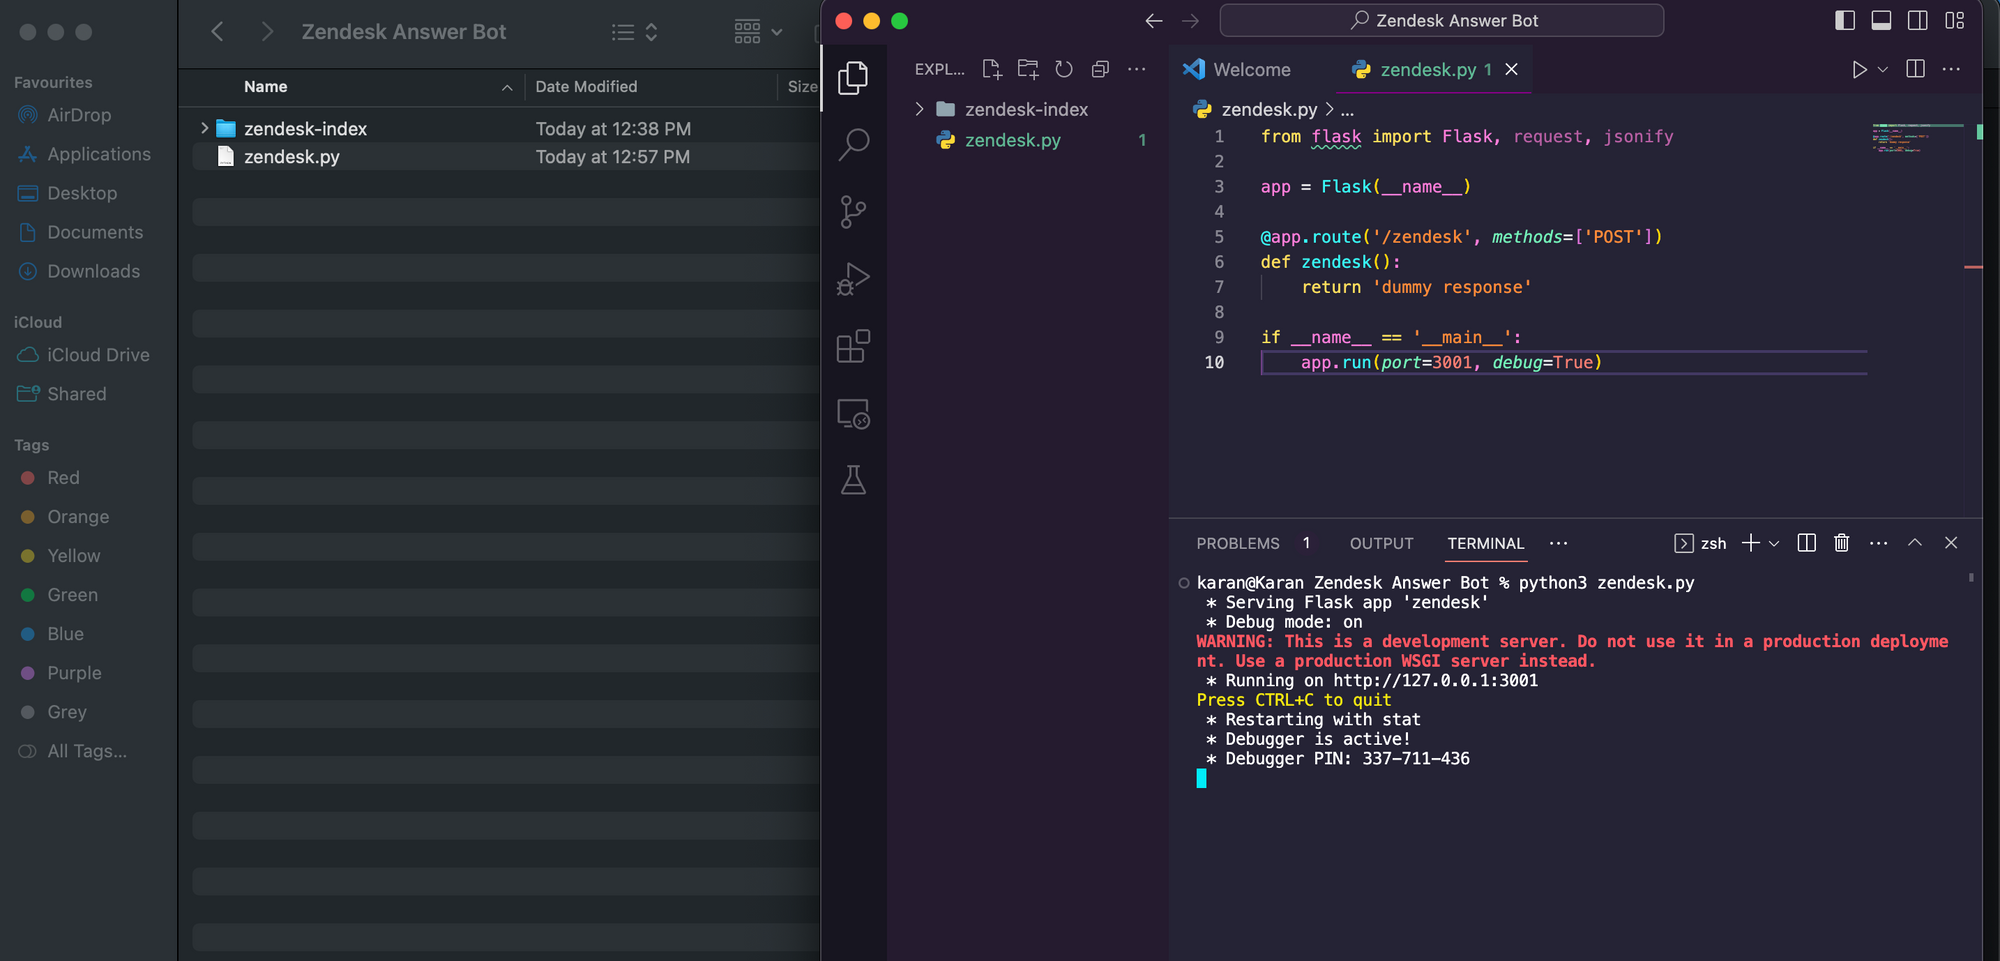
- Obtain and configure ngrok utilizing the directions right here. Make certain to configure the ngrok authtoken in your terminal as directed on the hyperlink.
- Open a brand new terminal occasion and run beneath command.
ngrok http 3001- We now have our Flask Service uncovered over an exterior IP utilizing which we will make API calls to our service from anyplace.
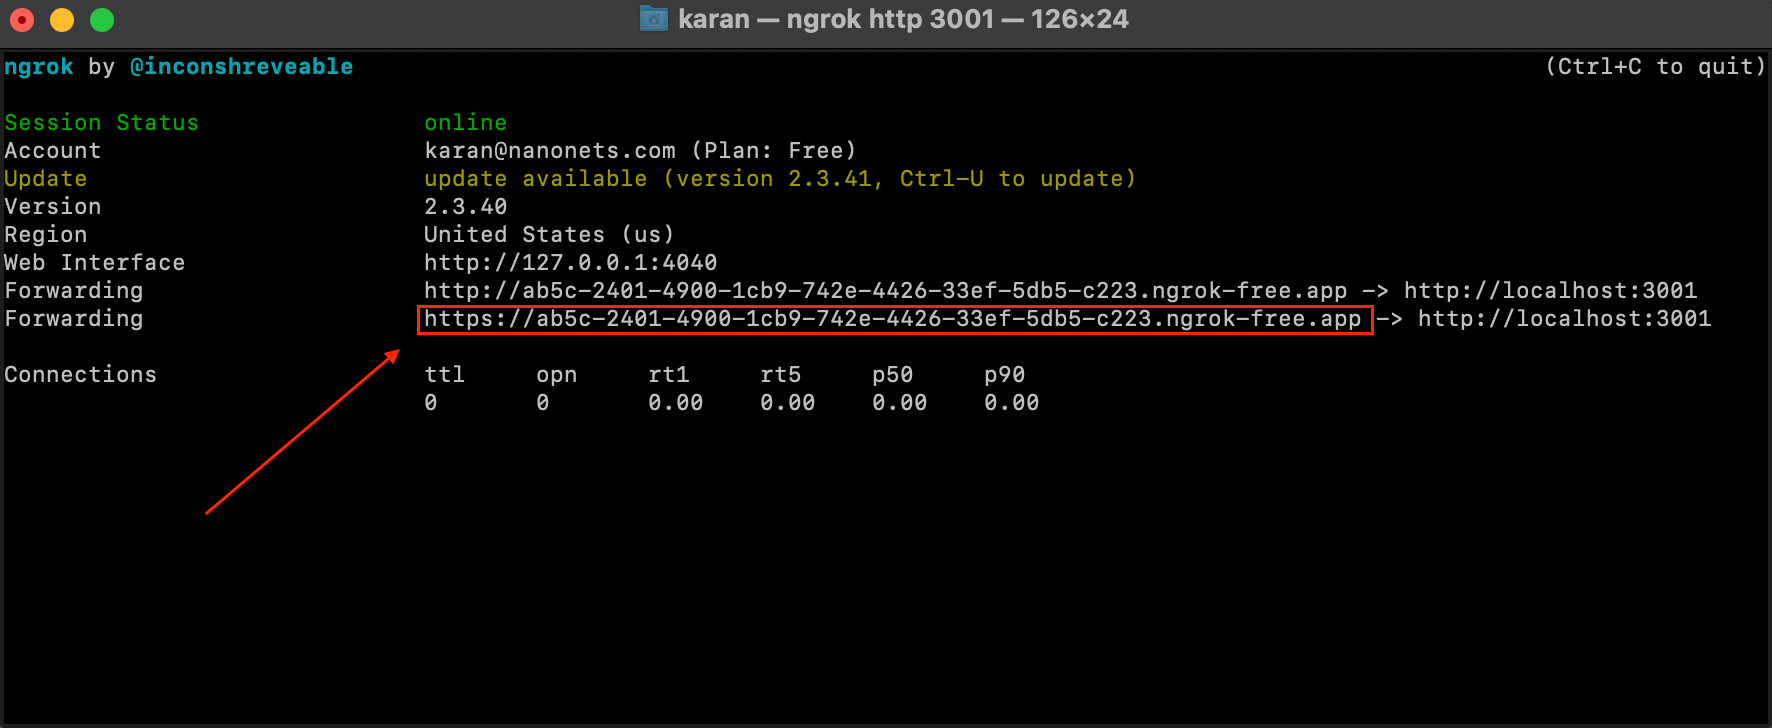
- We then arrange a Zendesk Webhook, by both visiting the next hyperlink – https://YOUR_SUBDOMAIN.zendesk.com/admin/apps-integrations/webhooks/webhooks OR straight operating the beneath code in our authentic Jupyter pocket book.
NOTE : You will need to notice that whereas utilizing ngrok is nice for testing functions, it’s strongly really useful to shift the Flask API service to a server occasion. In that case, the static IP of the server turns into the Zendesk Webhook endpoint and you will have to configure the endpoint in your Zendesk Webhook to level in the direction of this handle – https://YOUR_SERVER_STATIC_IP:3001/zendesk
zendesk_workflow_endpoint = "HTTPS_NGROK_FORWARDING_ADDRESS"

url = "https://" + subdomain + ".zendesk.com/api/v2/webhooks"
payload = {
    "webhook": {
        "endpoint": zendesk_workflow_endpoint,
        "http_method": "POST",
        "title": "Nanonets Workflows Webhook v1",
        "standing": "lively",
        "request_format": "json",
        "subscriptions": ["conditional_ticket_events"],
    }
}
headers = {"Content material-Kind": "utility/json"}

auth = (username, password)

response = requests.put up(url, json=payload, headers=headers, auth=auth)
webhook = response.json()

webhookid = webhook["webhook"]["id"]
- We now arrange a Zendesk Set off, which can set off the above webhook we simply created to run each time a brand new ticket seems. We are able to arrange the Zendesk set off by both visiting the next hyperlink – https://YOUR_SUBDOMAIN.zendesk.com/admin/objects-rules/guidelines/triggers OR by straight operating the beneath code in our authentic Jupyter pocket book.
url = "https://" + subdomain + ".zendesk.com/api/v2/triggers.json"


trigger_payload = {
    "set off": {
        "title": "Nanonets Workflows Set off v1",
        "lively": True,
        "circumstances": {"all": [{"field": "update_type", "value": "Create"}]},
        "actions": [
            {
                "field": "notification_webhook",
                "value": [
                    webhookid,
                    json.dumps(
                        {
                            "ticket_id": "{{ticket.id}}",
                            "org_id": "{{ticket.url}}",
                            "subject": "{{ticket.title}}",
                            "body": "{{ticket.description}}",
                        }
                    ),
                ],
            }
        ],
    }
}

response = requests.put up(url, auth=(username, password), json=trigger_payload)
set off = response.json()
- Retrieve Related Data: When a brand new ticket is available in, use the listed data base to retrieve related info and previous tickets that may assist in producing a response.
After the set off and webhook has been arrange, Zendesk will be sure that our at present operating Flask service will get an API name on the /zendesk route with the ticket ID, topic and physique each time a brand new ticket arrives.
We now need to configure our Flask Service to
a. generate a response utilizing our vector retailer ‘zendesk-index’.
b. replace the ticket with the generated response.
We change our present flask service code in zendesk.py with the code beneath –
from flask import Flask, request, jsonify
from langchain.document_loaders import PyPDFLoader
from langchain.vectorstores import FAISS
from langchain.chat_models import ChatOpenAI
from langchain.embeddings.openai import OpenAIEmbeddings
from langchain.text_splitter import RecursiveCharacterTextSplitter
from langchain.chains import RetrievalQA, ConversationalRetrievalChain
from transformers import GPT2TokenizerFast
import os
import pandas as pd
import numpy as np

app = Flask(__name__)

@app.route('/zendesk', strategies=['POST'])
def zendesk():
    updatedticketjson = request.get_json()
    zenembeddings = OpenAIEmbeddings()
    question = updatedticketjson['body']
    zendb = FAISS.load_local('zendesk-index', zenembeddings)
    docs = zendb.similarity_search(question)

if __name__ == '__main__':
    app.run(port=3001, debug=True)
As you possibly can see, we have now run a similarity search on our vector index and retrieved essentially the most related tickets and articles to assist generate a response.
Methods to generate a response and put up to Zendesk
- Generate Response: Make the most of the LLM to generate a coherent and correct response primarily based on the retrieved info and analyzed context.
Allow us to now proceed organising our API endpoint. We additional modify the code as proven beneath to generate a response primarily based on the related info retrieved.
@app.route("/zendesk", strategies=["POST"])
def zendesk():
    updatedticketjson = request.get_json()
    zenembeddings = OpenAIEmbeddings()
    question = updatedticketjson["body"]
    zendb = FAISS.load_local("zendesk-index", zenembeddings)
    docs = zendb.similarity_search(question)
    zenchain = load_qa_chain(OpenAI(temperature=0.7), chain_type="stuff")
    reply = zenchain.run(input_documents=docs, query=question)
The reply variable will comprise the generated response.
- Assessment Response: Optionally, have a human agent assessment the generated response for accuracy and appropriateness earlier than posting.
The best way we’re making certain that is by NOT posting the response generated by GPT straight because the Zendesk reply. As an alternative, we are going to create a perform to replace new tickets with an inside notice containing the GPT generated response.
Add the next perform to the zendesk.py flask service –
def update_ticket_with_internal_note(
    subdomain, ticket_id, username, password, comment_body
):

    url = f"https://{subdomain}.zendesk.com/api/v2/tickets/{ticket_id}.json"
    electronic mail = username

    headers = {"Content material-Kind": "utility/json"}

    comment_body = "Prompt Response - " + comment_body

    knowledge = {"ticket": {"remark": {"physique": comment_body, "public": False}}}

    response = requests.put(url, json=knowledge, headers=headers, auth=(electronic mail, password))
- Publish to Zendesk: Use the Zendesk API to put up the generated response to the corresponding ticket, making certain well timed communication with the shopper.
Allow us to now incorporate the interior notice creation perform into our API endpoint.
@app.route("/zendesk", strategies=["POST"])
def zendesk():
    updatedticketjson = request.get_json()
    zenembeddings = OpenAIEmbeddings()
    question = updatedticketjson["body"]
    zendb = FAISS.load_local("zendesk-index", zenembeddings)
    docs = zendb.similarity_search(question)
    zenchain = load_qa_chain(OpenAI(temperature=0.7), chain_type="stuff")
    reply = zenchain.run(input_documents=docs, query=question)
    update_ticket_with_internal_note(subdomain, ticket, username, password, reply)
    return reply
This completes our workflow!
Allow us to revise the workflow we have now arrange –
- Our Zendesk Set off begins the workflow when a brand new Zendesk ticket seems.
- The set off sends the brand new ticket’s knowledge to our Webhook.
- Our Webhook sends a request to our Flask Service.
- Our Flask Service queries the vector retailer created utilizing previous Zendesk knowledge to retrieve related previous tickets and articles to reply the brand new ticket.
- The related previous tickets and articles are handed to GPT together with the brand new ticket’s knowledge to generate a response.
- The brand new ticket is up to date with an inside notice containing the GPT generated response.
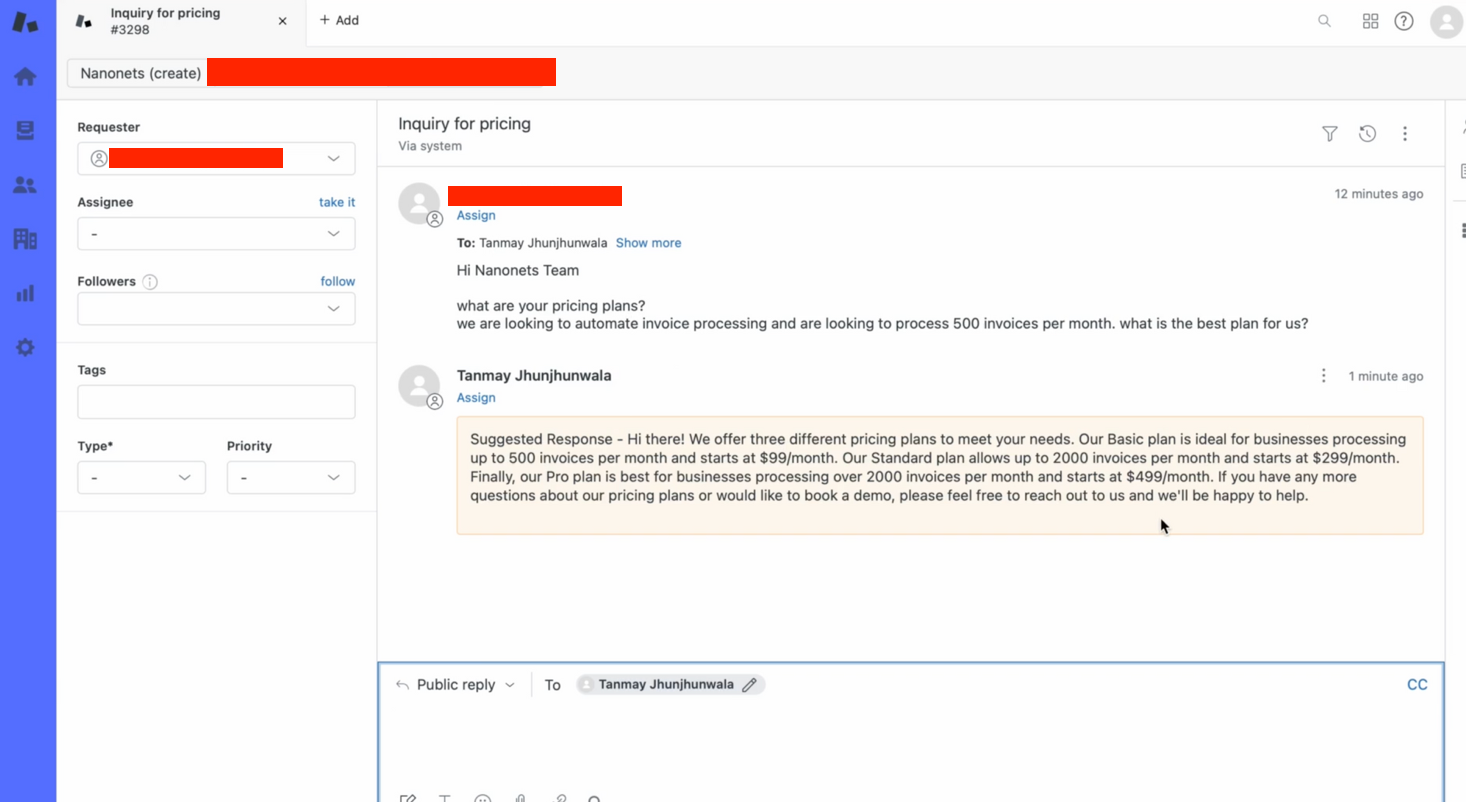
We are able to check this manually –
- We create a ticket on Zendesk manually to check the movement.
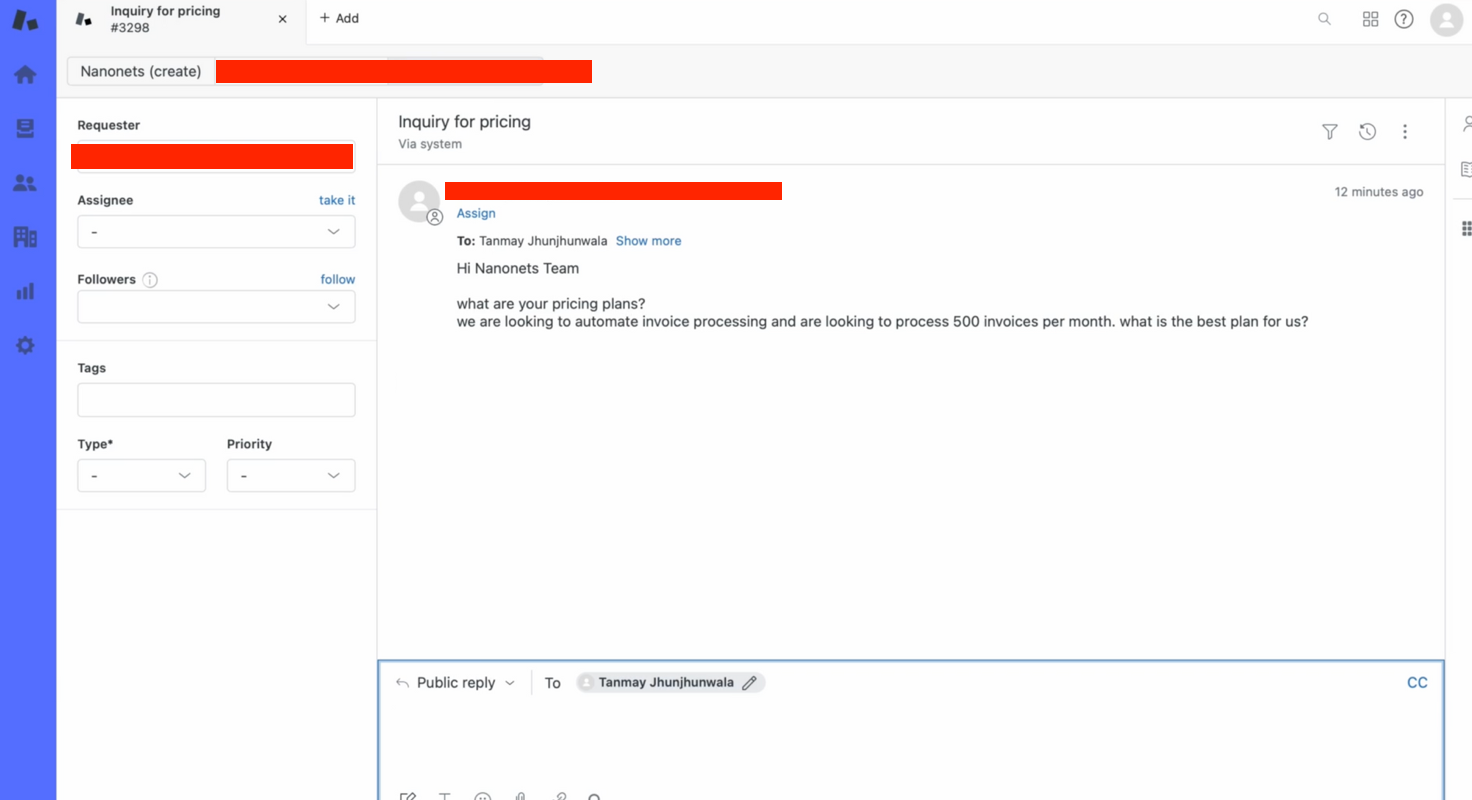
- Inside seconds, our bot supplies a related reply to the ticket question!
How to do that total workflow with Nanonets
Nanonets gives a robust platform to implement and handle RAG-based workflows seamlessly. Right here’s how one can leverage Nanonets for this workflow:
- Combine with Zendesk: Join Nanonets with Zendesk to watch and retrieve tickets effectively.
- Construct and Prepare Fashions: Use Nanonets to construct and prepare LLMs to generate correct and coherent responses primarily based on the data base and analyzed context.
- Automate Responses: Arrange automation guidelines in Nanonets to routinely put up generated responses to Zendesk or ahead them to human brokers for assessment.
- Monitor and Optimize: Repeatedly monitor the efficiency of the workflow and optimize the fashions and guidelines to enhance accuracy and effectivity.
By integrating LLMs with RAG-based workflows in GenAI and leveraging the capabilities of Nanonets, companies can considerably improve their buyer assist operations, offering swift and correct responses to buyer queries on Zendesk.

