
On this article, we’re going to indicate you the way to carry out a clear set up of macOS. There are a variety of explanation why you would possibly need to do a clear set up:
- You would possibly need to reinstall the working system in an effort to right issues together with your Mac – doing a clear set up could also be a very good choice in case your Mac is operating gradual or in any other case misbehaving.
- Doing a clear set up lets you clear away outdated information that you simply may need been accumulating for years earlier than putting in the working system onto a freshly formatted disk.
- A clear set up can be one thing you need to do earlier than promoting your Mac or passing it on. It lets you take away all of your knowledge out of your Mac and return it to manufacturing unit settings for subsequent individual.
- A clear set up can be one thing many laptop customers resort to when they’re attempting to eliminate a virus (though there may be loads of debate about whether or not there are viruses on the Mac).
No matter your purpose, a clear set up of macOS would possibly resolve loads of issues.
Nonetheless, modifications in recent times could imply {that a} clear set up just isn’t obligatory, so we are going to begin by explaining why you won’t must do a clear set up in your Mac.
You also needs to understand that there are a number of methods to do a clear set up of macOS. The standard manner was to make a bootable copy of the macOS installer on a USB stick after which reformat your drive earlier than putting in the bootable copy onto your Mac. There may be additionally an excellent easier technique that lets you use macOS Restoration to reinstall the Mac working system over the online (now we have a separate tutorial about doing a clear set up of macOS utilizing Restoration).
Plus, if you’re operating macOS Monterey or afterward a M1 or M2 Mac, or an Intel Mac with a T2 chip, then there’s a setting in System Preferences that makes wiping your Mac simpler than ever. We’ll run by means of all of those strategies beneath.
Ought to I do a clear set up on my Mac?
Prior to now, it was useful to reinstall the system when you needed to right some Mac issues, however at this time this resolution doesn’t make as a lot sense.
Since macOS Large Sur, macOS has its dwelling by itself quantity, which is each read-only and cryptographically signed and sealed (known as a Sealed System Quantity). This seal is saved both within the T2 chip of the newer Intel Macs or within the Safe Enclave of the Apple M1/M2.
Every part of the system is signed in hierarchical order, and any change to a part would additionally invalidate the seal that represents the highest stage. For additional safety, these Macs additionally don’t begin immediately from the system quantity, however from a snapshot of the system–and snapshots can’t be modified, even by the system itself.
So macOS itself can’t be modified by any software program that you simply set up as a consumer. Ought to an issue happen with macOS throughout a restart, maybe as a result of a space for storing on the SSD is flawed and thus a system part is now not intact, this can be acknowledged by the startup course of because the seal will now be invalid. Ought to this occur you’ll have to reinstall the system.
Nonetheless, in case your Mac boots up with out concern then it signifies that there aren’t any issues with the system. So long as your Mac works (which may be decided on the idea of the seal), the Mac is taken into account to be in working order because it complies with Apple’s specs.
For that purpose, even when you do encounter issues on Macs with T2 chip or Apple Silicon whereas operating macOS it is not sensible to reinstall the system your self.
For many who need to do a clear set up in order that no leftovers that belong to an outdated system are carried alongside, this now not applies as a result of none of this info is carried over. All elements are checked after set up, then signed and eventually your complete system is sealed once more. Once more, the seal ensures that every part is ok and that nothing untoward has crept in.
Nonetheless, there may be one part of the system software program that isn’t put in on the read-only system quantity. All different user-installed applications reside on the amount with the consumer knowledge, together with Safari. This implies Apple can supply a separate replace for the browser and WebKit, so that you simply shouldn’t have to reinstall the entire system every time.
Within the case of Safari and different apps there may be advantages in cleansing up your Library folder since it might nonetheless include remnants of outdated purposes you now not use.
In the event you really feel that you’ve loads of this kind of crud in your Mac then wiping your drive may very well be helpful, simply be ready that it may be a dangerous enterprise and it’s possible you’ll find yourself deleting one thing necessary. Beware {that a} clear set up may cause extra issues than it fixes.
You would possibly desire to make use of an software like CleanMyMac X from MacPaw ($39.95/£34.95 a 12 months, free trial), or certainly one of these alternate options: Greatest Mac Cleaner App.
In case you are completely happy to take the danger and nonetheless need to wipe your Mac and reinstall macOS – which you need to positively do if you’re promoting or passing in your Mac – learn on!
3 ways to wash set up macOS
As we defined above, there may be a couple of method to wipe your Mac and reinstall macOS:
- Make a replica of the macOS installer on a USB stick, reformat your drive after which set up the macOS on to your Mac from the installer.
- Use macOS Restoration to reinstall macOS through the online.
- Use the Erase All Content material and Settings choice setting in System Preferences (obtainable if you’re operating macOS Monterey and afterward a M1 or M2 Mac, or an Intel Mac with a T2 chip).
Not solely are there three completely different strategies (which we’ll run by means of beneath) the strategies rely on the model of macOS that you’re operating.
There may be additionally the even trickier enterprise of putting in a clear copy of an older model of macOS in your Mac (Monterey, Large Sur, Catalina, Excessive Sierra, Sierra, El Capitan, Mojave, Yosemite or an excellent outdated model of OS X). Talking of which, if an outdated model is what you’re in search of, it might be price having a look at one other article the place we concentrate on that solely: Tips on how to obtain and set up outdated variations of OS X on a Mac.
Earlier than you start: Again up your Mac
Earlier than you start we advocate that you simply make a backup, simply in case one thing goes fallacious. Full directions right here: Tips on how to again up a Mac. It’s solely attainable that there can be one thing in your Mac that you simply thought was within the cloud however was in actual fact in your Mac (we communicate from expertise!)
Notice that with regard to backups, you in all probability received’t need to get well a Time Machine backup when you don’t need to copy over all of the settings and preferences related together with your outdated system. You would alternatively sync all of your Paperwork and Desktop with iCloud somewhat than run a full backup, however make it possible for every part you want is within the cloud and bear in mind that you could be lose your settings and purposes.
Choice 1: Erase All Content material and Settings (macOS Monterey and later)
Earlier than the arrival of Monterey, it was essential to create a bootable USB drive or use Restoration Mode to wipe your disk. Nonetheless, following Monterey Apple has made it straightforward to get a factory-fresh set up.
An Erase All Content material and Settings choice arrived with macOS Monterey that lets you reset your Mac to manufacturing unit settings with out having to work by means of the various steps to wipe and format your drives.
The brand new choice wasn’t obtainable on each Mac operating Monterey although. An M1 or later Mac, or an Intel Mac with a T2 chip inside was required to make use of the Erase All Content material and Settings choice.
These Intel Macs have the T2 safety chip:
- MacBook Air from 2018
- MacBook Professional from 2018
- Mac mini from 2018
- iMac 27-inch from 2020
- iMac Professional
- Mac Professional from 2019
In Ventura and later
Foundry
In Ventura System Preferences turned System Settings, so the strategy barely modified and issues look utterly completely different, so we are going to run by means of each strategies.
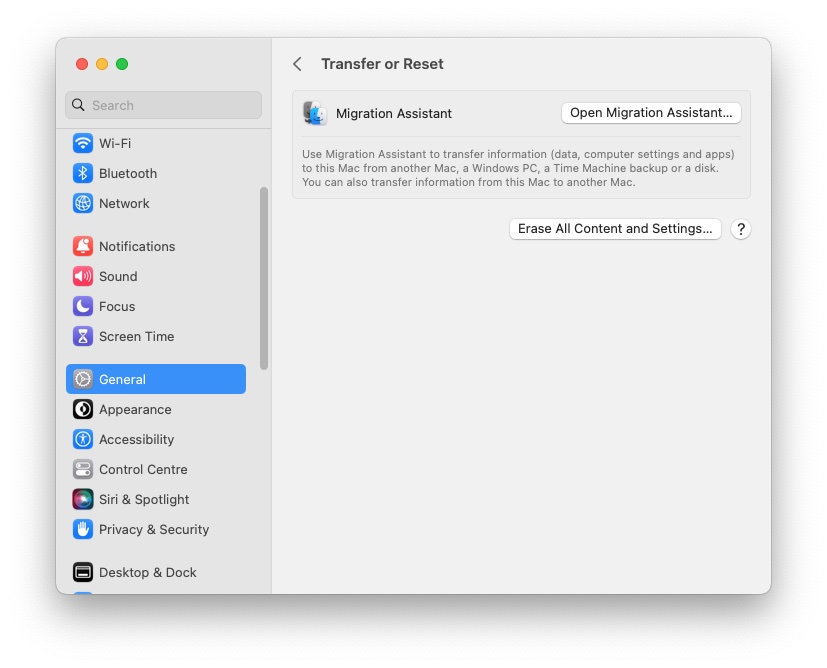
Right here’s the way to discover Erase all Content material and Settings in Ventura.
- Open System Settings.
- Click on on Basic.
- Click on on Switch or Reset.
- Select Erase all Content material and Settings.
In Monterey
Foundry
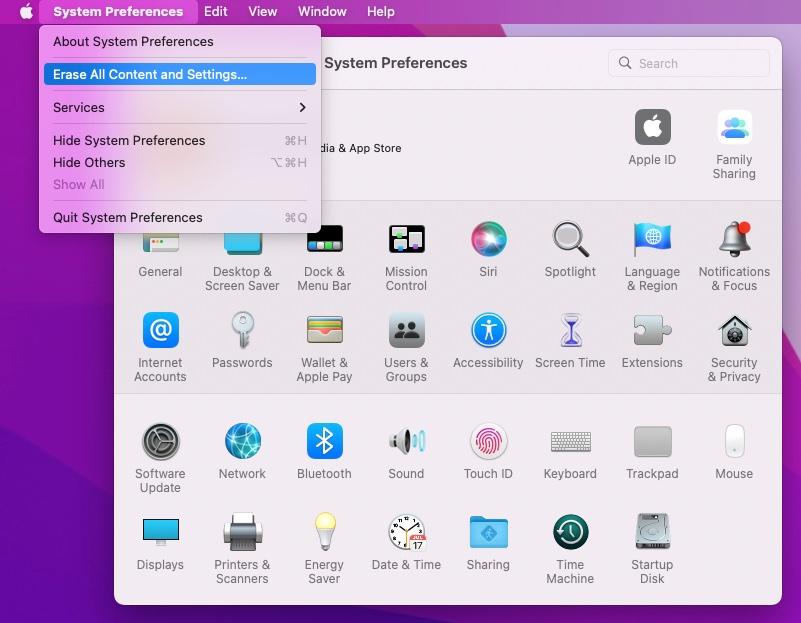
In case you are operating macOS Monterey the Erase All Content material and Settings choice is far simpler to seek out.
- Open System Preferences.
- Click on on System Preferences within the menu bar on the prime of your display.
- Click on on Erase All Content material and Settings.
Now that you’ve situated the Erase All Content material and Settings choice, comply with the steps beneath to wipe your Mac.
- Choose Erase All Content material and Settings
- Enter your password.
- You’ll be reminded to do a backup with Time Machine earlier than you start deletion, however you may skip that step.
- A window will present you what can be deleted, together with Apple ID, Contact ID, equipment, and Discover My settings.
- Lastly, you will want to sign off of your Mac and all associated providers utilizing your Apple ID.
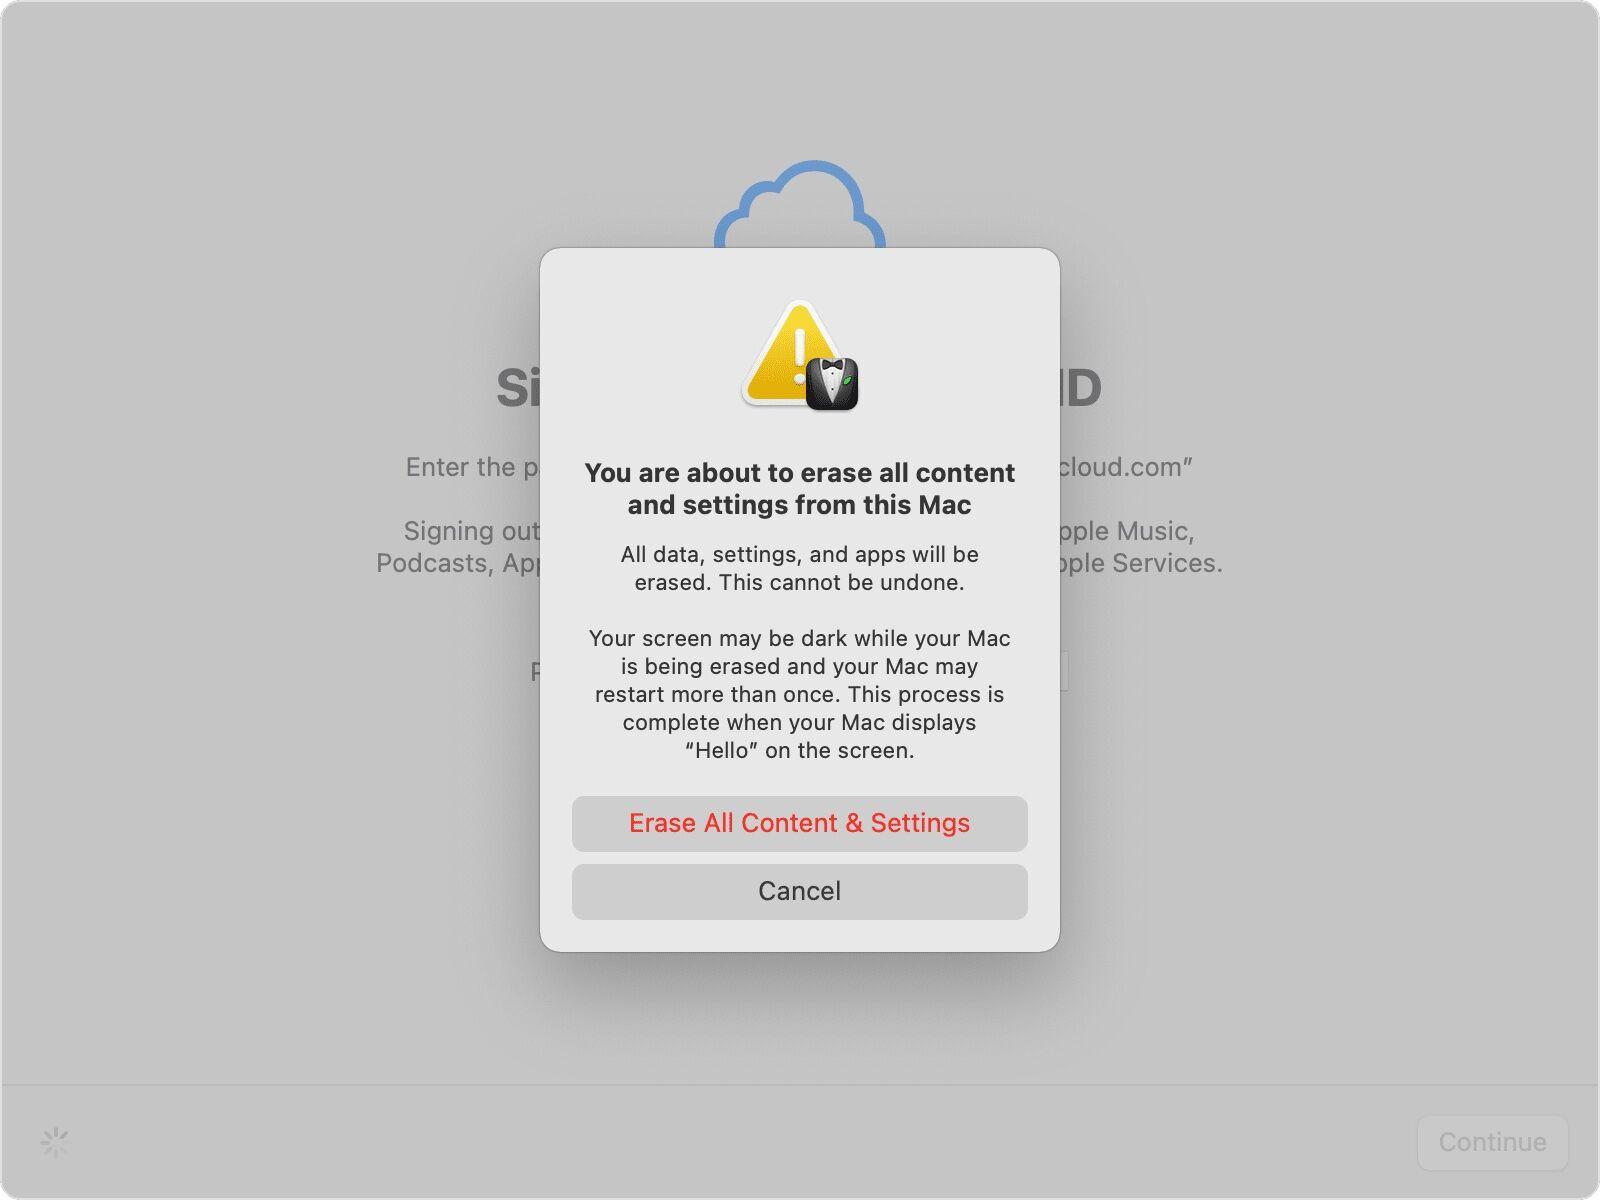
- Earlier than your Mac is erased you obtain a remaining warning, so when you have second ideas at the least you may cease at this level!
- Having clicked the second Erase All Content material & Settings your Mac will restart. Finally, you will note a black display whereas it restarts.
- As soon as your Mac restarts you may undergo the steps to set it up as new, or you may depart it at this stage for the subsequent proprietor to arrange. Simply flip the Mac off first.
Choice 2: Do a clear set up through Restoration
Foundry
We clarify the way to reinstall macOS through Restoration right here: Tips on how to reinstall macOS, however we are going to summarise the steps right here.
The way you enter restoration mode is determined by the Mac you personal.
If you wish to enter restoration mode on an M1 or M2-series Mac (or later) you should press and maintain the facility button if you begin up your Mac and proceed to press and maintain the button till you see a startup choices window seem with an Choices icon. Choose Choices and click on Proceed.
To enter Restoration on an Intel Mac press Command+R.
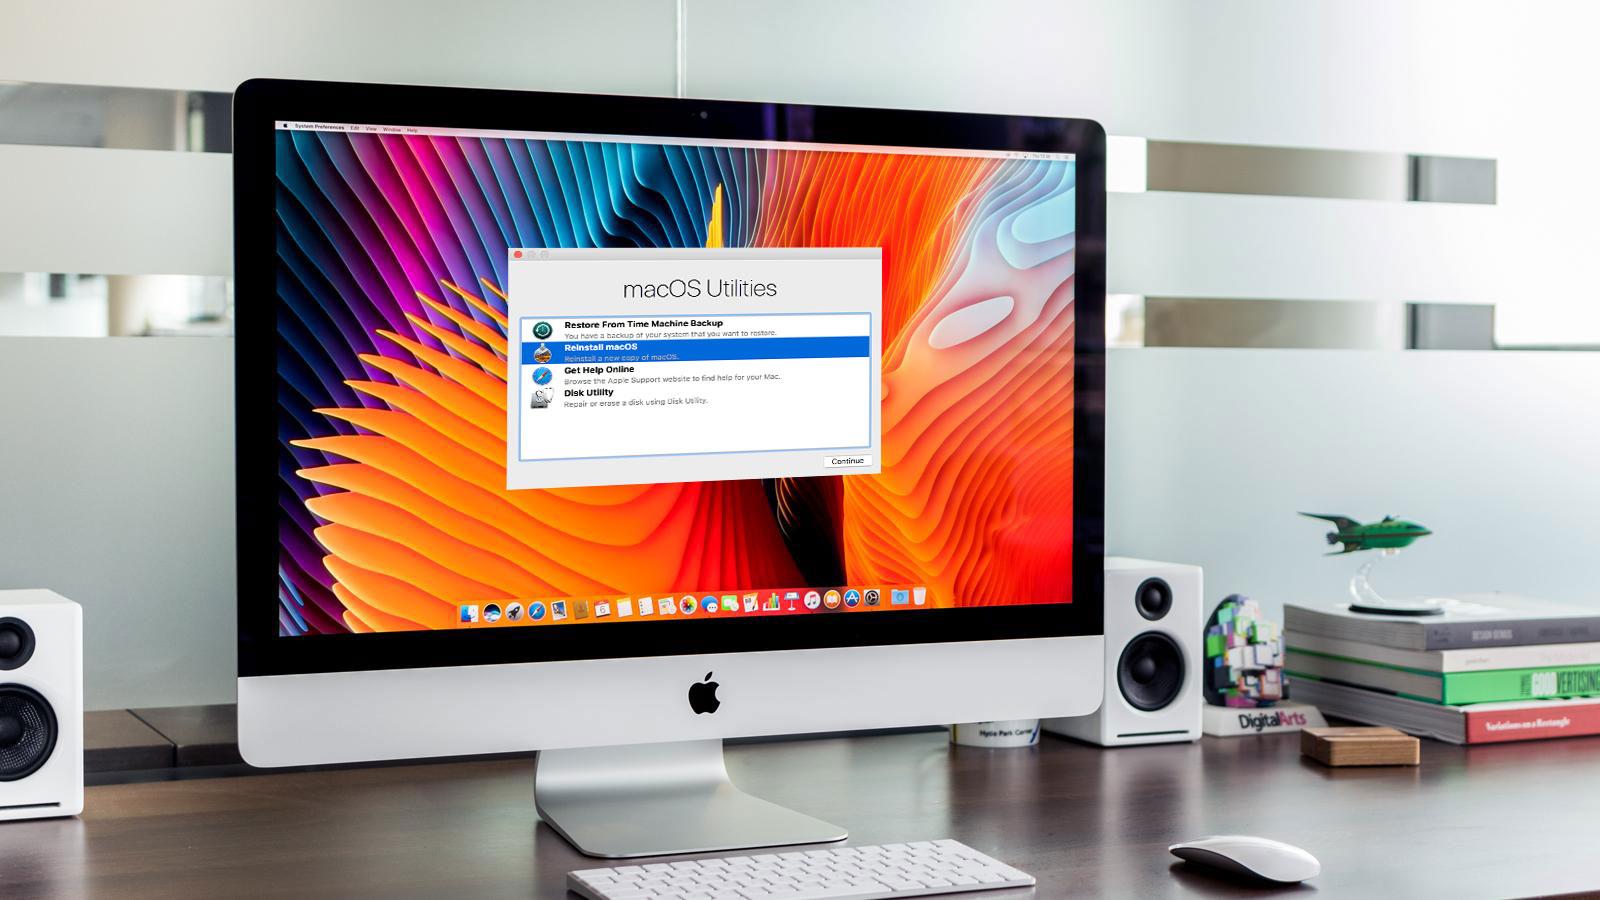
- As soon as Restoration begins up you’ll see a macOS Utilities window with choices to Restore From Time Machine Backup, Reinstall macOS [version], Safari (or Get Assist On-line in older variations) and Disk Utility. If you wish to wipe the Mac earlier than reinstalling select Disk Utility.
- Utilizing Disk Utility run by means of the steps to erase your Mac as detailed in our Tips on how to reinstall macOS information.
- After you will have erased your drive click on on Disk Utility > Stop Disk Utility. Or simply Command + Q.
- Now select Reinstall macOS from the choices.
- Wait whereas macOS is reinstalled. Count on this to take some time.
Choice 3: Do a clear set up macOS utilizing a bootable USB
Now for the strategy that entails utilizing a bootable USB with the macOS set up on it. This is likely to be the perfect technique if you have already got the set up information downloaded and don’t need to look ahead to hours for Restoration to obtain the information.
- Instruments required: A 15GB or bigger detachable USB flash drive to carry the installer file for our chosen model of macOS. (We’re going to erase it, so be certain that it doesn’t include any beneficial knowledge.) Admin privileges for the Mac. A again up, simply in case one thing goes fallacious.
Format the exterior drive
Foundry
We’re going to re-download the installer file for our chosen model of macOS and retailer it on a USB stick or exterior drive. However earlier than you do which you can put together the USB drive by reformatting it.
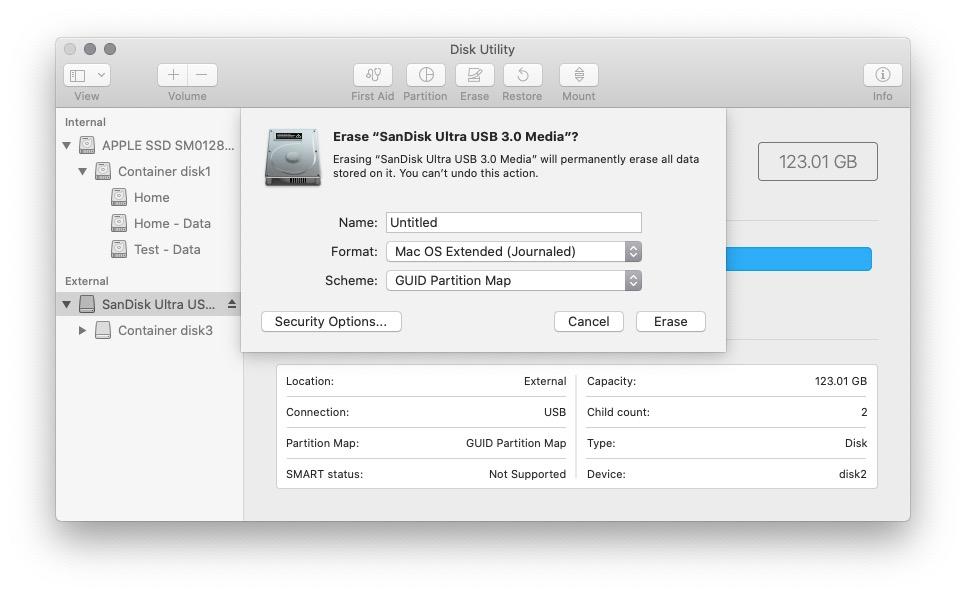
Right here’s the way to format your USB drive accurately:
- Plug within the USB drive.
- Go to Functions > Utilities.
- Open Disk Utility.
- Choose the drive and click on Erase. (The identify of the disk must be “Untitled”, if the Terminal instructions beneath are to work, so rename it if obligatory.)
- Choose Mac OS Prolonged (Journaled) because the format sort.
- Select GUID Partition Map from the Scheme choices (when you don’t see this you’re within the fallacious view – you should choose the exterior drive, not the container beneath it).
- Click on Erase.
- Disk Utility will create the partition and arrange the drive (it could actually take some time).
- Click on Completed.
Get the macOS set up file
Foundry
In the event you’re reinstalling the most recent model of macOS, or putting in a brand new model of macOS, the subsequent step is comparatively straightforward though the method for acquiring the installer can be completely different.
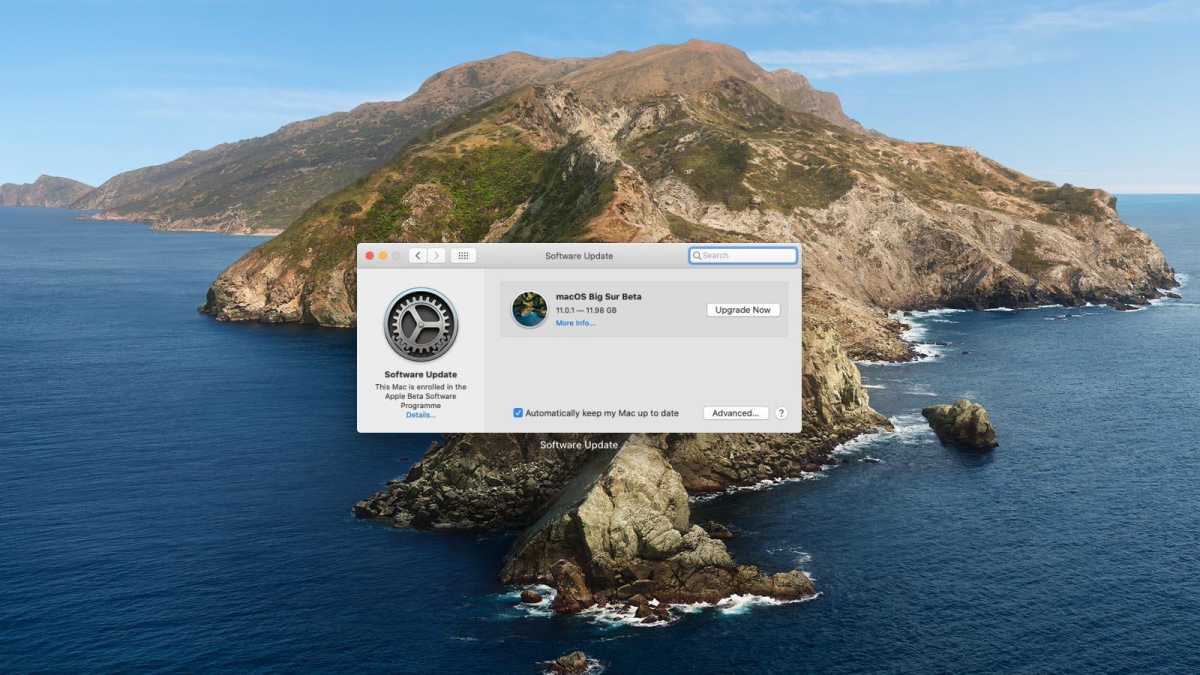
Tips on how to obtain the installer through Software program Replace
In case you are at present operating Ventura and need to do a clear set up of macOS Sonoma, for instance, then you may obtain the set up package deal through System Settings.
- Open System Setting.
- Select Basic.
- Select Software program Replace.
- Obtain the macOS Sonoma set up information (don’t set up it!)
Tips on how to obtain the installer from the Mac App Retailer
Alternatively, discover Sonoma on the Mac App Retailer and click on on Get to obtain it from there (don’t set up it).
If, then again, if you’re operating Ventura and also you need to reinstall Ventura seize the Ventura installer from the . If it’s an older model of macOS you’re after, you can too discover hyperlinks to these beneath. Additionally learn: Tips on how to set up older variations of macOS or OS X, however observe that you’ll want to substantiate that you simply Mac can run that model of macOS. See: What model of macOS can my Mac run.
- Monterey is on the Mac App Retailer .
- Large Sur is on the Mac App Retailer .
- Catalina is on the Mac App Retailer .
- You may get macOS Mojave .
- Obtain Excessive Sierra .
- Sierra is as a direct obtain.
- El Capitan may be downloaded
- Yosemite is out there right here.
(If these hyperlinks don’t work shut the Mac App Retailer and minimize and paste the hyperlinks into Safari. For extra recommendation on getting maintain of even older editions of Mac OS, see Tips on how to get outdated variations of OS X.)
Upon getting situated the model of macOS you need on the Mac App Retailer comply with these directions:
- Hit Obtain or Get (relying on the model of the Mac App Retailer you’re utilizing).
- You could get a warning message at this level, telling you that this model of macOS ‘is already put in on this laptop. Would you wish to proceed?’ Click on Proceed.
- Enter your Apple ID and password.
- The set up information will begin to obtain.
The installer file can be a number of gigabites. macOS Large Sur was 12.6GB, for instance, so anticipate downloading to take some time.
Don’t set up but!
Whichever manner you get the set up file the subsequent step is price highlighting for what you shouldn’t do, somewhat than what you need to do:
- When the macOS installer has completed downloading the installer will launch routinely, however we don’t need to use it but so don’t click on to start out the set up!
- Press Command + Q to give up out of the installer.
- Discover the installer file (it is going to be situated in your Functions folder, or you may seek for it utilizing Highlight (command + House and begin typing Sonoma, Ventura, Monterey, Catalina or Large Sur).
Create a bootable USB disk
Foundry
Subsequent we have to flip the USB drive right into a bootable USB disk in order that we are able to use it to put in a brand new copy of macOS on our Mac after now we have reformatted it (that step will come later on this tutorial).
We’ve received full directions on Tips on how to make a bootable macOS set up drive in a distinct article, however we’ll run by means of the fundamentals right here.
We’re going to create the bootable drive utilizing Terminal, which you’ll be able to open in your Mac by urgent Command + House bar and typing Terminal.
Join the USB drive that you simply formatted earlier to your Mac. Ensure it’s known as Untitled – rename it if obligatory (this may enable you enter the right textual content in Terminal within the subsequent steps).
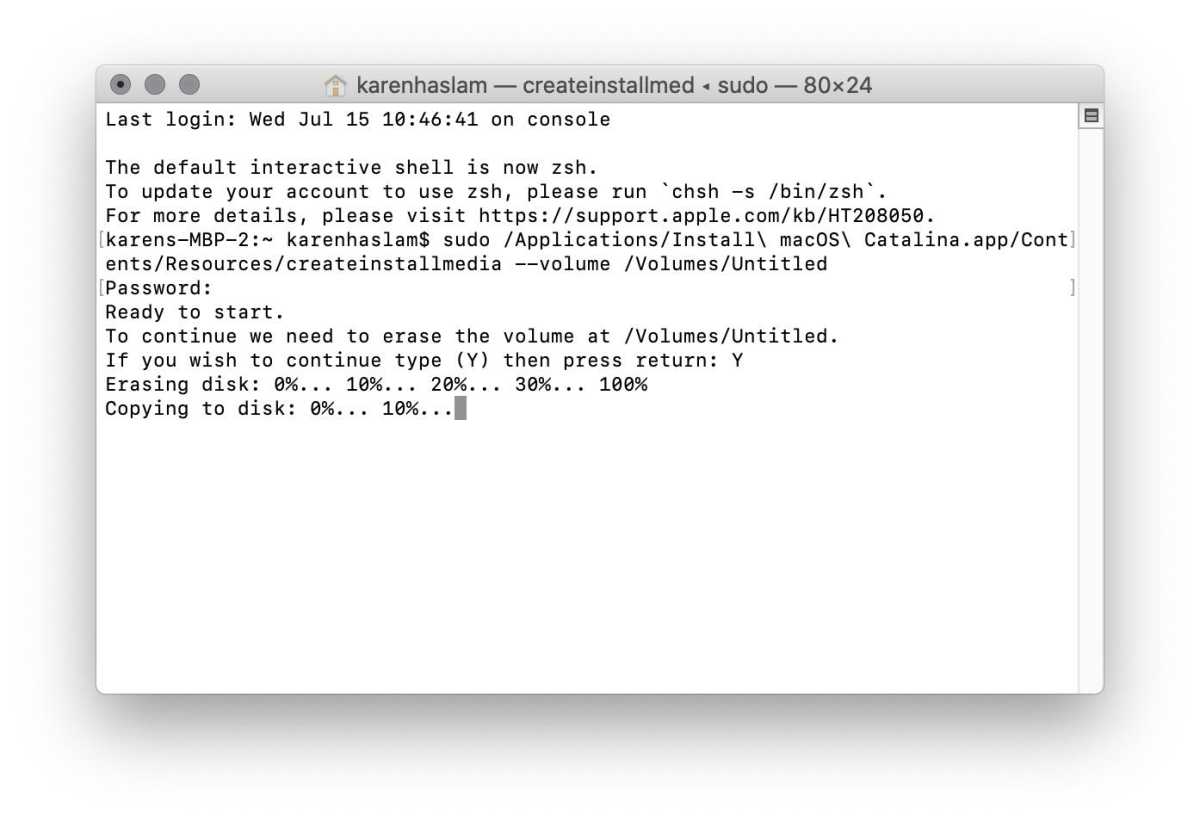
Making a bootable installer has been fairly straightforward because the arrival of Mavericks in 2013 due to the Terminal command createinstallmedia that arrived in that model. Right here’s the way to use it (observe that the identify of the model of macOS will rely on which model you’re putting in):
- Open the Terminal software in your Mac (discover it by looking utilizing Command + House and typing Terminal)
- Now copy and paste the next textual content into Terminal (This textual content is for Ventura – we embody the textual content wanted for the opposite variations of macOS on this article). Once you minimize and paste the next textual content into Terminal do verify that it maintains the — as now we have heard of individuals pasting within the — and it changing to –)
sudo /Functions/Set up macOS Ventura.app/Contents/Assets/createinstallmedia –quantity /Volumes/MyVolume (the place MyVolume is the identify of the exterior drive you’re utilizing – it may very well be Untitled). - Press Return.
- Enter your password (you received’t see the password seem).
- Press Return once more.
- Terminal will warn that it’s about to erase the drive. If you wish to proceed press Y after which Return. The method can take some time, you’ll see “Erasing Disk: 0%… 10%… 20%… 30%…100%…
- Subsequent Terminal will spend a couple of minutes copying the installer file to your drive. “Copying installer information to disk… Copy full” and so forth will seem within the Terminal window. Once more, this may take some time – it took our Mac ages to go from 0% to 10%…
- When the bootable drive is ready you will note the phrase Completed. It might take some time.
Now you will have the installer on the exterior drive you should use that to put in copies of macOS on a number of Macs – which may very well be useful if you’re admin for lots of methods.
Nonetheless, if you’re studying this since you need to do wipe your Mac and do a clear set up, learn on…
Wipe your Mac
Foundry
Now we’re prepared to put in the copy of macOS from the installer drive on our Mac. If you wish to do a recent set up (and utterly wipe your Mac) it’s time to reformat your Mac’s start-up drive.
If in case you have a just lately trendy Mac with Monterey put in, you’ll be finest off wiping your Mac utilizing the Erase all Contents and Settings choice. However for these operating older Macs with older variations of macOS might want to use Disk Utility to delete their knowledge.
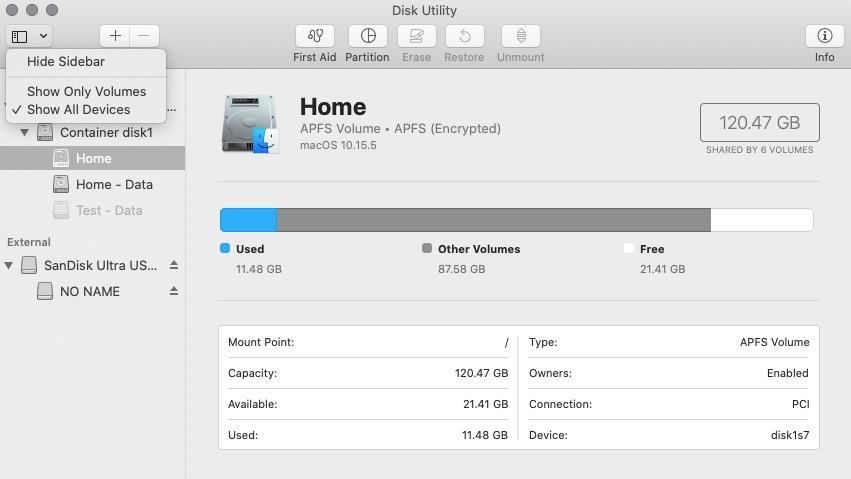
In case you are operating macOS Catalina or Large Sur you’ll have two volumes: Macintosh HD and Macintosh HD – Knowledge. If you wish to do a clear set up of macOS over an current set up you will want to delete the Macintosh HD – Knowledge quantity. We cowl how to do that in additional element right here: Tips on how to reset and wipe a Mac.
Macintosh HD – Knowledge is the place your knowledge is saved individually to the macOS set up.
- Both click on on the – button or go to the menu and select Edit > Delete APFS quantity.
- You will notice a message warning you that this may completely erase your knowledge. Click on on Delete. Don’t select Delete Quantity Group.
- Wait whereas the amount is deleted.
Then you may transfer on to deleting your Macintosh HD quantity as above.
Right here’s the way to do a recent set up of macOS when you aren’t already operating Catalina, Large Sur or later.
- Join your boot drive.
- Begin – or restart – your Mac whereas holding down the Choice key (often known as Alt). This can take you to Startup Supervisor.
- Select to put in your chosen model of macOS from the exterior drive.
- Choose Disk Utility.
- Choose your Mac’s start-up disc, in all probability known as Macintosh HD or House.
- Click on on Erase.
- Wait on your startup disk to be formatted.
- Return to the principle Utilities menu and select Set up macOS.
- Select your startup drive as the placement to put in macOS.
As soon as set up is full, you may restore apps and settings out of your backup, or obtain them once more manually.
Set up macOS
IDG
Now you should use your bootable installer to do a clear set up of macOS in your wiped Mac.
The method for putting in the OS from the bootable installer is barely completely different when you have an M1 or M2-series Mac (often known as Apple Silicon) or an Intel processor inside your Mac. We’ll run by means of each strategies.
In each instances, you will want to have your Mac linked to the Web. It additionally must be appropriate with the model of macOS you are attempting to put in (you may’t set up a macOS older than Large Sur on a M1 Mac).
Tips on how to set up macOS from a bootable installer
If in case you have an M1 or M2 Mac right here’s the way to set up macOS from a bootable installer. As we talked about above, you may’t set up a macOS older than Large Sur on an Apple Silicon Mac.
- Plug in your bootable installer
- Flip off your Mac.
- Press the facility button to activate the Mac – however maintain it pressed till you see the startup choices window together with your bootable quantity.
- Select the bootable installer quantity.
- Click on Proceed.
- The macOS installer ought to open – when it does comply with the onscreen directions to do the clear set up.
If in case you have an Intel-powered Mac right here’s the way to set up macOS from a bootable installer:
- Plug in your bootable installer
- Flip off your Mac.
- Press and maintain Choice/Alt whereas the Mac begins up – maintain urgent the important thing till you see a display displaying the bootable quantity.
- Select the bootable installer quantity.
- Click on Proceed.
- Choose Set up macOS from the Utilities window that seems.
- Click on Proceed.
- Now comply with the onscreen directions to do your clear set up.

